Brother International MFC-J410w Network Users Manual - English - Page 35
Configuring your machine when the SSID is not broadcast, Entering Text, Troubleshooting - wireless setup
 |
View all Brother International MFC-J410w manuals
Add to My Manuals
Save this manual to your list of manuals |
Page 35 highlights
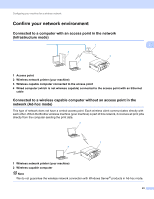
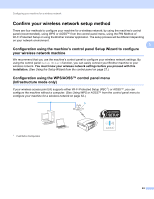
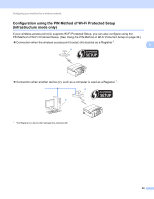
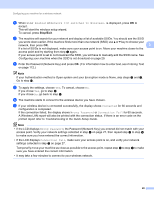
Configuring your machine for a wireless network f When WLAN Enable? or Network I/F switched to Wireless. is displayed, press OK to accept. This will start the wireless setup wizard. To cancel, press Stop/Exit. g The machine will search for your network and display a list of available SSIDs. You should see the SSID you wrote down earlier. If the machine finds more than one network (SSID) use a or b key to choose your network, then press OK. 3 If a list of SSIDs is not displayed, make sure your access point is on. Move your machine closer to the access point and try starting from step a again. If your access point is set to not broadcast the SSID, you will have to manually add the SSID name. See Configuring your machine when the SSID is not broadcast on page 29. h Enter the Password (Network Key) and press OK. (For information how to enter text, see Entering Text on page 112.) Note If your Authentication method is Open system and your Encryption mode is None, skip steps h and i. Go to step j. i To apply the settings, choose Yes. To cancel, choose No. If you chose Yes, go to step j. If you chose No, go back to step g. j The machine starts to connect to the wireless device you have chosen. k If your wireless device is connected successfully, the display shows Connected for 60 seconds and configuration is completed. If the connection failed, the display shows Wrong Password or Connection Fail for 60 seconds. A Wireless LAN report will also be printed with the connection status. If there is an error code on the printed report refer to Troubleshooting in the Quick Setup Guide. Note • If the LCD displays Wrong Password, the Password (Network Key) you entered did not match with your access point. Verify your network settings collected in step a on page 27, then repeat step b to step i to make sure you have entered the correct information. • If the LCD displays Connection Fail, make sure your access point is on, and verify your network settings collected in step a on page 27. Temporarily move your machine as close as possible to the access point, repeat step b to step i to make sure you have entered the correct information. • It may take a few minutes to connect to your wireless network. 28
-
 1
1 -
2
-
3
-
4
-
5
-
6
-
7
-
8
-
9
-
10
-
11
-
12
-
13
-
14
-
15
-
16
-
17
-
18
-
19
-
20
-
21
-
22
-
23
-
24
-
25
-
26
-
27
-
28
-
29
-
 30
30 -
 31
31 -
 32
32 -
 33
33 -
 34
34 -
 35
35 -
 36
36 -
 37
37 -
 38
38 -
 39
39 -
 40
40 -
41
-
42
-
43
-
44
-
45
-
46
-
47
-
48
-
49
-
50
-
51
-
52
-
53
-
54
-
55
-
56
-
57
-
58
-
59
-
60
-
61
-
62
-
63
-
64
-
65
-
66
-
67
-
68
-
69
-
70
-
71
-
72
-
73
-
74
-
75
-
76
-
77
-
78
-
79
-
80
-
81
-
82
-
83
-
84
-
85
-
86
-
87
-
88
-
89
-
90
-
91
-
92
-
93
-
94
-
95
-
96
-
97
-
98
-
99
-
100
-
101
-
102
-
103
-
104
-
105
-
106
-
107
-
108
-
109
-
110
-
111
-
112
-
113
-
114
-
115
-
116
-
117
-
118
-
119
-
120
-
121
-
122
 |
 |