Brother International MFC-L2740DW Basic Users Guide - Page 25
Set the Check Size, Change the Paper Size
 |
View all Brother International MFC-L2740DW manuals
Add to My Manuals
Save this manual to your list of manuals |
Page 25 highlights
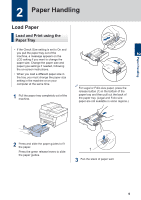
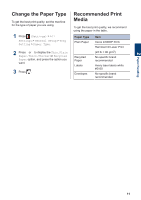
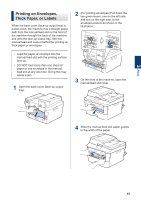
4 Load paper with the printing surface face down in the paper tray. DO NOT load different types of paper in the paper tray at the same time. Doing this may cause the paper to jam or misfeed. 5 Make sure the paper is below the maximum paper mark (b b b). Overfilling the paper tray will cause paper jams. 6 Slowly push the paper tray completely into the machine. 7 Lift the support flap to prevent paper from sliding off the output tray. 8 Send your print job to the machine. Change your print preferences in the Print dialog box before sending the print job from your computer. Set the Check Size Your Brother machine's Check Size setting causes the machine to display a message when you remove the paper tray from the machine, asking if you changed the paper size. The default setting is On. 1 Press (Settings) > All Settings > General Setup > Tray Setting > Check Size. 2 Press On or Off. 3 Press . Change the Paper Size When you change the size of the paper you load in the tray, you must change the paper size setting on the LCD at the same time. 1 Press (Settings) > All Settings > General Setup > Tray Setting > Paper Size. 2 Press a or b to display the A4, Letter, A5, A5 L, A6, Executive, Legal or Folio option, and press the option you want. 3 Press . 10
-
 1
1 -
2
-
3
-
4
-
5
-
6
-
7
-
8
-
9
-
10
-
11
-
12
-
13
-
14
-
15
-
16
-
17
-
18
-
19
-
 20
20 -
 21
21 -
 22
22 -
 23
23 -
 24
24 -
 25
25 -
 26
26 -
 27
27 -
 28
28 -
 29
29 -
 30
30 -
31
-
32
-
33
-
34
-
35
-
36
-
37
-
38
-
39
-
40
-
41
-
42
-
43
-
44
-
45
-
46
-
47
-
48
-
49
-
50
-
51
-
52
-
53
-
54
-
55
-
56
-
57
-
58
-
59
-
60
-
61
-
62
-
63
-
64
-
65
-
66
-
67
-
68
-
69
-
70
-
71
-
72
-
73
-
74
-
75
-
76
-
77
-
78
-
79
-
80
-
81
-
82
 |
 |
