Brother International NX-650Q Users Manual - English - Page 30
If the spool or the spool cap is not, positioned correctly, the thread may, become tangled around
 |
View all Brother International NX-650Q manuals
Add to My Manuals
Save this manual to your list of manuals |
Page 30 highlights
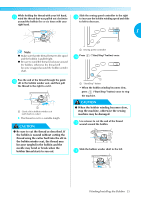
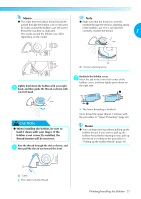
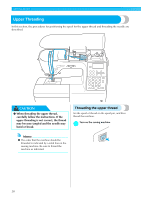
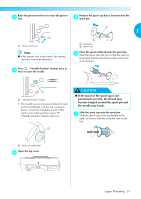
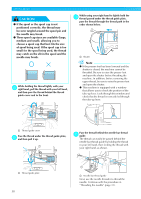
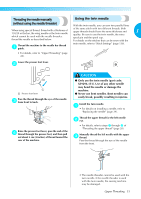
Raise the presser foot lever to raise the presser b foot. Remove the spool cap that is inserted onto the e spool pin. a a Presser foot lever Note z If the presser foot is not raised, the sewing machine cannot be threaded. 1 1 2 a Spool pin b Spool cap Place the spool of thread onto the spool pin. f Slide the spool onto the pin so that the spool is horizontal and the thread unwinds to the front at the bottom. Press ("Needle Position" button) once or c twice to raise the needle. 1 a "Needle Position" button X The needle is correctly raised when the mark on the handwheel is at the top, as shown below. Check the handwheel and, if this mark is not at this position, press ("Needle Position" button) until it is. 1 CAUTION ● If the spool or the spool cap is not positioned correctly, the thread may become tangled around the spool pin and the needle may break. Slide the spool cap onto the spool pin. g Slide the spool cap as far as possible to the right, as shown, with the rounded side on the left. a Mark on handwheel Open the top cover. d Upper Threading 29
-
 1
1 -
2
-
3
-
4
-
5
-
6
-
7
-
8
-
9
-
10
-
11
-
12
-
13
-
14
-
15
-
16
-
17
-
18
-
19
-
20
-
21
-
22
-
23
-
24
-
 25
25 -
 26
26 -
 27
27 -
 28
28 -
 29
29 -
 30
30 -
 31
31 -
 32
32 -
 33
33 -
 34
34 -
 35
35 -
36
-
37
-
38
-
39
-
40
-
41
-
42
-
43
-
44
-
45
-
46
-
47
-
48
-
49
-
50
-
51
-
52
-
53
-
54
-
55
-
56
-
57
-
58
-
59
-
60
-
61
-
62
-
63
-
64
-
65
-
66
-
67
-
68
-
69
-
70
-
71
-
72
-
73
-
74
-
75
-
76
-
77
-
78
-
79
-
80
-
81
-
82
-
83
-
84
-
85
-
86
-
87
-
88
-
89
-
90
-
91
-
92
-
93
-
94
-
95
-
96
-
97
-
98
-
99
-
100
-
101
-
102
-
103
-
104
-
105
-
106
-
107
-
108
-
109
-
110
-
111
-
112
-
113
-
114
-
115
-
116
-
117
-
118
-
119
-
120
-
121
-
122
-
123
-
124
-
125
-
126
-
127
-
128
-
129
-
130
-
131
-
132
-
133
-
134
-
135
-
136
-
137
-
138
-
139
-
140
-
141
-
142
-
143
-
144
-
145
-
146
-
147
-
148
-
149
-
150
-
151
-
152
-
153
-
154
-
155
-
156
-
157
-
158
-
159
-
160
-
161
-
162
 |
 |
