Brother International PC 420 Users Manual - English - Page 32
medium and small, allowing you to, choose a spool cap that best fits the size
 |
UPC - 012502541004
View all Brother International PC 420 manuals
Add to My Manuals
Save this manual to your list of manuals |
Page 32 highlights
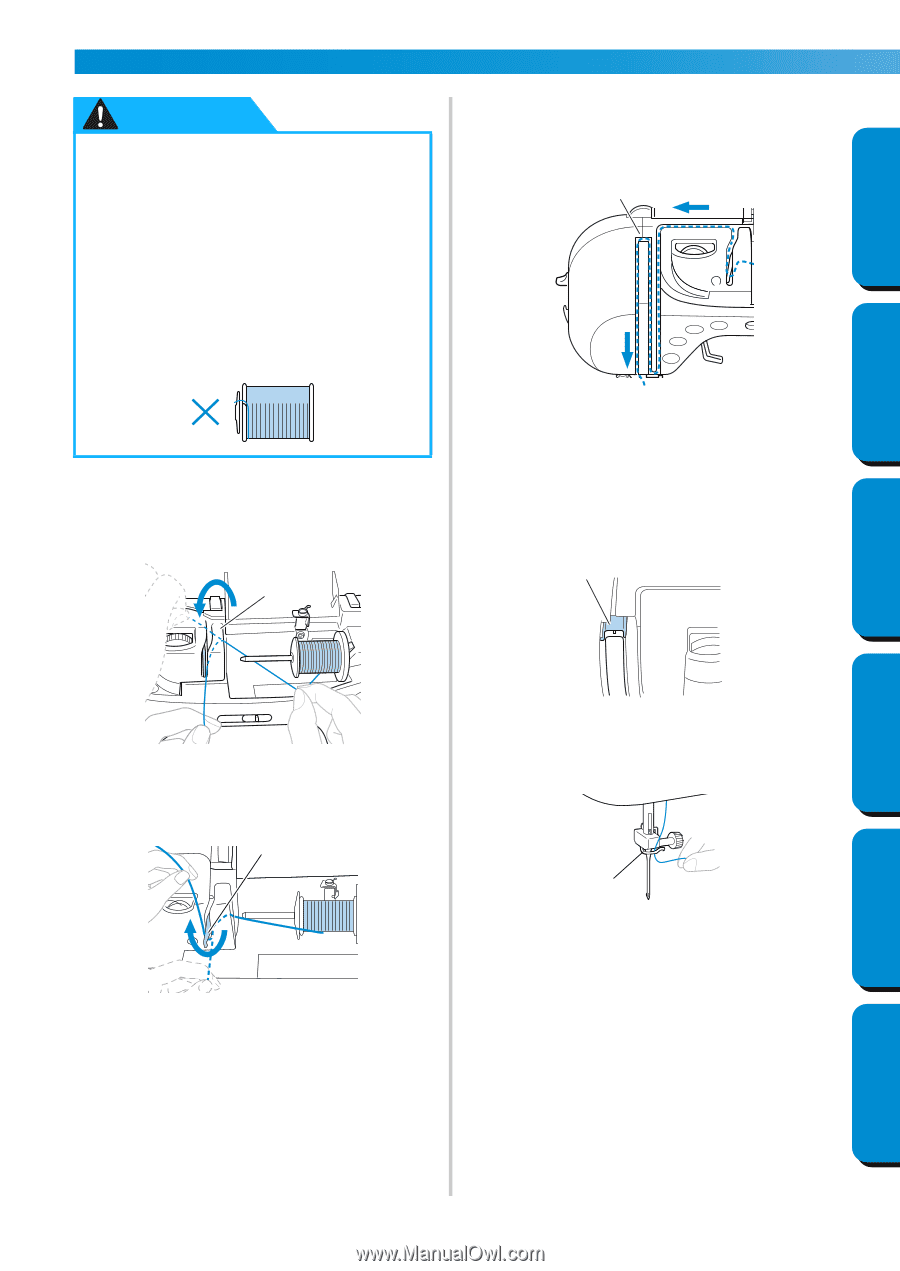
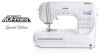
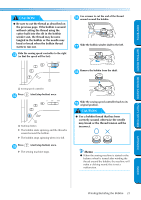
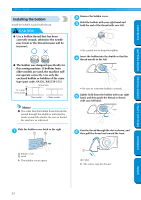
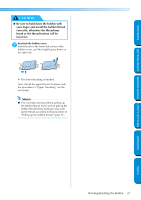
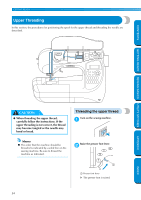
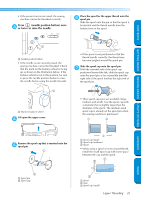
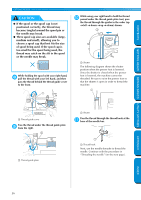
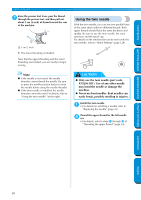
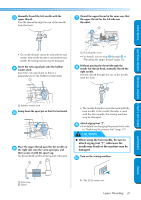
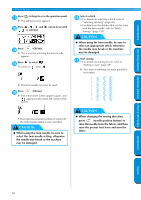
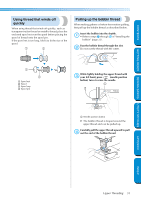
GETTING READY SEWING BASICS UTILITY STITCHES GETTING READY CONTENTS CAUTION ● If the spool or the spool cap is not positioned correctly, the thread may become tangled around the spool pin or the needle may break. ● Three spool cap sizes are available (large, medium and small), allowing you to choose a spool cap that best fits the size of spool being used. If the spool cap is too small for the spool being used, the thread may catch on the slit in the spool or the needle may break. While holding the spool with your right hand, 8 pull the thread with your left hand, and then pass the thread behind the thread guide cover to the front. 1 While using your right hand to hold the thread 0 passed under the thread guide plate taut, pass the thread through the guides in the order (up → left → down → up → down) shown. 1 1 Shutter The following diagram shows the shutter position when the presser foot is lowered. Since the shutter is closed when the presser foot is lowered, the machine cannot be threaded. Be sure to raise the presser foot so that the shutter is open in order to thread the machine. 1 APPENDIX 1 Thread guide cover Pass the thread under the thread guide plate 9 from the right. 1 1 Thread guide plate 1 Shutter Pass the thread through the thread hook at the a base of the needle bar. 1 1 Thread hook Next, use the needle threader to thread the needle. Continue with the procedure in "Threading the needle" (on the next page). INDEX 26
-
 1
1 -
2
-
3
-
4
-
5
-
6
-
7
-
8
-
9
-
10
-
11
-
12
-
13
-
14
-
15
-
16
-
17
-
18
-
19
-
20
-
21
-
22
-
23
-
24
-
25
-
26
-
 27
27 -
 28
28 -
 29
29 -
 30
30 -
 31
31 -
 32
32 -
 33
33 -
 34
34 -
 35
35 -
 36
36 -
 37
37 -
38
-
39
-
40
-
41
-
42
-
43
-
44
-
45
-
46
-
47
-
48
-
49
-
50
-
51
-
52
-
53
-
54
-
55
-
56
-
57
-
58
-
59
-
60
-
61
-
62
-
63
-
64
-
65
-
66
-
67
-
68
-
69
-
70
-
71
-
72
-
73
-
74
-
75
-
76
-
77
-
78
-
79
-
80
-
81
-
82
-
83
-
84
-
85
-
86
-
87
-
88
-
89
-
90
-
91
-
92
-
93
-
94
-
95
-
96
-
97
-
98
-
99
-
100
-
101
-
102
-
103
-
104
-
105
-
106
-
107
-
108
-
109
-
110
-
111
-
112
-
113
-
114
-
115
-
116
-
117
-
118
-
119
-
120
-
121
-
122
-
123
-
124
-
125
-
126
-
127
-
128
-
129
-
130
-
131
-
132
-
133
-
134
-
135
-
136
-
137
-
138
-
139
-
140
-
141
-
142
-
143
-
144
-
145
-
146
-
147
-
148
-
149
-
150
-
151
-
152
-
153
 |
 |