Brother International PC-420PRW Users Manual - English - Page 3
Names of Machine Parts and Their Functions, Front view - accessories
 |
View all Brother International PC-420PRW manuals
Add to My Manuals
Save this manual to your list of manuals |
Page 3 highlights
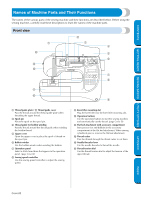
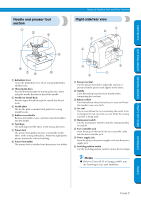
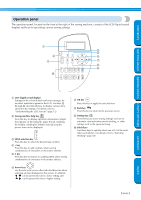
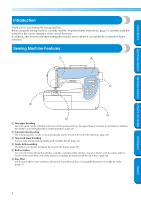
CONTENTS GETTING READY SEWING BASICS UTILITY STITCHES Names of Machine Parts and Their Functions The names of the various parts of the sewing machine and their functions are described below. Before using the sewing machine, carefully read these descriptions to learn the names of the machine parts. Front view 1 D C B 2 3 4 5 6 7 8 A 0 9 1 Thread guide plate / 2 Thread guide cover Pass the thread around the thread guide plate when threading the upper thread. 3 Spool pin Place the spool on the spool pin. 4 Thread guide for bobbin winding Pass the thread around this thread guide when winding the bobbin thread. 5 Upper cover Open the upper cover to place the spool of thread on the spool pin. 6 Bobbin winder Use the bobbin winder when winding the bobbin. 7 Operation panel Select a stitch from those that appear in the operation panel. (page Cover E) 8 Sewing speed controller Use the sewing speed controller to adjust the sewing speed. 9 Knee lifter mounting slot Plug the knee lifter into the knee lifter mounting slot. 0 Operation buttons Use the operation buttons to start the sewing machine and automatically cut the thread. (page Cover D) A Flat bed attachment with accessory compartment Store presser feet and bobbins in the accessory compartment of the flat bed attachment. When sewing cylindrical pieces, remove the flat bed attachment. B Thread cutter Pass the threads through the thread cutter to cut them. C Needle threader lever Use the needle threader to thread the needle. D Thread tension dial Use the thread tension dial to adjust the tension of the upper thread. APPENDIX INDEX Cover B
-
 1
1 -
 2
2 -
 3
3 -
 4
4 -
 5
5 -
 6
6 -
 7
7 -
 8
8 -
 9
9 -
10
-
11
-
12
-
13
-
14
-
15
-
16
-
17
-
18
-
19
-
20
-
21
-
22
-
23
-
24
-
25
-
26
-
27
-
28
-
29
-
30
-
31
-
32
-
33
-
34
-
35
-
36
-
37
-
38
-
39
-
40
-
41
-
42
-
43
-
44
-
45
-
46
-
47
-
48
-
49
-
50
-
51
-
52
-
53
-
54
-
55
-
56
-
57
-
58
-
59
-
60
-
61
-
62
-
63
-
64
-
65
-
66
-
67
-
68
-
69
-
70
-
71
-
72
-
73
-
74
-
75
-
76
-
77
-
78
-
79
-
80
-
81
-
82
-
83
-
84
-
85
-
86
-
87
-
88
-
89
-
90
-
91
-
92
-
93
-
94
-
95
-
96
-
97
-
98
-
99
-
100
-
101
-
102
-
103
-
104
-
105
-
106
-
107
-
108
-
109
-
110
-
111
-
112
-
113
-
114
-
115
-
116
-
117
-
118
-
119
-
120
-
121
-
122
-
123
-
124
-
125
-
126
-
127
-
128
-
129
-
130
-
131
-
132
-
133
-
134
-
135
-
136
-
137
-
138
-
139
-
140
-
141
-
142
-
143
-
144
-
145
-
146
-
147
-
148
-
149
-
150
-
151
-
152
-
153
 |
 |