Brother International PC-7000 Users Manual - English - Page 113
Mechanical, trouble, Caution
 |
View all Brother International PC-7000 manuals
Add to My Manuals
Save this manual to your list of manuals |
Page 113 highlights
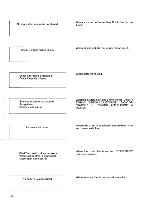
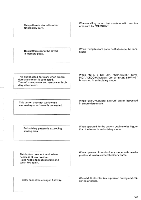
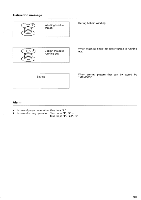
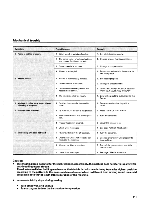
Mechanical trouble Symptom 1. Fabric is not fed properly. 2. Needle breaks 3. Machine is noisy, slow speed, thread trimming is not good 4. Machine does not start 5. Embroidery unit does not work Probable cause Remedy 1. Stitch length is set at no feeding. 1. Set stitch length properly. 2. The combination of selected pattern and presser foot is not correct. 2. Change presser foot to correct one. 3. Correct needle is not used. 3. Change to proper needle. 4. Thread is entangled. 4. Remove thread-ends in the race or inner rotary hook. 1. Needle is not correctly inserted. 2. Correct needle is not used. 1. Set needle properly. 2. Change to proper needle. 3. Combination of fabric, thread and needle is not correct. 3. Check "RELATIVE CHART OF SEWING FABRICS, NEEDLE AND THREAD". 4. The fabric is pulled too much. 4. Sew without pulling but just guide the fabric. 1. Dust is clinging under the needle plate. 1. Remove dust by cleaning with a brush. 1. "START/STOP" button is not pressed. 2. Main power switch is in the off position. 1. Press "START/STOP" button. 2. Turn the power on. 3. Presser foot is not lowered. 3. Lower the presser foot. 4. Check Error messages. 4. See page "ERROR MESSAGE". 1. Power switch is in the off position. 1. Turn the power on. 2. Embroidery unit is not correctly connected to the machine. 2. Connect embroidery unit properly to the machine. 3. Memory card is not inserted. 3. Turn off the machine then insert the memory card. 4. Check Error messages. 4. See page "ERROR MESSAGE". Caution • This machine has a detector for thread breakages. Accordingly, the machine does not start properly without threading upper thread. Also due to needle bar holding mechanism, the fabric is fed with needle being kept at its highest position according to the pattern. In this case, mechanical sound which is different from sewing sound is caused but please note that it is not affect operation of the machine. • In case electricity stops during sewing. • Turn off power, and unplug. • To start again, follow the instruction for operation. 111
-
 1
1 -
2
-
3
-
4
-
5
-
6
-
7
-
8
-
9
-
10
-
11
-
12
-
13
-
14
-
15
-
16
-
17
-
18
-
19
-
20
-
21
-
22
-
23
-
24
-
25
-
26
-
27
-
28
-
29
-
30
-
31
-
32
-
33
-
34
-
35
-
36
-
37
-
38
-
39
-
40
-
41
-
42
-
43
-
44
-
45
-
46
-
47
-
48
-
49
-
50
-
51
-
52
-
53
-
54
-
55
-
56
-
57
-
58
-
59
-
60
-
61
-
62
-
63
-
64
-
65
-
66
-
67
-
68
-
69
-
70
-
71
-
72
-
73
-
74
-
75
-
76
-
77
-
78
-
79
-
80
-
81
-
82
-
83
-
84
-
85
-
86
-
87
-
88
-
89
-
90
-
91
-
92
-
93
-
94
-
95
-
96
-
97
-
98
-
99
-
100
-
101
-
102
-
103
-
104
-
105
-
106
-
107
-
 108
108 -
 109
109 -
 110
110 -
 111
111 -
 112
112 -
 113
113 -
 114
114 -
 115
115 -
 116
116 -
 117
117 -
 118
118 -
119
-
120
-
121
-
122
 |
 |
