Brother International PC-8500D Users Manual - English - Page 50
Adapter For Low Shank Attachments
 |
View all Brother International PC-8500D manuals
Add to My Manuals
Save this manual to your list of manuals |
Page 50 highlights
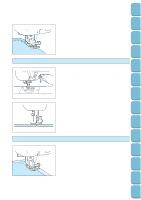
Setting Up Sewing Utility Stitches Characters and Decorative Stitches ADAPTER FOR LOW SHANK ATTACHMENTS This adapter is used for attaching screw-on presser feet to this machine. Following is explanation about installation of walking foot. Included accessories 1 2 3 1 Adapter 2 Screw (small) * 3 Screw (large) ** Installation of walking foot This foot is very useful for sewing materials such as vinyl cloth, synthetic leather, thin leather, etc. These materials are difficult to be fed when sewing but this foot can prevent such materials from crumpling, slipping or sticking between presser foot and materials thanks to even feeding upper and lower materials. You can use walking foot only for sewing STRAIGHT STITCH ( · ) and ZIGZAG STITCH ( ). You can not use this foot for sewing other patterns including horizontal feed (STRAIGHT & ZIGZAG STITCH). 1. Remove the presser foot and the presser foot holder. 3 5 Embroidering Editing Embroidery Patterns Retrieving My Custom Stitch TM Error Maintenance Messages Trouble shooting * 1 ** 2. Attach the adapter for low shank attachments. * Push the adapter up onto the end of the presser bar as far as possible. * Use the metal disk provided with your machine (accessory #14 on page 7) or screw driver to tighten the screw (small) firmly. * When attaching the adapter, be sure to use the metal disk or screw driver to tighten the screw firmly. If the screw is not completely tightened, injuries may occur. 3. Fix the connecting lever of Walking foot to the needle fixing screw and install Walking foot onto the presser bar. Lower the presser foot and tighten the presser foot holder screw (large). ** Before sewing, be sure to turn the balance wheel toward you slowly to check that the needle does not touch the presser foot, otherwise injuries may occur. Please sew with slow to medium speed. 1 Connection lever 47 Sewing Chart Patterns (Programmed in Machine) Patterns (Memory Card)
-
 1
1 -
2
-
3
-
4
-
5
-
6
-
7
-
8
-
9
-
10
-
11
-
12
-
13
-
14
-
15
-
16
-
17
-
18
-
19
-
20
-
21
-
22
-
23
-
24
-
25
-
26
-
27
-
28
-
29
-
30
-
31
-
32
-
33
-
34
-
35
-
36
-
37
-
38
-
39
-
40
-
41
-
42
-
43
-
44
-
 45
45 -
 46
46 -
 47
47 -
 48
48 -
 49
49 -
 50
50 -
 51
51 -
 52
52 -
 53
53 -
 54
54 -
 55
55 -
56
-
57
-
58
-
59
-
60
-
61
-
62
-
63
-
64
-
65
-
66
-
67
-
68
-
69
-
70
-
71
-
72
-
73
-
74
-
75
-
76
-
77
-
78
-
79
-
80
-
81
-
82
-
83
-
84
-
85
-
86
-
87
-
88
-
89
-
90
-
91
-
92
-
93
-
94
-
95
-
96
-
97
-
98
-
99
-
100
-
101
-
102
-
103
-
104
-
105
-
106
-
107
-
108
-
109
-
110
-
111
-
112
-
113
-
114
-
115
-
116
-
117
-
118
-
119
-
120
-
121
-
122
-
123
-
124
-
125
-
126
-
127
-
128
-
129
-
130
-
131
-
132
-
133
-
134
-
135
-
136
-
137
-
138
-
139
-
140
-
141
-
142
-
143
-
144
-
145
-
146
-
147
-
148
-
149
-
150
-
151
-
152
-
153
-
154
-
155
-
156
-
157
-
158
-
159
-
160
-
161
-
162
-
163
-
164
-
165
-
166
-
167
-
168
-
169
-
170
-
171
-
172
-
173
-
174
-
175
-
176
-
177
-
178
-
179
-
180
-
181
-
182
-
183
-
184
-
185
-
186
-
187
-
188
-
189
-
190
-
191
-
192
-
193
-
194
-
195
-
196
 |
 |
