Brother International PE550D Operation Manual - Page 36
Aligning the pattern and the needle position, Embroidering linked characters
 |
View all Brother International PE550D manuals
Add to My Manuals
Save this manual to your list of manuals |
Page 36 highlights
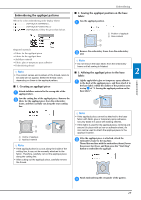
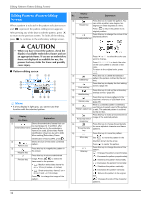
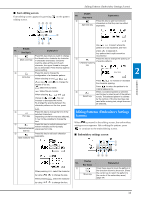
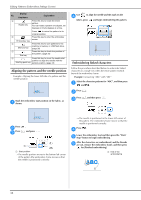
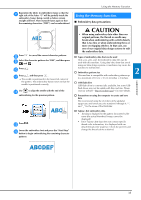
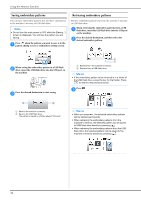
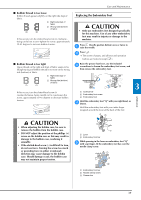
Editing Patterns (Embroidery Settings Screen) Display No. Key Name Explanation 2 Press this key to rotate the entire Rotate key pattern. You can rotate a pattern one degree, ten degrees or ninety degrees at a time. Press to return the pattern to its original position. 3 Press this key to enter the embroidery screen. Embroidery key 4 Press this key to save patterns to the machine's memory or USB flash drive. Memory key (page 36) 5 Press this key to check the position of Trial key the pattern. (page 25) 6 Press this key to move the needle start position to align the needle with the Starting point key pattern position. (page 34) Aligning the pattern and the needle position Example: Aligning the lower left side of a pattern and the needle position Mark the embroidery start position on the fabric, as a shown. Use d to align the needle and the mark on the fabric, press and begin embroidering the pattern. Embroidering linked characters Follow the procedure described below to embroider linked characters in a single row when the entire pattern extends beyond the embroidery frame. Example: Connecting "ABC" with "DEF" Select the character patterns for "ABC", and then press a and . Press . b Press , and then press . c Press . b Press c and press . 1 1 Start position The needle position moves to the bottom left corner of the pattern (the embroidery frame moves so that the needle is positioned correctly). The needle is positioned in the lower-left corner of the pattern. The embroidery frame moves so that the needle is positioned correctly. Press . d Lower the embroidery foot and then press the "Start/ e Stop" button to begin embroidering. After the characters are embroidered, and the threads f are cut, remove the embroidery frame, and then press for [Finished embroidering]. 1 End of the embroidering a 34
-
 1
1 -
2
-
3
-
4
-
5
-
6
-
7
-
8
-
9
-
10
-
11
-
12
-
13
-
14
-
15
-
16
-
17
-
18
-
19
-
20
-
21
-
22
-
23
-
24
-
25
-
26
-
27
-
28
-
29
-
30
-
 31
31 -
 32
32 -
 33
33 -
 34
34 -
 35
35 -
 36
36 -
 37
37 -
 38
38 -
 39
39 -
 40
40 -
 41
41 -
42
-
43
-
44
-
45
-
46
-
47
-
48
-
49
-
50
-
51
-
52
 |
 |
