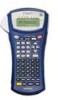
Brother International PT 1400 Users Manual - English - Page 13
Notes on tape cassettes - tapes
 |
UPC - 012502607359
View all Brother International PT 1400 manuals
Add to My Manuals
Save this manual to your list of manuals |
Page 13 highlights
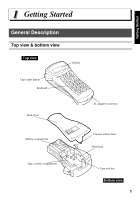
Getting Started ☞ Make sure that the batteries are inserted so that their poles point in the correct direction. With batteries installed, the P-touch determines the remaining battery charge during printing and feeding. If a low battery charge is detected, the low battery indicator ()) comes on. When this occurs, be sure to replace the batteries. The low battery indicator may not come on in some operating conditions. ☞ Before replacing the batteries, make sure that the P-touch is turned off. In addition, when replacing the batteries, insert the new ones within five minutes of removing the old ones, otherwise the text shown in the display and any text stored in the memory will be lost. ☞ If you do not intend to use this P-touch for an extended period of time, remove the batteries. When the power is disconnected, all text shown in the display and stored in the memory will be lost. ☞ Since the enclosed batteries begin discharging from the time that the unit is shipped from the factory, their life span may not meet specifications, depending on when the unit is put into use. Notes on tape cassettes ☞ Before installing the tape cassette, make sure that the end of the tape feeds under the tape guides. If the tape cassette to be installed has an ink ribbon and the ink ribbon is loose, use your finger to wind the toothed wheel in the direction of the arrow on the cassette until there is no slack in the ribbon. End of the tape Tape guides ☞ When inserting the tape cassette, make sure that the inner ribbon does not catch on the corner of the metal guide. ☞ After installing a tape cassette, press f once to remove any slack in the tape, and then press in on the tape cutter button to cut off the excess tape. ☞ Always cut off the tape before removing it from the machine. If the tape is pulled on before being cut off, the tape cassette may be damaged. 5
-
 1
1 -
2
-
3
-
4
-
5
-
6
-
7
-
 8
8 -
 9
9 -
 10
10 -
 11
11 -
 12
12 -
 13
13 -
 14
14 -
 15
15 -
 16
16 -
 17
17 -
 18
18 -
19
-
20
-
21
-
22
-
23
-
24
-
25
-
26
-
27
-
28
-
29
-
30
-
31
-
32
-
33
-
34
-
35
-
36
-
37
-
38
-
39
-
40
-
41
-
42
-
43
-
44
-
45
-
46
-
47
-
48
-
49
-
50
-
51
-
52
-
53
-
54
-
55
-
56
-
57
-
58
-
59
-
60
-
61
-
62
-
63
-
64
-
65
-
66
-
67
-
68
-
69
-
70
-
71
-
72
-
73
-
74
-
75
-
76
-
77
-
78
-
79
-
80
-
81
-
82
-
83
-
84
-
85
-
86
-
87
-
88
-
89
-
90
-
91
-
92
-
93
-
94
-
95
-
96
-
97
-
98
-
99
-
100
-
101
-
102
-
103
-
104
-
105
-
106
-
107
-
108
-
109
-
110
-
111
-
112
-
113
-
114
-
115
-
116
-
117
-
118
-
119
-
120
-
121
-
122
-
123
-
124
-
125
 |
 |
