Brother International PT 2110 Users Manual - English and Spanish - Page 58
Mirror Printing, display the print options screen, and then select
 |
UPC - 012502618805
View all Brother International PT 2110 manuals
Add to My Manuals
Save this manual to your list of manuals |
Page 58 highlights
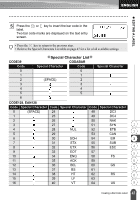
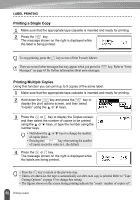
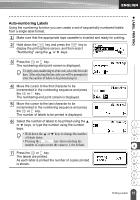
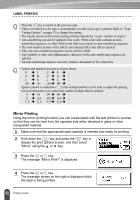
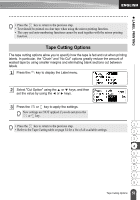
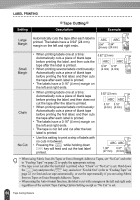
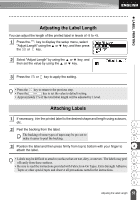
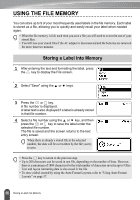
LABEL PRINTING • Press the key to return to the previous step. • Unless set otherwise, the tape is automatically cut after each copy is printed. Refer to "Tape Cutting Options" on page 53 to change this setting. • The figures shown on the screen during printing indicate the "count / number of copies". • Auto-numbering can also be applied to bar codes. When a bar code contains an auto- numbering sequence, no other fields in the label can contain an auto-numbering sequence. • The auto-number portion of the label is incremented after each label is printed. • Only one auto-numbering sequence can be used in a label. • Any symbols or other non-alphanumeric characters in the auto-numbering sequence are ignored. • An auto-numbering sequence can only contain a maximum of five characters. • Letters and numbers increase as shown below: 0 Î 1 ...9 Î 0 Î ... A Î B ...Z Î A Î ... a Î b ...z Î a Î ... A0 Î A1 ...A9 Î B0 Î ... Spaces (shown as underlines "_" in the example below) can be used to adjust the spacing between characters or to control the number of digits that are printed. _9 Î 10 ...99 Î 00 Î ... _Z Î AA ...ZZ Î AA Î ... 1_9 Î 2_0 ...9_9Î 0_0 Î ... Mirror Printing Using the mirror printing function you can create labels with the text printed in reverse so that they can be read from the opposite side when attached to glass or other transparent material. 1 Make sure that the appropriate tape cassette is inserted and ready for printing. 2 Hold down the key and press the key to display the print options screen, and then select "Mirror" using the or key. 3 Press the or key. The message "Mirror Print?" is displayed 4 Press the or key. The message shown on the right is displayed while the label is being printed. 52 Printing a Label
-
 1
1 -
2
-
3
-
4
-
5
-
6
-
7
-
8
-
9
-
10
-
11
-
12
-
13
-
14
-
15
-
16
-
17
-
18
-
19
-
20
-
21
-
22
-
23
-
24
-
25
-
26
-
27
-
28
-
29
-
30
-
31
-
32
-
33
-
34
-
35
-
36
-
37
-
38
-
39
-
40
-
41
-
42
-
43
-
44
-
45
-
46
-
47
-
48
-
49
-
50
-
51
-
52
-
 53
53 -
 54
54 -
 55
55 -
 56
56 -
 57
57 -
 58
58 -
 59
59 -
 60
60 -
 61
61 -
 62
62 -
 63
63 -
64
-
65
-
66
-
67
-
68
-
69
-
70
-
71
-
72
-
73
-
74
-
75
-
76
-
77
-
78
-
79
-
80
-
81
-
82
-
83
-
84
-
85
-
86
-
87
-
88
-
89
-
90
-
91
-
92
-
93
-
94
-
95
-
96
-
97
-
98
-
99
-
100
-
101
-
102
-
103
-
104
-
105
-
106
-
107
-
108
-
109
-
110
-
111
-
112
-
113
-
114
-
115
-
116
-
117
-
118
-
119
-
120
-
121
-
122
-
123
-
124
-
125
-
126
-
127
-
128
-
129
-
130
-
131
-
132
-
133
-
134
-
135
-
136
-
137
-
138
-
139
-
140
-
141
-
142
-
143
-
144
-
145
-
146
-
147
-
148
-
149
-
150
-
151
-
152
-
153
-
154
-
155
-
156
-
157
-
158
-
159
-
160
-
161
 |
 |