Brother International QL-800 Users Guide - Page 11
Rear, Remove the Protective Sheet from the Label Output Slot.
 |
View all Brother International QL-800 manuals
Add to My Manuals
Save this manual to your list of manuals |
Page 11 highlights
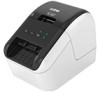
Setting Up the Label Printer Rear 1 1 1 Power Cord Slot 2 USB Port 2 1 Important Before using the Label Printer, make sure you remove the Protective Sheet, as shown below: 1 Make sure that the Label Printer is turned Off. Hold the Label Printer by the front, and firmly lift the DK Roll Compartment Cover to open it. 2 Remove the Protective Sheet from the Label Output Slot. Protective Sheet • Do not throw away the Protective Sheet. • When the Label Printer is not in use, lift the DK Roll Compartment Cover and remove any DK Rolls from inside the Label Printer. Then, insert the Protective Sheet into the Label Output Slot to maintain good printing quality. 3
-
 1
1 -
2
-
3
-
4
-
5
-
 6
6 -
 7
7 -
 8
8 -
 9
9 -
 10
10 -
 11
11 -
 12
12 -
 13
13 -
 14
14 -
 15
15 -
 16
16 -
17
-
18
-
19
-
20
-
21
-
22
-
23
-
24
-
25
-
26
-
27
-
28
-
29
-
30
-
31
-
32
-
33
-
34
-
35
-
36
-
37
-
38
-
39
-
40
-
41
-
42
-
43
-
44
-
45
-
46
-
47
-
48
-
49
-
50
-
51
-
52
-
53
-
54
-
55
-
56
-
57
-
58
-
59
-
60
-
61
-
62
-
63
-
64
-
65
-
66
-
67
-
68
-
69
-
70
-
71
-
72
-
73
-
74
-
75
-
76
-
77
-
78
-
79
-
80
-
81
-
82
-
83
-
84
-
85
 |
 |

Setting Up the Label Printer
3
1
Rear
1
1
Power Cord Slot
2
USB Port
Important
Before using the Label Printer, make sure you remove the Protective Sheet, as shown below:
1
Make sure that the Label Printer is turned Off.
Hold the Label Printer by the front, and firmly lift the DK Roll Compartment Cover to open it.
2
Remove the Protective Sheet from the Label Output Slot.
•
Do not throw away the Protective Sheet.
•
When the Label Printer is not in use, lift the DK Roll Compartment Cover and remove any DK Rolls
from inside the Label Printer. Then, insert the Protective Sheet into the Label Output Slot to maintain
good printing quality.
2
1
Protective
Sheet