Brother International Quattro 6000D Operation Manual Kit 1 - English - Page 21
HOW TO USE NEW FEATURES, Displaying the Fabric While Aligning the Embroidery Position - embroidery machine
 |
View all Brother International Quattro 6000D manuals
Add to My Manuals
Save this manual to your list of manuals |
Page 21 highlights
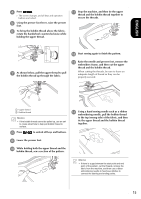
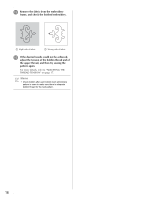
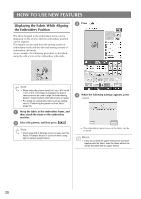
HOW TO USE NEW FEATURES Displaying the Fabric While Aligning c Press . the Embroidery Position The fabric hooped in the embroidery frame can be displayed on the LCD so that the embroidery position can be aligned. This feature can be used from the sewing screen of embroidery mode and the edit and sewing screens of embroidery edit mode. As an example, the following procedure is described using the edit screen of the embroidery edit mode. Note • When embroidery frame (small: H 2 cm × W 6 cm (H 1 inch × W 2-1/2 inches)) is installed, the built-in camera cannot be used to align the embroidering position. Install medium embroidery frame or larger. • For details on using thicker fabric such as quilting, refer to "Positioning the pattern on thick fabric" (page 22). a Hoop the fabric in the embroidery frame, and then attach the frame to the embroidery machine. b Select the pattern, and then press . Note • Check page 8/8 of Settings screen to make sure the Fabric Thickness Sensor is turned off when using light to medium weight fabrics. d When the following message appears, press . → The embroidery frame moves so the fabric can be scanned. Memo • If you do not wish the upper thread to be scanned together with the fabric, scan the fabric without the needle threaded with the upper thread. 20
-
 1
1 -
2
-
3
-
4
-
5
-
6
-
7
-
8
-
9
-
10
-
11
-
12
-
13
-
14
-
15
-
 16
16 -
 17
17 -
 18
18 -
 19
19 -
 20
20 -
 21
21 -
 22
22 -
 23
23 -
 24
24 -
 25
25 -
 26
26 -
27
-
28
-
29
 |
 |
