Brother International S-7200B Instruction Manual - English - Page 7
Contents, Using The Control Box Panel
 |
View all Brother International S-7200B manuals
Add to My Manuals
Save this manual to your list of manuals |
Page 7 highlights
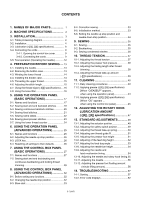
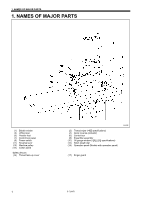
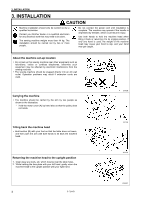
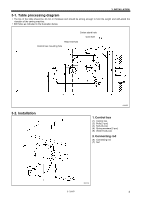
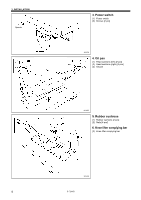
CONTENTS 1. NAMES OF MAJOR PARTS 1 2. MACHINE SPECIFICATIONS 2 3. INSTALLATION 3 3-1. Table processing diagram 4 3-2. Installation 4 3-3. Lubrication (-[]0[], []3[] specifications 8 3-4. Connecting the cords 9 3-4-1. Opening the control box cover 9 3-4-2. Connecting the cords 9 3-5. Test operation (Operating the treadle 12 4. PREPARATION BEFORE SEWING .... 13 4-1. Installing the needle 13 4-2. Removing the bobbin case 13 4-3. Winding the lower thread 14 4-4. Installing the bobbin case 14 4-5. Threading the upper thread 15 4-6. Adjusting the stitch length 15 4-7. Using the thread wiper (-4[][] specifications) .... 16 4-8. Using the knee lifter 16 5. USING THE OPERATION PANEL (BASIC OPERATIONS 17 5-1. Names and functions 17 5-2. Sewing start and end backtack stitches 19 5-3. Sewing continuous backtack stitches 20 5-4. Sewing fixed stitches 21 5-5. Sewing name labels 22 5-6. Sewing pleat presser stitches 23 5-7. Using the lower thread counter 24 6. USING THE OPERATION PANEL (ADVANCED OPERATIONS 25 6-1. Names and functions 25 6-2. Adjusting the needle up stop position 26 6-3. LOCK key 26 6-4. Resetting all settings to their defaults 26 7. USING THE CONTROL BOX PANEL (BASIC OPERATIONS 27 7-1. Names and functions 27 7-2. Sewing start and end backtacking and continuous backtacking and locking thread trimming 28 8. USING THE CONTROL BOX PANEL (ADVANCED OPERATIONS 32 8-1. Before setting any functions 32 8-2. Changing the needle stop position 32 8-3. Slow start 33 8-4. Correction sewing 33 8-5. Initialization method 33 8-6. Setting the needle up stop position and needle down stop position 34 9. SEWING 35 9-1. Sewing 35 9-2. Backtacking 35 9-3. Sewing condensed stitches 36 10. THREAD TENSION 37 10-1. Adjusting the thread tension 37 10-2. Adjusting the presser foot pressure 38 10-3. Adjusting the trailing length after thread trimming 38 10-4. Adjusting the thread take-up amount (-[][]3 specifications 39 11. CLEANING 40 11-1. Daily cleaning procedures 40 11-2. Applying grease (-[]3[], []5[] specifications) [When "GrEASEUP" appears... when using the operation panel 43 11-3. Applying grease (-[]3[], []5[] specifications) [When "GU" appears ... when using the control box panel 45 12. ADJUSTING THE ROTARY HOOK LUBRICATION AMOUNT (-[]0[], []3[] specifications 47 13. STANDARD ADJUSTMENTS 48 13-1. Adjusting the actuator position 48 13-2. Adjusting the safety switch position 49 13-3. Adjusting the thread take-up spring 50 13-4. Adjusting arm thread guide R 51 13-5. Adjusting the presser foot height 51 13-6. Adjusting of the feed dog height 52 13-7. Adjusting the feed dog angle 53 13-8. Adjusting the needle bar height 54 13-9. Adjusting the needle and feed mechanism timing 54 13-10. Adjusting the needle and rotary hook timing.55 13-11. Adjusting the treadle 56 13-12. Adjusting the presser foot floating amount (minute lifting amount 56 14. TROUBLESHOOTING 57 14-1. Sewing 57 14-2. Error code displays 62 S-7200B
-
 1
1 -
 2
2 -
 3
3 -
 4
4 -
 5
5 -
 6
6 -
 7
7 -
 8
8 -
 9
9 -
 10
10 -
 11
11 -
 12
12 -
13
-
14
-
15
-
16
-
17
-
18
-
19
-
20
-
21
-
22
-
23
-
24
-
25
-
26
-
27
-
28
-
29
-
30
-
31
-
32
-
33
-
34
-
35
-
36
-
37
-
38
-
39
-
40
-
41
-
42
-
43
-
44
-
45
-
46
-
47
-
48
-
49
-
50
-
51
-
52
-
53
-
54
-
55
-
56
-
57
-
58
-
59
-
60
-
61
-
62
-
63
-
64
-
65
-
66
-
67
-
68
-
69
-
70
-
71
-
72
-
73
-
74
 |
 |