Brother International SB700T Operation Manual - Page 31
Thread tension
 |
View all Brother International SB700T manuals
Add to My Manuals
Save this manual to your list of manuals |
Page 31 highlights
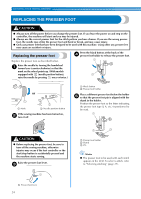
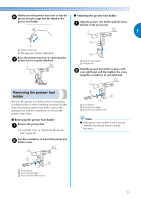
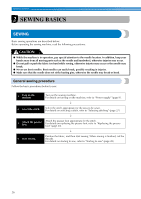
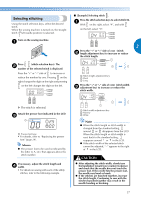
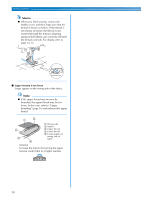
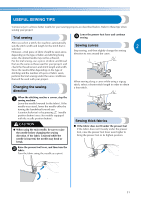
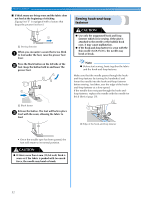
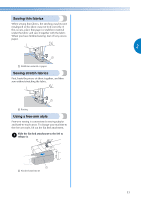
Raise the presser foot lever. j Thread tension Pull the fabric to the left side of the machine, k and then pass the threads through the thread cutter to cut them. The thread tension will affect the quality of your stitches. You may need to adjust it when you change fabric or thread. a Thread cutter Memo ● We recommend that you do a test sample on scrap of a fabric before you start to sew. ■ Correct tension 2 Correct tension is important as too much or too little tension will weaken your seams or cause puckers on your fabric. 1 Memo ● When the foot controller is plugged in, (start/stop button) cannot be used to start sewing. ● When sewing is stopped, the needle remains lowered (in the fabric). The machine can be set so that the needle will stay up when sewing is stopped. For details on setting the machine so that the needles stay up when sewing is stopped, refer to "Changing the needle stop position" (page 10). ■ Sewing reinforcement stitches When sewing stitches other than straight or zigzag stitches that are secured with reverse stitching, pressing (reverse/reinforcement stitch button) sews reinforcement stitches, 3 to 5 stitches on top of each other. 1 2 a Reverse stitching b Reinforcement stitching 2 3 4 a Wrong side b Surface c Upper thread d Lower thread ■ Upper tension is too tight Loops will appear on the surface of the fabric. Note ● If the bobbin thread was incorrectly threaded, the upper thread may be too tight. In this case, refer to "Lower threading" (page 14) and rethread the bobbin thread. 1 2 3 5 4 a Wrong side b Surface c Upper thread d Lower thread e Loops appear on surface of fabric Solution Reduce the tension by turning the upper tension-control dial to a lower number. 54 3 Memo ● Whether reverse stitches or reinforcement stitches are sewn depends on the stitch that is selected. For details, refer to "STITCH SETTINGS" (page 56). 29
-
 1
1 -
2
-
3
-
4
-
5
-
6
-
7
-
8
-
9
-
10
-
11
-
12
-
13
-
14
-
15
-
16
-
17
-
18
-
19
-
20
-
21
-
22
-
23
-
24
-
25
-
 26
26 -
 27
27 -
 28
28 -
 29
29 -
 30
30 -
 31
31 -
 32
32 -
 33
33 -
 34
34 -
 35
35 -
 36
36 -
37
-
38
-
39
-
40
-
41
-
42
-
43
-
44
-
45
-
46
-
47
-
48
-
49
-
50
-
51
-
52
-
53
-
54
-
55
-
56
-
57
-
58
-
59
-
60
-
61
-
62
-
63
-
64
-
65
-
66
-
67
-
68
-
69
-
70
-
71
-
72
 |
 |
