Brother International SQ9050 Users Manual - English - Page 76
threader can
 |
View all Brother International SQ9050 manuals
Add to My Manuals
Save this manual to your list of manuals |
Page 76 highlights
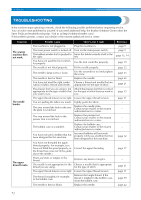
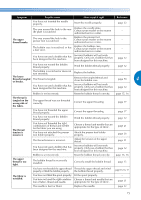
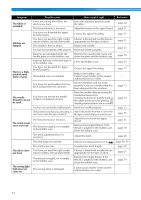
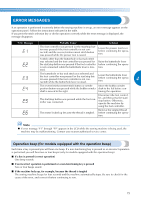
APPENDIX Symptom The fabric is wrinkled. Stitches are skipped. There is a highpitched noise while sewing. The needle threader can not be used. The stitch is not sewn correctly. Possible cause If you are sewing thin fabric, the stitch is too thick. The thread tension is incorrect. You have not threaded the upper thread properly. You have not used the right combination of fabric, thread and needle. The needle is bent or blunt. You have not inserted the needle properly. Dust has accumulated under the needle plate or in the bobbin case. Dust has built up in the feed dogs or in the bobbin case. You have not threaded the upper thread properly. The bobbin case is scratched. You have not used bobbin that has been designed for this machine. You have not moved the needle holder to its highest position. You have not inserted the needle properly. The presser foot that you are using is not correct for the type of stitch. The thread tension is incorrect. The thread is tangled, for example, in the bobbin case. The stitch adjustment level is incorrect. How to put it right Sew with stabilizer material under the fabric. Adjust the tension of the upper thread. Correct the upper threading. Choose a thread and needle that are appropriate for the type of fabric. Replace the needle. Insert the needle properly. Remove the needle plate cover and clean the plate and the bobbin case. Clean the bobbin case. Correct the upper threading. Replace the bobbin case. Contact your retailer or the nearest authorized service center. Incorrect bobbins will not work properly. Only use a bobbin that has been designed for this machine. Raise the needle either by turning the handwheel toward you (counterclockwise) so that the mark on the wheel points up or by pressing (needle position button) once or twice. Insert the needle properly. Attach the presser foot that is correct for the type of stitch that you want to sew. Adjust the tension of the upper thread. Remove the tangled thread. If the thread is tangled in the bobbin case, clean the bobbin case. Adjust the stitch. Reference page 34 page 31 page 17 page 21 page 22 page 70 page 70 page 17 - page 12 page 17 page 22 page 35 page 31 page 70 page 68 The feed dogs are lowered. Slide the feed dog position lever to . page 49, 56 The fabric does not feed. The sewing light bulb does not come on. The stitch is too fine. You have not used the right combination of fabric, thread and needle. The thread is tangled, for example, in the bobbin case. The sewing lamp is damaged. Lengthen the stitch length. Choose a thread and needle that are appropriate for the type of fabric. Remove the tangle thread. If the thread is tangled in the bobbin case, clean the bobbin case. Contact your retailer or the nearest authorized service center. page 28 page 21 page 70 - 74
-
 1
1 -
2
-
3
-
4
-
5
-
6
-
7
-
8
-
9
-
10
-
11
-
12
-
13
-
14
-
15
-
16
-
17
-
18
-
19
-
20
-
21
-
22
-
23
-
24
-
25
-
26
-
27
-
28
-
29
-
30
-
31
-
32
-
33
-
34
-
35
-
36
-
37
-
38
-
39
-
40
-
41
-
42
-
43
-
44
-
45
-
46
-
47
-
48
-
49
-
50
-
51
-
52
-
53
-
54
-
55
-
56
-
57
-
58
-
59
-
60
-
61
-
62
-
63
-
64
-
65
-
66
-
67
-
68
-
69
-
70
-
 71
71 -
 72
72 -
 73
73 -
 74
74 -
 75
75 -
 76
76 -
 77
77 -
 78
78 -
 79
79 -
 80
80
 |
 |