Browning A-Bolt Shotgun Owners Manual
Browning A-Bolt Shotgun Manual
 |
View all Browning A-Bolt Shotgun manuals
Add to My Manuals
Save this manual to your list of manuals |
Browning A-Bolt Shotgun manual content summary:
- Browning A-Bolt Shotgun | Owners Manual - Page 1
A-Bolt® Shotgun bolt-action shotgun owner's manual - Browning A-Bolt Shotgun | Owners Manual - Page 2
Important operating instructions for: Browning A-Bolt® Shotguns If you have any questions about your new firearm, this owner's manual or other Browning products, contact: Browning Customer Service One Browning Place Morgan, UT 84050-9326 Phone: (800) 333-3288 browning.com Please use the space below - Browning A-Bolt Shotgun | Owners Manual - Page 3
Indicator 12 Inserting and Removing the Bolt 12 Ammunition 14 Magazine Capacity 15 Loading 15 Firing...19 Unloading 20 Sight Adjustment 21 Mounting a Scope 22 Trigger Adjustment 23 Cleaning and Maintenance Suggestions 25 Cleaning the Magazine 28 Service or Repair 29 1 - Browning A-Bolt Shotgun | Owners Manual - Page 4
. Please read and understand all of the cautions, warnings, notices, proper handling procedures and instructions outlined in this owner's manual before using your new firearm. 1 ALWAYS KEEP THE MUZZLE OF YOUR firearm POINTED IN A SAFE DIRECTION even though you are certain it is unloaded. Never point - Browning A-Bolt Shotgun | Owners Manual - Page 5
from flying particles. Allow proper distance (eye relief) between a scope and your eye when firing a scoped rifle, shotgun or pistol. Do not use unorthodox shooting methods that could cause the rearward travel of the slide or bolt of a firearm to contact your eyes, face or hands. Always keep a safe - Browning A-Bolt Shotgun | Owners Manual - Page 6
firearm to prevent the possibility of springs, spring-tensioned parts, solvents or other agents from contacting your eyes. 5 Keep all firearms or unwelcome hands. Store all firearms in secure, locked cases or a gun safe. Keep your firearm unloaded when not in use. 9 BEWARE OF BARREL OBSTRUCTIONS. - Browning A-Bolt Shotgun | Owners Manual - Page 7
sound or light recoil when a shell is fired, do not load another shell into the chamber. If your shotgun fails to fire, keep the muzzle pointed in a safe direction for a minimum of 30 seconds. Rotate the ejection area of the firearm away from you, carefully open the action and remove the shell from - Browning A-Bolt Shotgun | Owners Manual - Page 8
and on ammunition boxes. See page 14 for more information on the correct ammunition for your firearm. 13 USE ONLY SAAMI APPROVED AMMUNITION. The barrel and action of this firearm have been made with substantial safety margins beyond the pressures developed by established American commercial loads - Browning A-Bolt Shotgun | Owners Manual - Page 9
you observe other shooters violating any of these safety precautions, politely suggest safer handling practices. 20 BE CERTAIN your firearm is UNLOADED BEFORE CLEANING. Because so many firearm accidents occur when a firearm is being cleaned, special and extreme care should be taken to be sure your - Browning A-Bolt Shotgun | Owners Manual - Page 10
of Browning firearms. 25 WE RESERVE THE RIGHT TO REFUSE SERVICE ON FIREARMS THAT HAVE BEEN ALTERED, ADDED TO OR SUBSTANTIALLY CHANGED. Removal of metal from the barrel, or modifications of the firing mechanism and/or operating parts, may lead to a refusal of service on such firearms. We - Browning A-Bolt Shotgun | Owners Manual - Page 11
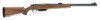
Cocking Indicator "Safety" Bolt Handle Bolt Receiver Rear Sight Barrel Front Sight Recoil Pad Buttstock Magazine Release Trigger Fore-end Hinged Magazine Muzzle G e n e r a l d e s c r i p t i o n a n d Op e r a t i o n The Browning A-Bolt Shotgun is a bolt-action shotgun that operates by - Browning A-Bolt Shotgun | Owners Manual - Page 12
. Before firing your shotgun, clean the anti-rust compound from the inside of the barrel, receiver and the action/chamber areas. A high-quality lightweight gun oil is ideal for removing this compound, and for giving your new firearm its first lubrication. Clean the barrel using a cleaning rod and - Browning A-Bolt Shotgun | Owners Manual - Page 13
when cleaning the A-Bolt shotgun. The ejector spring (Figure 2) protrudes slightly from the side of the receiver and can be bent or damaged when a cleaning rod and patch or brush are drawn past the chamber and through the receiver. operation of t h e " S af e t y " Figure 2 Use care not to bend - Browning A-Bolt Shotgun | Owners Manual - Page 14
downward (Figure 5). When the shotgun is fired, the cocking indicator retracts into the bolt shroud and cannot be seen or removing the bolt ALWAYS KEEP the muzzle pointed in a safe direction. BEFORE inserting or removing the bolt, VISUALLY INSPECT THE CHAMBER TO BE ABSOLUTELY CERTAIN THE FIREARM - Browning A-Bolt Shotgun | Owners Manual - Page 15
or death. Figure 6 IN S ERTING THE B OLT The A-Bolt Shotgun comes packed in a foam-padded box with the bolt removed from the shotgun. To install the bolt into the receiver perform the following procedure: Press the bolt stop and pull the bolt rearward. 1 Place the "safety" in the off safe - Browning A-Bolt Shotgun | Owners Manual - Page 16
cause damage to your shotgun. do not put a 16 or 20 gauge shell in a 12 gauge shotgun. do not put a 28 gauge shell in a 20 gauge shotgun. do not put a .410 bore shell in a 28 gauge shotgun. never put metallic shells of any kind in a shotgun. specifically, never put centerfire rifle or pistol shells - Browning A-Bolt Shotgun | Owners Manual - Page 17
use of shells of nonstandard dimension or those developing pressures in excess of SAAMI (Sporting Arms and Ammunition Manufacturers' Institute) established standards. A-Bolt Shotguns The A-Bolt Shotgun utilizes a detachable box magazine attached to a hinged floorplate. The capacity of the magazine is - Browning A-Bolt Shotgun | Owners Manual - Page 18
same manner. NOTICE! The base of each shell must be flush with the rear of the magazine. If the front of a shell protrudes beyond the front of the magazine, it could cause feeding problems or interfere when inserting the magazine into the shotgun. 5 Reattach the magazine by inserting the small lip - Browning A-Bolt Shotgun | Owners Manual - Page 19
of the magazine, it could cause feeding problems or interfere when inserting the magazine into the shotgun. 4 After loading the magazine, swing the floorplate and loaded magazine upwards until it is retained by the magazine catch. conventional magazine loading procedure The A-Bolt Shotgun may also - Browning A-Bolt Shotgun | Owners Manual - Page 20
of a cartridge protrudes beyond the front of the magazine, it could cause feeding problems or interfere when inserting the magazine into the firearm. 4 If you do not wish to load the chamber, depress the top shell with your finger and close the bolt. The bolt will slide over the top of the shell - Browning A-Bolt Shotgun | Owners Manual - Page 21
loading directly to the chamber You may also load your shotgun by placing a shell directly into the chamber. To load the shotgun in this manner, use the following loading procedure. 1 Insert an unloaded magazine into the firearm. 2 Pull the bolt rearward and inspect the chamber to make sure it is - Browning A-Bolt Shotgun | Owners Manual - Page 22
these warnings could result in serious injury or death. EVEN WITH THE bolt OPEN AFTER SHOOTING, DO NOT ASSUME the firearm IS UNLOADED. ALWAYS INSPECT THE CHAMBER, barrel, feed mechanism AND MAGAZINE TO BE certain THE firearm is completely unloaded. Failure to follow these warnings could result in - Browning A-Bolt Shotgun | Owners Manual - Page 23
adjustment procedures, MAKE SURE YOUR firearm IS completely UNLOADED. Remove the magazine, check the action and chamber for shells. Keep the muzzle pointed in a safe direction. Failure to follow these warnings could result in serious injury or death. A-Bolt Shotguns include a fiber-optic front sight - Browning A-Bolt Shotgun | Owners Manual - Page 24
in serious injury or death. The A-Bolt Shotgun receiver is drilled and tapped for scope bases. From the factory, the scope base holes are fitted with filler screws. Notice! Always use the correct bases for this shotgun and the appropriate length screws. 1 Place your shotgun in a gun vise or on - Browning A-Bolt Shotgun | Owners Manual - Page 25
from the receiver top and from the scope base parts. 4 Remove all four filler screws from the top of the receiver using a very small, thin-bladed gunsmithing-type screwdriver. 5 Pre-position the bases on the receiver top to determine the best orientation of the bases. 6 Insert the screws through the - Browning A-Bolt Shotgun | Owners Manual - Page 26
the trigger guard from the stock. The A-Bolt Shotgun's trigger is pre-set Remove the magazine from the firearm. 3 Open the bolt and verify the firearm is unloaded. 4 Remove the two screws that retain the trigger guard with a standard screwdriver (Figure 12). 5 Lift the trigger guard out of the stock - Browning A-Bolt Shotgun | Owners Manual - Page 27
pull can be measured, with the firearm unloaded and the bolt closed, using a very accurate spring scale or a stock and reinstall the trigger guard screws snugly. Cleaning and maintenance suggestions NOTICE! PLEASE TAKE NOTE OF THE FOLLOWING INFORMATION BEFORE CLEANING YOUR FIREARM. Cleaning Parts - Browning A-Bolt Shotgun | Owners Manual - Page 28
. If you encounter a function problem be sure to give your firearm a thorough cleaning to see if it solves the problem before seeking the services of a Browning Recommended Service Center or our Service Facility in Arnold, Missouri, or a qualified gunsmith. 1 Remove the bolt as explained previously - Browning A-Bolt Shotgun | Owners Manual - Page 29
can affect the accuracy of your firearm. If, or when, fouling should become heavy, it can be removed with a removed. To prevent bristles from breaking off, the brush should be pushed completely through the barrel before being withdrawn. Notice! use additional care when cleaning the A-Bolt shotgun - Browning A-Bolt Shotgun | Owners Manual - Page 30
should be cleaned after firing 500 to 1,000 shells. 1 Remove the magazine from the firearm as explained previously. 2 Slide the magazine bottom plate out to the rear (Figure 15). 3 The magazine spring and follower can be removed for inspection. 4 Wipe off dirt and residue. Lightly oil and - Browning A-Bolt Shotgun | Owners Manual - Page 31
322-4626 Canadian customers contact: Browning Canada Sports Ltd/Ltée 5583 Chemin St-François St-Laurent, Quebec H4S 1W6 Phone: (514) 333-7261 When returning your firearm for servicing, you must do the following: 1 Be sure it is completely unloaded. 2 Remove the scope or other optics. 3 Package it - Browning A-Bolt Shotgun | Owners Manual - Page 32
Notes 30 - Browning A-Bolt Shotgun | Owners Manual - Page 33
Notes 31 - Browning A-Bolt Shotgun | Owners Manual - Page 34
Notes 32 - Browning A-Bolt Shotgun | Owners Manual - Page 35
browning.com BROWNING US: Morgan, Utah 84050-9326 BROWNING CANADA: Browning Canada Sports Ltd/Ltée, St-Laurent, Quebec, H4S 1W6 BROWNING INTL: Parc Industriel des Hauts-Sarts, B-4040 Herstal, Belgium A01104/11130
-
 1
1 -
 2
2 -
 3
3 -
 4
4 -
 5
5 -
 6
6 -
 7
7 -
8
-
9
-
10
-
11
-
12
-
13
-
14
-
15
-
16
-
17
-
18
-
19
-
20
-
21
-
22
-
23
-
24
-
25
-
26
-
27
-
28
-
29
-
30
-
31
-
32
-
33
-
34
-
35
 |
 |

A-BOLT
®
SHOTGUN
BOLT-ACTION SHOTGUN
OWNER’S MANUAL