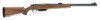
Browning A-Bolt Shotgun Owners Manual - Page 15
The A-Bolt Shotgun comes packed - stocks
 |
View all Browning A-Bolt Shotgun manuals
Add to My Manuals
Save this manual to your list of manuals |
Page 15 highlights
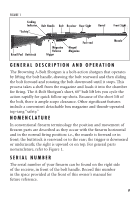
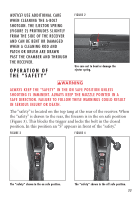
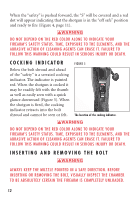
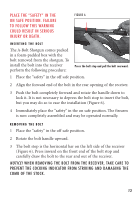
place the "safety" in the on safe position. Failure to follow this warning could result in serious injury or death. Figure 6 IN S ERTING THE B OLT The A-Bolt Shotgun comes packed in a foam-padded box with the bolt removed from the shotgun. To install the bolt into the receiver perform the following procedure: Press the bolt stop and pull the bolt rearward. 1 Place the "safety" in the off safe position. 2 Align the forward end of the bolt in the rear opening of the receiver. 3 Push the bolt completely forward and rotate the handle down to lock it. It is not necessary to depress the bolt stop to insert the bolt, but you may do so to ease the installation (Figure 6). 4 Immediately place the "safety" in the on safe position. The firearm is now completely assembled and may be operated normally. REMOVING THE B OLT 1 Place the "safety" in the off safe position. 2 Rotate the bolt handle upward. 3 The bolt stop is the horizontal bar on the left side of the receiver (Figure 6). Press inward on the front end of the bolt stop and carefully draw the bolt to the rear and out of the receiver. NOTICE! When removing the bolt from the receiver, take care to prevent the cocking indicator from striking and damaging the comb of the stock. 13
-
 1
1 -
2
-
3
-
4
-
5
-
6
-
7
-
8
-
9
-
 10
10 -
 11
11 -
 12
12 -
 13
13 -
 14
14 -
 15
15 -
 16
16 -
 17
17 -
 18
18 -
 19
19 -
 20
20 -
21
-
22
-
23
-
24
-
25
-
26
-
27
-
28
-
29
-
30
-
31
-
32
-
33
-
34
-
35
 |
 |
