Browning A-Bolt Shotgun Owners Manual - Page 18
The Base Of Each Shell Must Be Flush With The Rear - bases for
 |
View all Browning A-Bolt Shotgun manuals
Add to My Manuals
Save this manual to your list of manuals |
Page 18 highlights
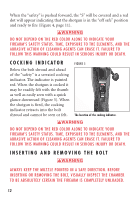
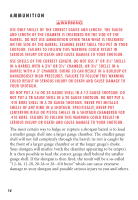
Figure 7 Figure 8 Press the magazine release. Grasp the sides of the magazine and pull it from the floorplate. 3 Detach the magazine by grasping the sides of the magazine and pulling it off the hinged floorplate (Figure 8). 4 Once the magazine has been detached, it may be loaded by laying a shell on top of the follower, aligning the shell's rim with the rim slots and pressing the shell down and rearward until it is retained in the magazine. Load a subsequent shell into the magazine in the same manner. NOTICE! The base of each shell must be flush with the rear of the magazine. If the front of a shell protrudes beyond the front of the magazine, it could cause feeding problems or interfere when inserting the magazine into the shotgun. 5 Reattach the magazine by inserting the small lip on the rear of the magazine into the matching groove in the back end of the floorplate (Figure 9, page 17). Snap the front of the magazine firmly into place. 6 After loading the magazine, swing the floorplate and loaded magazine upwards until it is retained by the magazine catch. Extra magazines may be carried loaded for rapid replacement of an empty magazine using this same procedure. 16
-
 1
1 -
2
-
3
-
4
-
5
-
6
-
7
-
8
-
9
-
10
-
11
-
12
-
 13
13 -
 14
14 -
 15
15 -
 16
16 -
 17
17 -
 18
18 -
 19
19 -
 20
20 -
 21
21 -
 22
22 -
 23
23 -
24
-
25
-
26
-
27
-
28
-
29
-
30
-
31
-
32
-
33
-
34
-
35
 |
 |
