Canon 1231B002 REALiS Manual - Page 2
Quick Reference - How to start projection
 |
UPC - 013803065251
View all Canon 1231B002 manuals
Add to My Manuals
Save this manual to your list of manuals |
Page 2 highlights
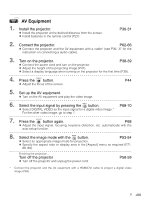
Quick Reference - How to start projection Computer 1. Install the projector. z Install the projector at the desired distance from the screen. P30-31 2. Connect the projector. z Connect the projector and the computer with a cable. P34-37 3. Turn on the projector. P38-39 z Connect the power cord and turn on the projector. z Adjust the height of the projecting image (P41). z Select a display language when turning on the projector for the first time (P39). 4. Press the button. P44 z Adjust the focus of the screen. 5. Set up the computer. z Turn on the computer and set the resolution. P42-43 6. Select the input signal by pressing the button. P46-48 z Select an appropriate input signal in accord with the signal from the computer. 7. Press the button again. P44 z Adjust the input signal, focusing, keystone distortion, etc. automatically with the auto setup function. 8. Press the button. P52 z Optimize the input signal with the auto PC function (Skip this step if the projector is projecting an image properly.) 9. Select the image mode with the button. P53-54 z Select an appropriate image mode for projection. z Specify the aspect ratio or display area in the [Aspect] menu as required (P55, 88). 10. Start the presentation. P76-81 z Set the useful functions available during the presentation from the remote control. Finishing the projection... Turn off the projector z Turn off the projector and unplug the power cord. P58-59 2
-
 1
1 -
 2
2 -
 3
3 -
 4
4 -
 5
5 -
 6
6 -
 7
7 -
 8
8 -
9
-
10
-
11
-
12
-
13
-
14
-
15
-
16
-
17
-
18
-
19
-
20
-
21
-
22
-
23
-
24
-
25
-
26
-
27
-
28
-
29
-
30
-
31
-
32
-
33
-
34
-
35
-
36
-
37
-
38
-
39
-
40
-
41
-
42
-
43
-
44
-
45
-
46
-
47
-
48
-
49
-
50
-
51
-
52
-
53
-
54
-
55
-
56
-
57
-
58
-
59
-
60
-
61
-
62
-
63
-
64
-
65
-
66
-
67
-
68
-
69
-
70
-
71
-
72
-
73
-
74
-
75
-
76
-
77
-
78
-
79
-
80
-
81
-
82
-
83
-
84
-
85
-
86
-
87
-
88
-
89
-
90
-
91
-
92
-
93
-
94
-
95
-
96
-
97
-
98
-
99
-
100
-
101
-
102
-
103
-
104
-
105
-
106
-
107
-
108
-
109
-
110
-
111
-
112
-
113
-
114
-
115
-
116
-
117
-
118
-
119
-
120
-
121
-
122
-
123
-
124
-
125
-
126
-
127
-
128
-
129
-
130
-
131
-
132
-
133
-
134
-
135
-
136
-
137
-
138
-
139
-
140
-
141
 |
 |
