Canon 6864A001AA ImageBrowser_v1x_guide.pdf - Page 4
Try It! ImageBrowser, Starting ImageBrowser
 |
UPC - 013803001983
View all Canon 6864A001AA manuals
Add to My Manuals
Save this manual to your list of manuals |
Page 4 highlights
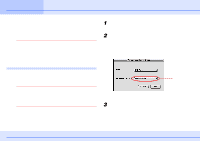
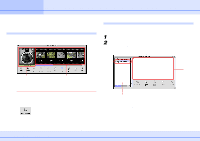
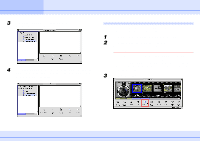
Chapter 1 Try It! ImageBrowser Starting ImageBrowser (1/2) This chapter covers the basic operations of ImageBrowser. It explains how to start ImageBrowser, import images from a 1 Connect a camera to your computer using a USB cable. For information on how to connect a camera to your computer, camera, and then print the images. Let's begin with how to start refer to the documentation that comes with the camera. ImageBrowser. IMPORTANT 2 Make the camera ready for communication with your computer. This manual assumes that all the required applications and USB drivers have been correctly installed. If some of the required applications or drivers are not installed yet, be sure to refer to the corresponding supplied documentation and perform installation. This operation may differ, depending on the camera. Therefore, be sure to refer to the documentation that comes with the camera. The following window appears. (This window only appears the first time you turn on your computer.) Starting ImageBrowser by connecting a camera to your computer You can start ImageBrowser by connecting a camera and enabling it for communication with your computer, using the following procedure. IMPORTANT This method applies only when you connect the camera to your computer through a USB port. When you connect the camera through a serial port or use a card reader, see the Using Non-USB Connections section in the Appendices. REFERENCE You can prevent ImageBrowser from starting automatically. For setting details, see Preventing ImageBrowser from Starting Automatically in the Appendices. The model name of the camera that you are using appears here. If the window above does not appear, see the Troubleshooting section in the Appendices. 3 Click [Set]. ImageBrowser starts. 4 ImageBrowser Software Guide
-
 1
1 -
 2
2 -
 3
3 -
 4
4 -
 5
5 -
 6
6 -
 7
7 -
 8
8 -
 9
9 -
 10
10 -
11
-
12
-
13
-
14
-
15
-
16
-
17
-
18
-
19
-
20
-
21
-
22
-
23
-
24
-
25
-
26
-
27
-
28
-
29
-
30
-
31
-
32
-
33
-
34
-
35
-
36
-
37
-
38
-
39
-
40
-
41
-
42
-
43
-
44
-
45
-
46
-
47
-
48
-
49
-
50
-
51
-
52
-
53
-
54
-
55
-
56
-
57
-
58
-
59
-
60
-
61
-
62
-
63
-
64
-
65
-
66
-
67
-
68
-
69
-
70
-
71
-
72
-
73
-
74
-
75
-
76
-
77
-
78
-
79
 |
 |
