Canon 9080C User Manual - Page 19
Operation Panel - error codes
 |
View all Canon 9080C manuals
Add to My Manuals
Save this manual to your list of manuals |
Page 19 highlights
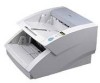
◆ Operation Panel (1) Counter display (2) Count Only key (3) New File key (4) Bypass Mode key (5) Stop key (6) Start key 1.3 Part Names 1 (1) Counter display Displays an error code or the number of pages scanned. To clear the number on the counter display, press the [Count Only] key, then press the [Stop] key down for at least two seconds. (2) Count Only key Sets the scanner to the Count Only mode for just counting the number of pages fed. (See p.52.) When you press this key, it will light. If you place the document and press the Start key in this state, the document will be fed and the scanner will count the number of pages. (The document will not be scanned.) (3) New File key Enabled when the application supports the "Batch Separator" function. This key lights when it is pressed, or when the batch separator has been set in the application. When this function is in use, scanned images will be saved to a separate file or folder from that of the preceding images. (4) Bypass Mode key Press this key to set the scanner to the Bypass (manual) mode. Use this function to scan documents that might double feed or that are bound at the edge and to be fed without page separation. (5) Stop key Press this key to stop scanning. Also use this key to cancel the currently set mode, or to clear the number of pages scanned or cancel an error on the counter display. (6) Start key LED will light when the Count Only mode is selected or the application has activated the scanner. Press the [Start] key when the LED is lit to start scanning. 15
-
 1
1 -
2
-
3
-
4
-
5
-
6
-
7
-
8
-
9
-
10
-
11
-
12
-
13
-
 14
14 -
 15
15 -
 16
16 -
 17
17 -
 18
18 -
 19
19 -
 20
20 -
 21
21 -
 22
22 -
 23
23 -
 24
24 -
25
-
26
-
27
-
28
-
29
-
30
-
31
-
32
-
33
-
34
-
35
-
36
-
37
-
38
-
39
-
40
-
41
-
42
-
43
-
44
-
45
-
46
-
47
-
48
-
49
-
50
-
51
-
52
-
53
-
54
-
55
-
56
-
57
-
58
-
59
-
60
-
61
-
62
-
63
-
64
-
65
-
66
-
67
-
68
-
69
-
70
-
71
-
72
-
73
-
74
-
75
-
76
-
77
-
78
-
79
-
80
-
81
-
82
-
83
-
84
-
85
-
86
-
87
-
88
-
89
-
90
-
91
-
92
-
93
-
94
-
95
-
96
-
97
-
98
-
99
-
100
-
101
-
102
-
103
-
104
-
105
-
106
-
107
-
108
-
109
-
110
 |
 |
