Canon B45 FAXPHONE B45 Set-up Sheet - Page 4
Install the BJ cartridge., Connect the AC power cord.
 |
UPC - 013803022896
View all Canon B45 manuals
Add to My Manuals
Save this manual to your list of manuals |
Page 4 highlights
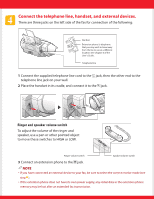
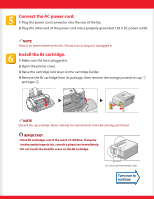
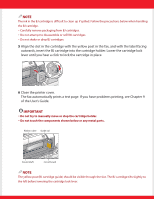
Connect the AC power cord. 1 Plug the power cord connector into the rear of the fax. 2 Plug the other end of the power cord into a properly grounded 120 V AC power outlet. NOTE There is no power switch on the fax. The fax is on as long as it is plugged in. Install the BJ cartridge. 1 Make sure the fax is plugged in. 2 Open the printer cover. 3 Raise the cartridge lock lever on the cartridge holder. 4 Remove the BJ cartridge from its package, then remove the orange protective cap q and tape w. 1 2 NOTE Discard the cap and tape. Never attempt to reattach them to the BJ cartridge print head. IMPORTANT • Store BJ cartridges out of the reach of children. If anyone inadvertently ingests ink, consult a physician immediately. • Do not touch the metallic areas on the BJ cartridge. Do not touch these metallic areas.
-
 1
1 -
 2
2 -
 3
3 -
 4
4 -
 5
5 -
 6
6 -
 7
7 -
 8
8
 |
 |
