Canon CanoScan N650U User Guide
Canon CanoScan N650U Manual
 |
View all Canon CanoScan N650U manuals
Add to My Manuals
Save this manual to your list of manuals |
Canon CanoScan N650U manual content summary:
- Canon CanoScan N650U | User Guide - Page 1
for Macintosh Canon Plug-in Module CS-U 3.8 for CanoScan N650U/N656U/N1220U Color Image Scanner User's Guide - Canon CanoScan N650U | User Guide - Page 2
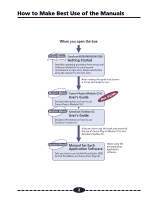
open the box Printed Manual CanoScan N650U/N656U/N1220U Getting Started Describes operating procedure from set up and software installation to scanning and confirmation of operation. Please read before using the scanner for the first time. After reading this guide and scanner is set up and ready - Canon CanoScan N650U | User Guide - Page 3
referred to as Plug-in Module CS-U), the Macintosh driver (plug-in software) used with Canon image scanners. A plug-in is not an independent software program; it must be used within a plug-in compliant application, such as CanoScan Toolbox CS or ArcSoft PhotoStudio 2000, to expand the capabilities - Canon CanoScan N650U | User Guide - Page 4
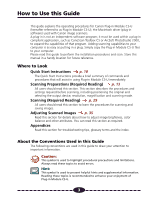
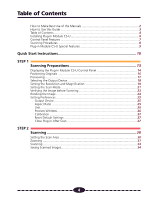
Manuals 2 How to Use this Guide 3 Table of Contents 4 Installing Plug-in Module CS-U 6 Control Panel Features 7 Scanning Procedures 8 Plug-in Module CS-U Special Features 9 Quick Start Instructions 10 Aspect Ratio 25 Unit ...26 Preview Window 26 Calibration ...27 Reset Default Settings 27 - Canon CanoScan N650U | User Guide - Page 5
Settings 46 Adjusting the Threshold Value 48 Auto Tone Correction 49 Unsharp Mask ...50 Descreen ...51 Saving/Recalling Settings 52 Scanning Techniques 54 Appendices 55 Troubleshooting 56 Error Messages ...58 Glossary ...59 Index ...64 Canon Customer Support Help Desk 66 5 - Canon CanoScan N650U | User Guide - Page 6
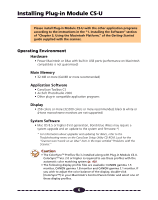
monitors are not supported) System Software • Mac OS 8.5 or higher (First-generation, Bondi blue iMacs may require a system upgrade and an update to the system and firmware.*) * For information about upgrades and updating for iMacs, refer to the Troubleshooting menu on the CanoScan Setup Utility CD - Canon CanoScan N650U | User Guide - Page 7
Button § pp. 36-48 Auto Tone Adjustment Button § p. 36 RGB values § p. 14 Preview Window § pp. 14, 26 Scan Button § p. 33 Preview Button § p. 17 Rotation Button § p. 24 Browser Button § p. 23 Hint In this guide, menu items are marked in the following manner: Select [Load] from the [Setting File - Canon CanoScan N650U | User Guide - Page 8
21 Refer to the scanner's Getting Started guide to install it. Refer to the scanner's Getting Started guide to attach it. Verify the Image before Scanning (Browser Window) § p. 23 50 • Descreen p. 51 If the current brightness and color pose no problem, there is no need to adjust these settings. 8 - Canon CanoScan N650U | User Guide - Page 9
™ (Ver 2.0 +) Compatible for Auto Tone Correction Compatible with the Mac OS 8.5 ColorSync™ (Ver 2.0 +) color management software. This function automatically matches the color profiles of various devices, such as scanners, color displays and color printers, for optimal color reproduction. • Browser - Canon CanoScan N650U | User Guide - Page 10
the instructions in the Getting Started guide. 1. Place the CanoScan Setup Utility CD-ROM into the computer's CD-ROM drive. The CanoScan Setup Utility will start automatically. (If it doesn't, double click the [CD-ROM] icon, followed by the [setup] icon.) 2. Click [Install the Software] to install - Canon CanoScan N650U | User Guide - Page 11
4 Set the Scan Mode, Output Device, Resolution and Magnification pp. 18-22 • Scanning mode determines how the image is scanned (p. 21). • Output device setting optimizes the images for particular uses (p. 18). • Resolution determines the amount of detail in the scanned image (p. 19). • Magnification - Canon CanoScan N650U | User Guide - Page 12
Module CS-U control panel will close and the scanned image will appear in the ArcSoft PhotoStudio 2000 or other plug-in compatible application window as an "Untitled" file. 8 Save the Scanned Image p. 34 Save the image with ArcSoft PhotoStudio 2000 or other plug-in compatible application, specifying - Canon CanoScan N650U | User Guide - Page 13
STEP 1 Scanning Preparations Step 1 presents the essential preparations for scanning. The following procedures are explained on the indicated pages. s Displaying the Plug-in Module CS-U Control Panel w s Positioning Originals w s Previewing w s Selecting the Output Device s Setting the Resolution - Canon CanoScan N650U | User Guide - Page 14
panel is used to perform scans. Plug-in Module CS-U can be opened from CanoScan Toolbox CS or ArcSoft PhotoStudio 2000 and other plug-in compatible application programs. To quit specified in the preview window are automatically displayed here. Preview Window Displays the image in preview mode. 14 - Canon CanoScan N650U | User Guide - Page 15
scanner is attached to your computer and that the power is on. Read the Getting Started guide for instructions on how to connect the scanner. . It must be started from a plug-in compatible application program, such as CanoScan Toolbox CS or ArcSoft PhotoStudio 2000. • The size of the Plug-in Module - Canon CanoScan N650U | User Guide - Page 16
's document glass. Open the cover and set the original face down on the scanner's document glass with the top edge at the front of the scanner. Align the original's corner with the alignment mark. Top Edge of the Document Bottom Edge of the Document Alignment Mark Close the cover carefully so - Canon CanoScan N650U | User Guide - Page 17
the entire scanable area of the document glass. The preview image is shown in the preview window. Use this image to specify a scan area and adjust the scan settings for the image. that should be white, calibrate the scanner by selecting [Preferences] and [Calibration] (p. 27). Calibrating the - Canon CanoScan N650U | User Guide - Page 18
STEP 1 Selecting the Output Device Use the following procedures to select the output device (printer, etc.) for the scanned image. Select the device that corresponds best to your output device and use of the image. Operating Procedures Click the arrow on the [Output Device] section of the control - Canon CanoScan N650U | User Guide - Page 19
STEP 1 Setting the Resolution and Magnification The magnification of an image can be changed before scanning to accommodate reproductions that are larger or smaller than the original. The settings can be changed in increments of 1%. 12"/30cm 6"/15cm 4"/10cm Scanning at 200% Scanning with - Canon CanoScan N650U | User Guide - Page 20
STEP 1 To Set the Magnification Factor Set the desired magnification factor on the control panel. Slider Drag the slider bar in either direction or use the arrow keys to change the resolution. Click here to return the magnification factor to 100%. Click the up or down arrow to increase or - Canon CanoScan N650U | User Guide - Page 21
Setting the Scan Mode STEP 1 When an image is scanned, it is read as a collection of "dots." The scan mode that is selected determines how each of these dots is represented in the output. The following four scan modes are available. Black and White Expresses images in two colors only: black or - Canon CanoScan N650U | User Guide - Page 22
STEP 1 Operating Procedures Click the arrow beside Scan Mode. Selecting the box opens the pop-up menu. Select a scan mode from the pop-up menu. 22 - Canon CanoScan N650U | User Guide - Page 23
the Image Set the magnification and scan mode to the appropriate settings. Click on the [Browser] button. • The selection frame will appear in the preview window to enable a portion of the image to be selected. • The size and shape of the selection frame cannot be changed because it is automatically - Canon CanoScan N650U | User Guide - Page 24
Rotating the Image STEP 1 You can rotate the image in the preview window clockwise to the right or counterclockwise to the left in increments of 90 or 180 degrees. To rotate the image, click the appropriate button. Caution • - Canon CanoScan N650U | User Guide - Page 25
device (printer, files), scan area setting method, size display units, preview window size, and close plug-in after scan. You can change these options be scanned, drag the mouse to size the selection frame in the preview window. The area inside the borders of the selection frame will be scanned. When - Canon CanoScan N650U | User Guide - Page 26
. Unit Settings Dialog The units displayed in this section of the control panel will change. Preview Window You can size the preview window and set its resolution. Enter a large value for a large preview window size. You can also use this feature to set the auto preview and preview cache options - Canon CanoScan N650U | User Guide - Page 27
image is off-balance, select this option to calibrate the scanner input. Reset Default Settings Returns the preference settings and all other -in Module CS-U closes automatically after completion of the scanning job. After you install Plug-in Module CS-U, this setting is set to on (Plug-in Module - Canon CanoScan N650U | User Guide - Page 28
control panel. Select the desired option from the pull-down menu. • Selecting any one of the Output Device, Aspect Ratio, Unit or Preview Window options displays the respective dialog. Choose the desired value in the dialog and select [OK] to change the setting. • A confirmation dialog will display - Canon CanoScan N650U | User Guide - Page 29
STEP 2 Scanning Step 2 presents the procedures for conducting the final scan, saving the scanned image in a file and editing image files. Follow the procedures below to perform the final scan. s Setting the Scan Area s Zooming w s Scanning w s Saving Scanned Images p. 30 p. 31 p. 33 p. 34 29 - Canon CanoScan N650U | User Guide - Page 30
one of four shapes Dragging the selection frame with the mouse cursor changes its shape. • Double-clicking the mouse button anywhere in the preview window selects the entire image. Hint • To specify small areas with precision, it is convenient to expand the preview display with the Zoom In button - Canon CanoScan N650U | User Guide - Page 31
Zooming STEP 2 You can specify a selected area of the image for enlargement with the zoom features. You can use the zoom function to select an area with high precision, or to select small areas for scanning. Procedures to Zoom In Select the area you want to enlarge with the zoom function. See - Canon CanoScan N650U | User Guide - Page 32
STEP 2 Click on the Zoom In button. The selected area will be displayed in expanded form. If you want to enlarge the image again, reduce the size of the area selected with the frame and click the Zoom In button again. ª Click the Zoom Out button to restore the view prior to zooming. Hint • The image - Canon CanoScan N650U | User Guide - Page 33
mode, you may proceed with the scan. Once the scan is complete, Plug-in Module CS-U automatically closes and returns to the application software, such as CanoScan Toolbox CS or ArcSoft PhotoStudio 2000, if the [Close Plug-in After Scan] setting is on. The following provides an example of scanning - Canon CanoScan N650U | User Guide - Page 34
STEP 2 Follow this procedure to save a scanned image with the parent software application. The example below shows how to save a scanned image with ArcSoft PhotoStudio 2000. See the ArcSoft PhotoStudio 2000 User's Guide. Operating Procedures After an image is scanned, the image is displayed as - Canon CanoScan N650U | User Guide - Page 35
STEP 3 Adjusting Scanned Images Scanned images may be corrected for brightness and color tone or edited in a variety of ways. The potential adjustments vary with the scan mode utilized in the preview. Adjustments to the scanned image may be made after the image is previewed. Grayscale, Color ( - Canon CanoScan N650U | User Guide - Page 36
Tone Adjustment STEP 3 Use Tone Adjustment to enhance the brightness or color of the image in the preview area. Open the [Image] menu and select [Tone Adjustment], or click the [Tone Adjustment] button, to open the Tone Adjustment dialog so you can enhance the preview image. You can also click the - Canon CanoScan N650U | User Guide - Page 37
Histogram Settings STEP 3 The data comprising an image contains a variety of brightness settings ranging from shadows to highlights. These settings are represented in Plug-in Module CS-U by values ranging between 0 and 255. The difference in these values determines the image's contrast. To show - Canon CanoScan N650U | User Guide - Page 38
STEP 3 How to Adjust Histograms To change the contrast in an image, the distribution of data between shadows and highlights can be adjusted by dragging the shadow and highlight marks at the bottom of the histogram. All of the data lying to the outside (left) of the shadow mark is changed to a zero - Canon CanoScan N650U | User Guide - Page 39
STEP 3 The histogram settings can be adjusted for all channels (Master) or for individual channels (R, G, B). The selectors are displayed to the left of the histogram graph (Master, R, G, B). The Master selection is unavailable if Grayscale has been selected as the scan mode. Shadow Mark All of - Canon CanoScan N650U | User Guide - Page 40
to manipulate the graph to change the settings. When you test these settings yourself, you can see the changes immediately reflected in the preview window or the browser to achieve many interesting effects. OUTPUT Unadjusted Curve If you want to brighten the light areas ... Drag the mid-tones of - Canon CanoScan N650U | User Guide - Page 41
this button. The Tone Adjustment settings can be saved in a file and reloaded for later use. Click the OK button. The image in the preview window changes to reflect the new settings. 41 - Canon CanoScan N650U | User Guide - Page 42
Curve and Image Brightness Tone curve values fall with a range of 0.01 to 10.00. A value of 1 appears as a straight line in the graph, and ª Input ª Input ª Input CAUTION • The tone curve cannot be adjusted manually in one of the color scan modes when ColorSync is selected because the color - Canon CanoScan N650U | User Guide - Page 43
STEP 3 Brightness and Contrast Settings You can adjust the image with two slide bars, one for contrast and one for brightness. Use this method to adjust an image before scanning if it is slightly out of focus or too dark. Hint • You cannot use this feature with the black and white or color scan - Canon CanoScan N650U | User Guide - Page 44
the brightness/contrast default settings, click this button. Click the [OK] button. The settings will be reflected in the image currently displayed in the preview window. 44 - Canon CanoScan N650U | User Guide - Page 45
STEP 3 Adjusting the Color Balance You can enhance color matching by adjusting the color balance of one or all of the three primary colors: red, green and blue (RGB). Use this feature to adjust the color balance when you see an over-abundance of a color in a scanned image. Hint • You cannot use this - Canon CanoScan N650U | User Guide - Page 46
Plug-in Module CS-U receives the image read from the scanner as input and sends it to the parent application as with your display or contact the manufacturer's customer service department to obtain the correct gamma value for your manually change the gamma value settings as described in the following - Canon CanoScan N650U | User Guide - Page 47
arrow in the spinbox to increase or decrease the value or enter a number directly into the entry box (0.1~10.0). The Tone Adjustment settings can be saved in a file and reloaded for later use. To restore all the . The changes are reflected in the image currently displayed in the preview window. 47 - Canon CanoScan N650U | User Guide - Page 48
STEP 3 Adjusting the Threshold Value When the scan mode is set to black and white, the image brightness can be adjusted. The threshold value setting determines whether a halftone will be expressed as a black or a white data point. The possible threshold values range between 0 and 255. Below a given - Canon CanoScan N650U | User Guide - Page 49
on the computer display with photo album software. This method adjusts the computer display automatically harmonizes the color adjustment functions of scanners, displays and printers for consistent color option if you wish to adjust the color balance manually with Plug-in Module CS-U or another image - Canon CanoScan N650U | User Guide - Page 50
Unsharp Mask STEP 3 The Unsharp Mask function enhances the outlines of an image. When set to On, this function makes the image outlines appear sharper without changing the brightness, contrast or color balance, giving it a natural look. It is particularly useful for scanning images that are - Canon CanoScan N650U | User Guide - Page 51
resolutions higher than 601 dpi. • The previous setting is enabled for the Descreen function when Plug-in Module CS-U is opened by a software application operating in the windowless mode. Operating Procedures Open the [Image] menu and select [Descreen]. A check mark will appear beside the Descreen - Canon CanoScan N650U | User Guide - Page 52
Saving/Recalling Settings STEP 3 The scan mode, resolution and preference settings can be saved with a preview image to a settings file and recalled for future processing. The user may freely assign a name to the settings file. It is convenient to save frequently used settings in a file. Hint • In - Canon CanoScan N650U | User Guide - Page 53
STEP 3 To Recall a Settings File Open the [Setting File] menu and select [Load]. Select the folder where the file is stored and click the name of the file you want to load. Click the [Open] button. The file you selected opens and the settings stored in the file are enabled for the Tone Adjustment - Canon CanoScan N650U | User Guide - Page 54
Enhanced Resolutions Optical resolution refers to the amount of information a scanner can sample per inch. Different varieties of scanner feature different optical resolutions. The maximum optical resolution of the CanoScan N650U/N656U models is 600 dpi for the primary scan (horizontal dimension of - Canon CanoScan N650U | User Guide - Page 55
Appendices s Troubleshooting s Error Messages s Glossary s Index s Canon Customer Support Help Desk p. 56 p. 58 p. 59 p. 64 p. 66 55 - Canon CanoScan N650U | User Guide - Page 56
page in the Getting Started guide. Problem: ®Solution: The "Can't use the driver required for a USB device. Search the Internet for a driver?" dialog displays on a system running Mac OS 9 (only applicable to Mac OS 9) Scanner software has not been installed. Click the [Cancel] button to - Canon CanoScan N650U | User Guide - Page 57
before rescanning. Please refer to the manual for the application program for the correct Problem: The [Image] menu [ColorSync] option cannot be used in Plug-in Module CS-U ®Solution: ColorSync is not recognized after Mac OS upgraded to Version 9 after Plug-in Module CS-U was installed onto Mac OS - Canon CanoScan N650U | User Guide - Page 58
to connect the Macintosh to the scanner properly. • After releasing the lock, temporarily disconnect the USB cable. Reconnect it and restart Plug-in Module CS-U. • Contact your nearest Canon Customer Support Help Desk. • Download and install the latest driver software. • Reduce the scan area to the - Canon CanoScan N650U | User Guide - Page 59
in a scanned image. Raising an image's brightness increases its overall brilliance, while decreasing it makes it darker. Calibration A scanner function that automatically adjusts the scanner's white balance to true white. Color Balance The function in that enables you to adjust the blend of colors - Canon CanoScan N650U | User Guide - Page 60
lowering it softens the image's overall appearance. Dot The basic element used to reproduce images. Images are reproduced as columns and rows of dots. A scanner's resolution is the measure of the number of dots it can read and reproduce per inch (dpi). DPI Dots per inch. An expression of monitor - Canon CanoScan N650U | User Guide - Page 61
Gamma Value A function for adjusting the overall brightness of an image. A gamma value is the mathematical expression of how brightness data is converted from a scanner (the input) to a monitor or printer (the output). With 1 as the base value, a gamma value less than 1 makes an image darker, while - Canon CanoScan N650U | User Guide - Page 62
-in Module CS-U is a driver plug-in that adds scanning capabilities to programs such as CanoScan Toolbox CS and PhotoStudio 2000. Preview Area Area at the right of the Plug-in Module CS-U window used to display preview images. Clicking the [Preview] button causes the scanner to scan its platen and - Canon CanoScan N650U | User Guide - Page 63
its single color channel. Each pixel is therefore assigned 8 bits. • Black and White: assigns 1 bit of data to each pixel. Scanning The process of using a scanner to read image data. Scanned data is sent to the computer as image data. Shadows The darkest portions of an image scanned in a color or - Canon CanoScan N650U | User Guide - Page 64
59 CanoScan Setup Utility CD-ROM 10 Close box Image menu 36 Image size 7 Install 6, 10 J JPEG 61 L Load Settings Software 62 Preferences 25 Preview 9, 17 Preview area 62 Preview button 7, 17 Preview mode 9 Preview scan 17, 62 Preview setting 26 Preview window 7, 14, 17, 26 Preview window size 26 64 - Canon CanoScan N650U | User Guide - Page 65
CS-U 10, 14 guide at any time without prior notice. Please take note that international copyright laws prohibit the scanning of copyright-protected materials for any uses other than for personal use. CanoScan and Canon Plug-in Module are trademarks of Canon Inc. Macintosh, Power Macintosh, Mac OS - Canon CanoScan N650U | User Guide - Page 66
Paul-Doumer 92414 Courbevoie Cedex, France Tél. 01 4199 7777 Fax. 01 4199 7951 Hotline: Tél. 01 4199 7070 CANON DEUTSCHLAND GmbH Postfach 528, 47705 Krefeld, Germany CANON- Hotline-Service Customer Support: (0 21 51) 349-555 Info-Desk: (0 21 51) 349-566 Mailbox: (0 21 51) 349-577 Telefax: (0 21 - Canon CanoScan N650U | User Guide - Page 67
Associates, Tokyo, Japan Jun Koike, CDS Inc., Tokyo, Japan Yoshisuke Kuramoto, CDS Inc., Tokyo, Japan Yoshisuke Kuramoto, CDS Inc., Tokyo, Japan I-OE-040AA 052000 CDS ©Canon Inc. 2000 Adobe Acrobat PDF created in Japan
-
 1
1 -
 2
2 -
 3
3 -
 4
4 -
 5
5 -
 6
6 -
 7
7 -
8
-
9
-
10
-
11
-
12
-
13
-
14
-
15
-
16
-
17
-
18
-
19
-
20
-
21
-
22
-
23
-
24
-
25
-
26
-
27
-
28
-
29
-
30
-
31
-
32
-
33
-
34
-
35
-
36
-
37
-
38
-
39
-
40
-
41
-
42
-
43
-
44
-
45
-
46
-
47
-
48
-
49
-
50
-
51
-
52
-
53
-
54
-
55
-
56
-
57
-
58
-
59
-
60
-
61
-
62
-
63
-
64
-
65
-
66
-
67
 |
 |

f o r
M
a
c
i
n
t
o
s
h
Canon Plug-in Module CS-U 3.8
for CanoScan N650U/N656U/N1220U Color Image Scanner
User's Guide