Canon DC210 DC210 Manual - Page 23
Preparing the Camcorder - cannot read disc
 |
UPC - 411378092144
View all Canon DC210 manuals
Add to My Manuals
Save this manual to your list of manuals |
Page 23 highlights
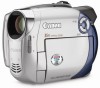
Getting Started 23 • The disc initialization will take approximately one minute. Avoid moving the camcorder while the operation is in progress. • You can start recording movies once the record pause indication appears. NOTES The process of recognizing a disc may take a moment. The display will move while the disc is being read. Wait until the camcorder finishes recognizing the disc before you start recording. Removing the Disc IMPORTANT When you slide OPEN after making a recording, important file allocation data is updated on the disc before the disc cover opens. While the DISC access indicator is on or flashing do not subject the camcorder to shocks such as forcefully laying it on a table. Preparing the Camcorder Preparations 1 Slide OPEN fully in the direction of the arrow and gently open the disc cover completely until it stops. • Do not subject the camcorder to strong impacts while the DISC access indicator is on or flashing. • Retract the grip belt under the camcorder so it will not get in the way of the disc cover. • It may take a moment after sliding OPEN for the disc cover to open. 2 Grab the edge of the disc and gently pull it out. Be careful not to touch the recording surface of the disc or the pick up lens. 3 Close the disc cover. 1 Turn on the camcorder. 2 Move the lens cover switch down to to open the lens cover. 3 Adjust the viewfinder. Keep the LCD panel closed to use the viewfinder and adjust the dioptric adjustment lever as necessary. 4 Fasten the grip belt. Adjust the grip belt so that you can reach the zoom lever with your index finger, and the start/stop button with your thumb.
-
 1
1 -
2
-
3
-
4
-
5
-
6
-
7
-
8
-
9
-
10
-
11
-
12
-
13
-
14
-
15
-
16
-
17
-
 18
18 -
 19
19 -
 20
20 -
 21
21 -
 22
22 -
 23
23 -
 24
24 -
 25
25 -
 26
26 -
 27
27 -
 28
28 -
29
-
30
-
31
-
32
-
33
-
34
-
35
-
36
-
37
-
38
-
39
-
40
-
41
-
42
-
43
-
44
-
45
-
46
-
47
-
48
-
49
-
50
-
51
-
52
-
53
-
54
-
55
-
56
-
57
-
58
-
59
-
60
-
61
-
62
-
63
-
64
-
65
-
66
-
67
-
68
-
69
-
70
-
71
-
72
-
73
-
74
-
75
-
76
-
77
-
78
-
79
-
80
-
81
-
82
-
83
-
84
-
85
 |
 |