Canon EOS-1D C EOS MOVIE Utility Ver.1.4 for Windows Instruction Manual - Page 11
Setting Markers, Drag the frame position slider left or right and click
 |
View all Canon EOS-1D C manuals
Add to My Manuals
Save this manual to your list of manuals |
Page 11 highlights
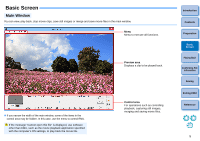
Setting Markers Markers can be used for tasks such as specifying the playback start position. Up to 20 markers can be set. Drag the frame position slider left or right and click the [ ] (Add marker) button at the position where you want to set a marker. ➜ The marker is set. ● Click the [ ] or [ ] button to select the next marker in the arrow direction and display the frame at that position. If there is no other marker between the selected marker and the start of the clip, the first frame in the clip is selected and displayed. If there is no other marker between the selected marker and the end of the clip, the last frame in the clip is selected and displayed. ● Click the [ ] (Marker list) button to display the list of markers. It displays a numbered list of markers and time codes in order from the beginning of the clip. • Select a number from the list and click the [Move] button to move the position of the selected marker, and the frame at that position is displayed. Effective when only one number is selected. • Select a number from the list and click the [Delete] button to delete the selected maker. • You can save the frames at all the marker positions on the list as still images. (p.20) ● You can set a marker by clicking the [ ] (Add marker) button even during playback. Introduction Contents Preparation Basic Screen Playing Back Confirming File Information Saving Exiting EMU Reference The marker settings in the selected clip are saved automatically, and the settings continue to be effective the next time you work with the clip in EMU. 10
-
 1
1 -
2
-
3
-
4
-
5
-
 6
6 -
 7
7 -
 8
8 -
 9
9 -
 10
10 -
 11
11 -
 12
12 -
 13
13 -
 14
14 -
 15
15 -
 16
16 -
17
-
18
-
19
-
20
-
21
-
22
-
23
-
24
-
25
-
26
-
27
-
28
-
29
-
30
 |
 |
