Canon EOS-1D EOS-1D Instructions - Page 27
Installing and Removing the CF Card
 |
UPC - 013803005912
View all Canon EOS-1D manuals
Add to My Manuals
Save this manual to your list of manuals |
Page 27 highlights
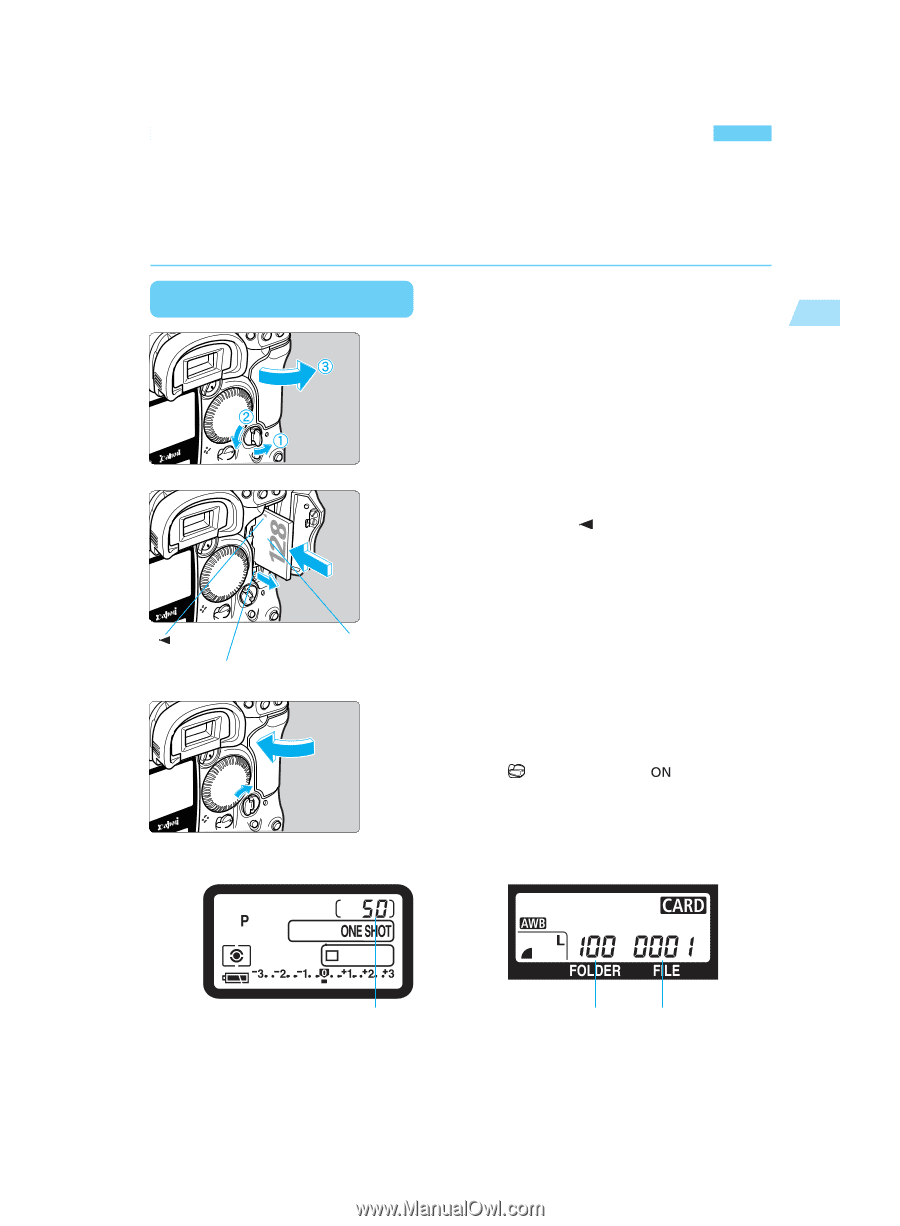
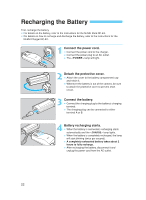
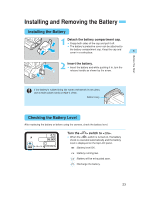
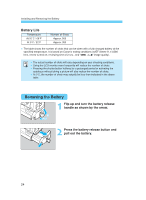
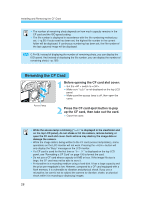
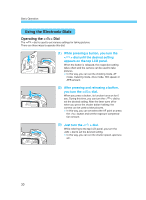
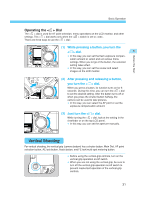
Before You Start Installing and Removing the CF Card The pictures you take are recorded on the CF card. The camera is compatible with Type I and Type II CompactFlash (CF) cards having a capacity of 16 MB or more. If you want to capture images in the Large/Fine or higher quality mode, a 64 MB or larger capacity CF card is recommended. Installing a CF Card 1 1 •Open the CF card slot cover. Flip up and turn the cover release knob as shown by the arrow. 2 •Insert the CF card. Make sure the arrow < > is on the left side of the card and push the card all the way in. s The CF card eject button will then pop-up. < > arrow CF card eject button Label side 3 •Close the cover. Push in the cover until the cover release knob returns to its original position. • When the < > switch is set to < >, the top LCD panel and viewfinder will show the number of remaining shots. The rear LCD panel will also display the file number. Top LCD panel Rear LCD panel Number of remaining shots Folder number File number 27
-
 1
1 -
2
-
3
-
4
-
5
-
6
-
7
-
8
-
9
-
10
-
11
-
12
-
13
-
14
-
15
-
16
-
17
-
18
-
19
-
20
-
21
-
 22
22 -
 23
23 -
 24
24 -
 25
25 -
 26
26 -
 27
27 -
 28
28 -
 29
29 -
 30
30 -
 31
31 -
 32
32 -
33
-
34
-
35
-
36
-
37
-
38
-
39
-
40
-
41
-
42
-
43
-
44
-
45
-
46
-
47
-
48
-
49
-
50
-
51
-
52
-
53
-
54
-
55
-
56
-
57
-
58
-
59
-
60
-
61
-
62
-
63
-
64
-
65
-
66
-
67
-
68
-
69
-
70
-
71
-
72
-
73
-
74
-
75
-
76
-
77
-
78
-
79
-
80
-
81
-
82
-
83
-
84
-
85
-
86
-
87
-
88
-
89
-
90
-
91
-
92
-
93
-
94
-
95
-
96
-
97
-
98
-
99
-
100
-
101
-
102
-
103
-
104
-
105
-
106
-
107
-
108
-
109
-
110
-
111
-
112
-
113
-
114
-
115
-
116
-
117
-
118
-
119
-
120
-
121
-
122
-
123
-
124
-
125
-
126
-
127
-
128
-
129
-
130
-
131
-
132
-
133
-
134
-
135
-
136
-
137
-
138
-
139
-
140
-
141
-
142
-
143
-
144
-
145
-
146
-
147
-
148
-
149
-
150
-
151
-
152
-
153
-
154
-
155
-
156
-
157
-
158
-
159
-
160
-
161
-
162
-
163
-
164
-
165
-
166
-
167
-
168
-
169
-
170
-
171
-
172
-
173
-
174
-
175
-
176
 |
 |