Canon EOS-1Ds Mark III Digital Photo Professional 3.2 Instruction Manual Windo - Page 17
Sorting Images, Attach check marks for sorting.
 |
UPC - 013803079265
View all Canon EOS-1Ds Mark III manuals
Add to My Manuals
Save this manual to your list of manuals |
Page 17 highlights
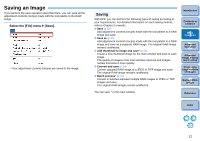
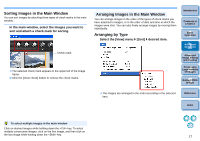
Convenient functions of the quick check window O To check all the images, do not select an image in the main window When step 2 is performed with no image selected in the main window, you can check in the quick check window all the images that were displayed in the main window. O Switch between images using the keyboard You can also switch between images by pressing the < > or keys on the keyboard. O Switch between screens using the keyboard You can also switch between full screen display/normal screen display by pressing the + keys. O Operate using the menu Each operation can also be performed with the menu which appears when you right-click with the mouse on an image. O The enlargement ratio when an image is enlarged is half (50%) of the 100% (actual pixel size). O You can change the enlargement ratio to 100%, when an image is enlarged (p.66). O For a list of quick check window functions, refer to p.101. Sorting Images You can sort images by attaching three types of check marks for each subject or theme. Attach check marks for sorting. Check mark Introduction Contents at a Glance 1Basic Operation 2Advanced Operation 3Advanced Image Editing and Printing 4 Processing Large Numbers of Images ¿ The selected check mark appears in the upper left of the window. O Click the [Clear] button to remove the check marks. 5 Editing JPEG Images Reference Index 16
-
 1
1 -
2
-
3
-
4
-
5
-
6
-
7
-
8
-
9
-
10
-
11
-
 12
12 -
 13
13 -
 14
14 -
 15
15 -
 16
16 -
 17
17 -
 18
18 -
 19
19 -
 20
20 -
 21
21 -
 22
22 -
23
-
24
-
25
-
26
-
27
-
28
-
29
-
30
-
31
-
32
-
33
-
34
-
35
-
36
-
37
-
38
-
39
-
40
-
41
-
42
-
43
-
44
-
45
-
46
-
47
-
48
-
49
-
50
-
51
-
52
-
53
-
54
-
55
-
56
-
57
-
58
-
59
-
60
-
61
-
62
-
63
-
64
-
65
-
66
-
67
-
68
-
69
-
70
-
71
-
72
-
73
-
74
-
75
-
76
-
77
-
78
-
79
-
80
-
81
-
82
-
83
-
84
-
85
-
86
-
87
-
88
-
89
-
90
-
91
-
92
-
93
-
94
-
95
-
96
-
97
-
98
-
99
-
100
-
101
-
102
-
103
-
104
-
105
-
106
-
107
-
108
-
109
-
110
-
111
-
112
-
113
-
114
-
115
-
116
 |
 |