Canon EOS Rebel T3 18-55mm IS II Kit red EOS REBEL T3 / EOS 1100D Basic Instru - Page 22
Installing and Removing the Battery and Card
 |
View all Canon EOS Rebel T3 18-55mm IS II Kit red manuals
Add to My Manuals
Save this manual to your list of manuals |
Page 22 highlights
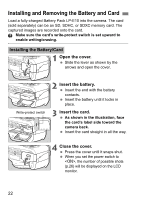
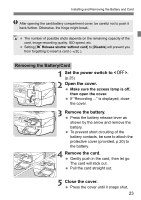
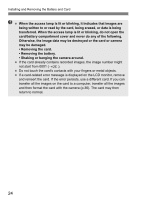
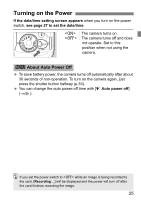
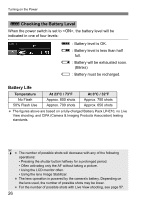
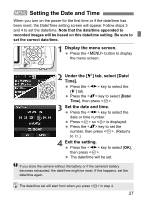
Installing and Removing the Battery and Card Load a fully-charged Battery Pack LP-E10 into the camera. The card (sold separately) can be an SD, SDHC, or SDXC memory card. The captured images are recorded onto the card. Make sure the card's write-protect switch is set upward to enable writing/erasing. Installing the Battery/Card 1 Open the cover. Slide the lever as shown by the arrows and open the cover. Write-protect switch 2 Insert the battery. Insert the end with the battery contacts. Insert the battery until it locks in place. 3 Insert the card. As shown in the illustration, face the card's label side toward the camera back. Insert the card straight in all the way. 4 Close the cover. Press the cover until it snaps shut. When you set the power switch to , the number of possible shots (p.26) will be displayed on the LCD monitor. 22
-
 1
1 -
2
-
3
-
4
-
5
-
6
-
7
-
8
-
9
-
10
-
11
-
12
-
13
-
14
-
15
-
16
-
 17
17 -
 18
18 -
 19
19 -
 20
20 -
 21
21 -
 22
22 -
 23
23 -
 24
24 -
 25
25 -
 26
26 -
 27
27 -
28
-
29
-
30
-
31
-
32
-
33
-
34
-
35
-
36
-
37
-
38
-
39
-
40
-
41
-
42
-
43
-
44
-
45
-
46
-
47
-
48
-
49
-
50
-
51
-
52
-
53
-
54
-
55
-
56
-
57
-
58
-
59
-
60
-
61
-
62
-
63
-
64
-
65
-
66
-
67
-
68
-
69
-
70
-
71
-
72
-
73
-
74
-
75
-
76
-
77
-
78
-
79
-
80
-
81
-
82
-
83
-
84
 |
 |
