Canon FAXPHONE L170 FAXPHONE L180 Starter Guide - Page 11
Install the Printer Driver, Installation Procedure - software
 |
UPC - 013803038477
View all Canon FAXPHONE L170 manuals
Add to My Manuals
Save this manual to your list of manuals |
Page 11 highlights
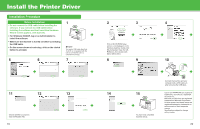
Install the Printer Driver Installation Procedure Before Installation: • Do not connect the USB cable before installing the software. If you connect the USB cable before installing the software and the Found New Hardware Wizard screen appears, click [Cancel]. • For Windows 2000/XP, log on as Administrator to install the software. • Make sure the machine is turned on before connecting the USB cable. • On the screen shown at each step, click on the circled button to proceed. 5 6 1 NOTE You need a USB cable (less than 16.4ft./5 m, not supplied with the unit) to connect the unit to a computer for printing. 7 11 12 Choose whether you want to read the Readme File. 19 13 2 3 4 If the L180 CD-ROM Setup screen is not displayed, on the Windows desktop, double-click [My Computer]. Open the CDROM icon, then double-click [Mlnst (Mlnst.exe)]. 8 9 10 14 15 You have now completed machine set-up. A Connect the machine and your computer with a USB cable (A) after removing the USB label. Canon and FAXPHONE are registered trademarks, and UHQ is a trademark of Canon Inc. Microsoft and Windows are registered trademarks of Microsoft Corporation. All other product and brand names are registered trademarks, trademarks or service marks of their respective owners. Specifications subject to change without notice. 20
-
 1
1 -
2
-
3
-
4
-
5
-
 6
6 -
 7
7 -
 8
8 -
 9
9 -
 10
10 -
 11
11 -
 12
12
 |
 |