Canon FAXPHONE L90 Starter Guide FAXPHONE L90 - Page 12
Set the Date and Time - can i get a confirmation page on
 |
UPC - 013803082029
View all Canon FAXPHONE L90 manuals
Add to My Manuals
Save this manual to your list of manuals |
Page 12 highlights
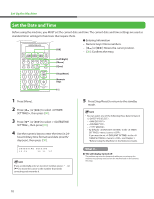
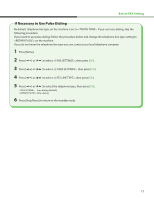
Set Up the Machine Set the Date and Time Before using the machine, you MUST set the current date and time. The current date and time settings are used as standard timer settings for functions that require them. ˔ Entering Information r Numeric keys: Enters numbers. r [ ] or [ ]: Moves the cursor position. r [OK]: Confirms the entry. 1 Press [Menu]. 2 Press [ ] or [ ] to select , then press [OK]. 3 Press [ ] or [ ] to select , then press [OK]. 4 Use the numeric keys to enter the time (in 24- hour/military time format) and date (month/ day/year), then press [OK]. Ex. DATE&TIME SETTING 15:50 12 31 '07 If you accidentally enter an incorrect number, press [ ] or [ ] to move the cursor to the number that needs correcting and overwrite it. 5 Press [Stop/Reset] to return to the standby mode. - You can select one of the following three date formats in . - - - - By default, in the menu is set to . If you want to set in the menu to , see Chapter 1, "Before Using the Machine," in the Reference Guide. ˔ The LCD display turned off: The machine may enter the sleep mode while you are setting up the machine. Press [Energy Saver] to turn the machine back on and continue the setup. 10
-
 1
1 -
2
-
3
-
4
-
5
-
6
-
 7
7 -
 8
8 -
 9
9 -
 10
10 -
 11
11 -
 12
12 -
 13
13 -
 14
14 -
 15
15 -
 16
16 -
 17
17 -
18
-
19
-
20
-
21
-
22
-
23
-
24
-
25
-
26
-
27
-
28
 |
 |
