Canon HV40 VIXIA HV40 Instruction Manual - Page 52
Adjusting the Picture, Exposure, Focus and Color
 |
UPC - 705105064512
View all Canon HV40 manuals
Add to My Manuals
Save this manual to your list of manuals |
Page 52 highlights
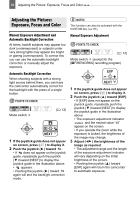
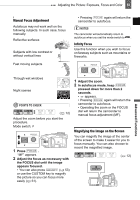
52 Adjusting the Picture: Exposure, Focus and Color Adjusting the Picture: Exposure, Focus and Color Adjusting the Picture: Exposure, Focus and Color NOTES This function can also be activated with the CUSTOM key ( 61). Manual Exposure Adjustment and Automatic Backlight Correction At times, backlit subjects may appear too dark (underexposed) or subjects under very strong lights may appear too bright or glaring (overexposed). To correct this you can use the automatic backlight correction or manually adjust the exposure. Manual Exposure Adjustment POINTS TO CHECK ( 12) Mode switch: (except for the [ FIREWORKS] recording program). Automatic Backlight Correction When shooting subjects with a strong light source behind them, you can have the camcorder automatically correct for the backlight with the press of a single button. POINTS TO CHECK Mode switch: ( 12) 1 If the joystick guide does not appear on screen, press ( ) to display it. 2 Push the joystick ( ) toward . • If does not appear on the joystick guide, repeatedly push the joystick ( ) toward [NEXT] to display the joystick guide in the illustration above. • appears. • Pushing the joystick ( ) toward again will end the backlight correction mode. 1 If the joystick guide does not appear on screen, press ( ) to display it. 2 Push the joystick ( ) toward [EXP]. • If [EXP] does not appear on the joystick guide, repeatedly push the joystick ( ) toward [NEXT] to display the joystick guide in the illustration above. • The exposure adjustment indicator and the neutral value "±0" appear on the screen. • If you operate the zoom while the exposure is locked, the brightness of the image may change. 3 Adjust ( ) the brightness of the image as required. • The adjustment range and the length of the exposure adjustment indicator will vary depending on the initial brightness of the picture. • Pushing the joystick ( ) toward [EXP] again will return the camcorder to automatic exposure.
-
 1
1 -
2
-
3
-
4
-
5
-
6
-
7
-
8
-
9
-
10
-
11
-
12
-
13
-
14
-
15
-
16
-
17
-
18
-
19
-
20
-
21
-
22
-
23
-
24
-
25
-
26
-
27
-
28
-
29
-
30
-
31
-
32
-
33
-
34
-
35
-
36
-
37
-
38
-
39
-
40
-
41
-
42
-
43
-
44
-
45
-
46
-
 47
47 -
 48
48 -
 49
49 -
 50
50 -
 51
51 -
 52
52 -
 53
53 -
 54
54 -
 55
55 -
 56
56 -
 57
57 -
58
-
59
-
60
-
61
-
62
-
63
-
64
-
65
-
66
-
67
-
68
-
69
-
70
-
71
-
72
-
73
-
74
-
75
-
76
-
77
-
78
-
79
-
80
-
81
-
82
-
83
-
84
-
85
-
86
-
87
-
88
-
89
-
90
-
91
-
92
-
93
-
94
-
95
-
96
-
97
-
98
-
99
-
100
-
101
-
102
-
103
-
104
-
105
-
106
-
107
-
108
-
109
-
110
-
111
-
112
-
113
-
114
 |
 |