Canon LV-7370 Projector Monitoring Software v1 Starter Guide - Page 1
Canon LV-7370 Manual
 |
View all Canon LV-7370 manuals
Add to My Manuals
Save this manual to your list of manuals |
Page 1 highlights
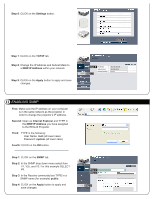
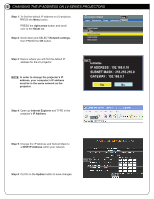
Projector Monitoring Software Starter Guide Only works with REALiS Series Mark II and Mark II D projectors and Canon LV-Series projectors with a network port. D DISCLAIMER 1. This is a EXAMPLE of how to use the Canon's Projector Monitoring Software. 2. You will need to change the projector's IP address to match your network settings. 3. Please make sure your computer meets the following System Requirements. Category OPERATING SYSTEM CPU MEMORY .NET FRAMEWORK SUPPORTED LANGUAGES: ACROBAT READER Essential Requirements Microsoft Windows XP Professional SP2 or later / Microsoft Windows Vista Ultimate Intel Pentium 4 2.4 GHz or better 1 GB or more Windows XP: .NET Framework 2.0 SP1 or more / Windows Vista : .NET Framework 3.0 or more English and Japanese 7.0 or higher I CHANGING THE IP ADDRESS ON REALiS PROJECTORS Step 1: To find the default IP address of the REALiS projector, PRESS the Menu button. Step 2 Step 2: PRESS the right-arrow button and scroll over to the Information tab. Here is where you will find the projector's default IP address. NOTE: In order to change the projector's IP address, your computer's IP address must be in the same network as the projector. Step 3: Open up Internet Explorer and TYPE in the projector's default IP Address. Step 3 Step 4: The REALiS web page will open up. TYPE in the following: User Name: root (all lower case) Password: system (all lower case) Step 5: CLICK on the OK button. Step 4 Step 5
-
 1
1 -
 2
2 -
 3
3 -
 4
4 -
 5
5 -
 6
6
 |
 |