Canon LV-7370 Projector Monitoring Software v1 Starter Guide - Page 4
Registering / Discovering Realis Projectors
 |
View all Canon LV-7370 manuals
Add to My Manuals
Save this manual to your list of manuals |
Page 4 highlights
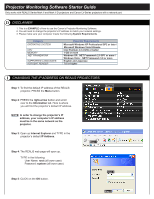
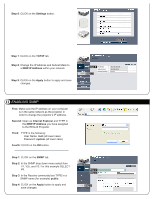
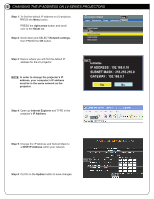
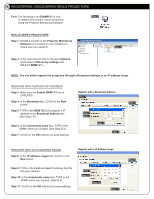
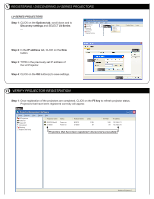
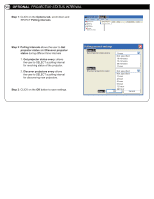
IV REGISTERING / DISCOVERING REALiS PROJECTORS First: The following is an EXAMPLE on how to register and monitor Canon projectors using the Projector Monitoring Software. Step 1 REALiS SERIES PROJECTORS Step 1: DOUBLE-CLICK on the Projector Monitoring Software icon located on your desktop (or where ever you saved it). Step 2 Step 2: In the menu bar CLICK on the word Options, scroll down to Discovery settings and SELECT SNMP V1 ... NOTE: You can either register the projectors through a Broadcast address or an IP address range. REGISTER WITH A BROADCAST ADDRESS Step 3: Make sure the Enable SNMP V1 box is CHECKED. Step 4: In the Broadcast tab, CLICK on the New button. Step 5: TYPE in the NEW REALiS projector's IP address in the Broadcast address box. (See Step I-8) Step 6: In the Community name box, TYPE in the SNMP name you created. (See Step II-3) Step 7: CLICK on the OK button(s) to save settings. Register with a Broadcast Address Step 3 Step 4 Step 5 Step 6 192. 168. 0. 11 public Step 7 Step 7 REGISTER WITH AN IP ADDRESS RANGE Step 8: In the IP address ranges tab, CLICK on the New button. Register with a IP Address range Step 9: TYPE in the First and Last IP address that fits into your network. Step 10: In the Community name box. TYPE in the SNMP name you created. (Step II-3) Step 11: CLICK on the OK button(s) to save setttings. Step 9 Step 10 192. 168. 0. 2 192. 168. 0. 255 public Step 11 Step 11 Step 8
-
 1
1 -
 2
2 -
 3
3 -
 4
4 -
 5
5 -
 6
6
 |
 |
