Canon LV-7370 Projector Monitoring Software v1 Starter Guide - Page 2
Enabling Snmp
 |
View all Canon LV-7370 manuals
Add to My Manuals
Save this manual to your list of manuals |
Page 2 highlights
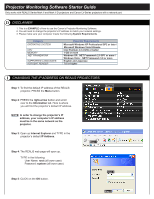
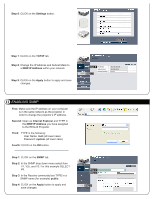
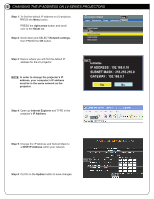
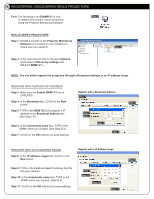
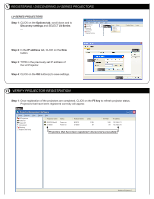
Step 6: CLICK on the Settings button. Step 6 Step 7: CLICK on the TCP/IP tab. Step 8: Change the IP Address and Subnet Mask to a NEW IP Address within your network. Step 9: CLICK on the Apply button to apply and save changes. TCP/IP Step 9 Step 8 TCP/IP Step 7 IP address Subnet mask IDaedfadureltsgsateway 192.168.254.254 255.255.255.0 0.0.0.0 192.168.100.2 SNMP II ENABLING SNMP First: Make sure the IP address on your computer is in the same network as the projector in order to change the projector's IP address. Second: Open up Internet Explorer and TYPE in the NEW IP Address you have assigned to the REALiS Projector. Third: TYPE in the following: User Name: root (all lower case) Password: system (all lower case) Fourth: CLICK on the OK button. Step 1: CLICK on the SNMP tab. Step 2: In the SNMP drop down menu select from V1, V2c, and V3. For this example SELECT V1. Step 3: In the Receive community box TYPE in a SNMP name (for example) public. Step 4: CLICK on the Apply button to apply and save changes. Step 4 Step 2 Step 3 Step 1
-
 1
1 -
 2
2 -
 3
3 -
 4
4 -
 5
5 -
 6
6
 |
 |
