Canon MF7280 PCL Driver Guide - Page 186
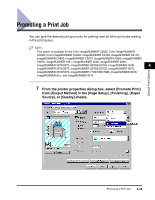
Specifying the ID and Password
 |
UPC - 013803056129
View all Canon MF7280 manuals
Add to My Manuals
Save this manual to your list of manuals |
Page 186 highlights
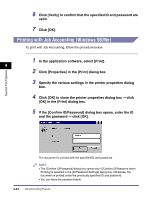
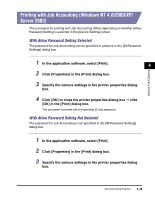
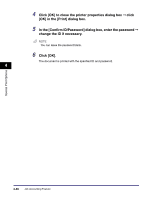
Special Print Options Specifying the ID and Password In order to print documents using the Job Accounting feature, follow the procedure below to specify the ID and password 1 On the [Start] menu, point to [Settings] ➞ click [Printers]. NOTE • If you are using Windows XP Professional/Server 2003, on the [Start] menu, click [Printers and Faxes]. • If you are using Windows XP Home Edition, on the [Start] menu, click [Control Panel] ➞ [Printers and Other Hardware] ➞ [Printers and Faxes]. 4 2 In the [Printers] folder, right-click the printer icon for your printer ➞ click [Properties]. 3 In the printer properties dialog box, click the [Configuration] tab (Windows 98/Me) or [Device Settings] tab (Windows NT 4.0/2000/XP/Server 2003). 4-42 Job Accounting Feature
-
 1
1 -
2
-
3
-
4
-
5
-
6
-
7
-
8
-
9
-
10
-
11
-
12
-
13
-
14
-
15
-
16
-
17
-
18
-
19
-
20
-
21
-
22
-
23
-
24
-
25
-
26
-
27
-
28
-
29
-
30
-
31
-
32
-
33
-
34
-
35
-
36
-
37
-
38
-
39
-
40
-
41
-
42
-
43
-
44
-
45
-
46
-
47
-
48
-
49
-
50
-
51
-
52
-
53
-
54
-
55
-
56
-
57
-
58
-
59
-
60
-
61
-
62
-
63
-
64
-
65
-
66
-
67
-
68
-
69
-
70
-
71
-
72
-
73
-
74
-
75
-
76
-
77
-
78
-
79
-
80
-
81
-
82
-
83
-
84
-
85
-
86
-
87
-
88
-
89
-
90
-
91
-
92
-
93
-
94
-
95
-
96
-
97
-
98
-
99
-
100
-
101
-
102
-
103
-
104
-
105
-
106
-
107
-
108
-
109
-
110
-
111
-
112
-
113
-
114
-
115
-
116
-
117
-
118
-
119
-
120
-
121
-
122
-
123
-
124
-
125
-
126
-
127
-
128
-
129
-
130
-
131
-
132
-
133
-
134
-
135
-
136
-
137
-
138
-
139
-
140
-
141
-
142
-
143
-
144
-
145
-
146
-
147
-
148
-
149
-
150
-
151
-
152
-
153
-
154
-
155
-
156
-
157
-
158
-
159
-
160
-
161
-
162
-
163
-
164
-
165
-
166
-
167
-
168
-
169
-
170
-
171
-
172
-
173
-
174
-
175
-
176
-
177
-
178
-
179
-
180
-
 181
181 -
 182
182 -
 183
183 -
 184
184 -
 185
185 -
 186
186 -
 187
187 -
 188
188 -
 189
189 -
 190
190 -
 191
191 -
192
-
193
-
194
-
195
-
196
-
197
-
198
-
199
-
200
-
201
-
202
-
203
-
204
-
205
-
206
-
207
-
208
-
209
-
210
-
211
-
212
-
213
-
214
-
215
-
216
-
217
-
218
-
219
-
220
-
221
-
222
-
223
-
224
 |
 |
