Canon PIXMA MX472 Fax Guide - Page 96
Creating an Address Book Fax Driver
 |
View all Canon PIXMA MX472 manuals
Add to My Manuals
Save this manual to your list of manuals |
Page 96 highlights
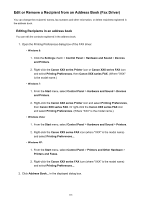
Creating an Address Book (Fax Driver) By using the address book, you can send a fax by simply specifying a recipient from it. You can register the recipient's name, fax number and other information in the address book. Registering a recipient (WAB contact) in the address book You can register an individual recipient (Contact) in the address book. 1. Open the Printing Preferences dialog box of the FAX driver. • Windows 8: 1. Click the Settings charm > Control Panel > Hardware and Sound > Devices and Printers. 2. Right-click the Canon XXX series Printer icon or Canon XXX series FAX icon and select Printing Preferences, then Canon XXX series FAX. (Where "XXX" is the model name.) • Windows 7: 1. From the Start menu, select Control Panel > Hardware and Sound > Devices and Printers. 2. Right-click the Canon XXX series Printer icon and select Printing Preferences, then Canon XXX series FAX. Or right-click the Canon XXX series FAX icon and select Printing Preferences. (Where "XXX" is the model name.) • Windows Vista: 1. From the Start menu, select Control Panel > Hardware and Sound > Printers. 2. Right-click the Canon XXX series FAX icon (where "XXX" is the model name) and select Printing Preferences.... • Windows XP: 1. From the Start menu, select Control Panel > Printers and Other Hardware > Printers and Faxes. 2. Right-click the Canon XXX series FAX icon (where "XXX" is the model name) and select Printing Preferences.... 2. Click Address Book... in the displayed dialog box. 96
-
 1
1 -
2
-
3
-
4
-
5
-
6
-
7
-
8
-
9
-
10
-
11
-
12
-
13
-
14
-
15
-
16
-
17
-
18
-
19
-
20
-
21
-
22
-
23
-
24
-
25
-
26
-
27
-
28
-
29
-
30
-
31
-
32
-
33
-
34
-
35
-
36
-
37
-
38
-
39
-
40
-
41
-
42
-
43
-
44
-
45
-
46
-
47
-
48
-
49
-
50
-
51
-
52
-
53
-
54
-
55
-
56
-
57
-
58
-
59
-
60
-
61
-
62
-
63
-
64
-
65
-
66
-
67
-
68
-
69
-
70
-
71
-
72
-
73
-
74
-
75
-
76
-
77
-
78
-
79
-
80
-
81
-
82
-
83
-
84
-
85
-
86
-
87
-
88
-
89
-
90
-
 91
91 -
 92
92 -
 93
93 -
 94
94 -
 95
95 -
 96
96 -
 97
97 -
 98
98 -
 99
99 -
 100
100 -
 101
101 -
102
-
103
-
104
-
105
-
106
-
107
-
108
-
109
-
110
 |
 |
