Canon PIXMA MX472 Printing Guide - Page 112
Placement Tab, Save settings Tab
 |
View all Canon PIXMA MX472 manuals
Add to My Manuals
Save this manual to your list of manuals |
Page 112 highlights
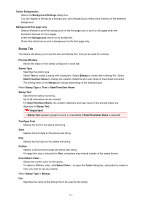
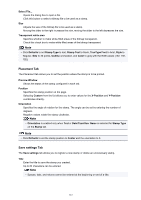
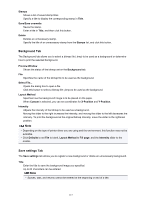
Select File... Opens the dialog box to open a file. Click this button to select a bitmap file to be used as a stamp. Size Adjusts the size of the bitmap file to be used as a stamp. Moving the slider to the right increases the size, moving the slider to the left decreases the size. Transparent white area Specifies whether to make white-filled areas of the bitmap transparent. Check this check box to make white-filled areas of the bitmap transparent. Note • Click Defaults to set Stamp Type to text, Stamp Text to blank, TrueType Font to Arial, Style to Regular, Size to 36 points, Outline unchecked, and Color to gray with the RGB values (192, 192, 192). Placement Tab The Placement tab allows you to set the position where the stamp is to be printed. Preview Window Shows the status of the stamp configured in each tab. Position Specifies the stamp position on the page. Selecting Custom from the list allows you to enter values for the X-Position and Y-Position coordinates directly. Orientation Specifies the angle of rotation for the stamp. The angle can be set by entering the number of degrees. Negative values rotate the stamp clockwise. Note • Orientation is enabled only when Text or Date/Time/User Name is selected for Stamp Type on the Stamp tab. Note • Click Defaults to set the stamp position to Center and the orientation to 0. Save settings Tab The Save settings tab allows you to register a new stamp or delete an unnecessary stamp. Title Enter the title to save the stamp you created. Up to 64 characters can be entered. Note • Spaces, tabs, and returns cannot be entered at the beginning or end of a title. 112
-
 1
1 -
2
-
3
-
4
-
5
-
6
-
7
-
8
-
9
-
10
-
11
-
12
-
13
-
14
-
15
-
16
-
17
-
18
-
19
-
20
-
21
-
22
-
23
-
24
-
25
-
26
-
27
-
28
-
29
-
30
-
31
-
32
-
33
-
34
-
35
-
36
-
37
-
38
-
39
-
40
-
41
-
42
-
43
-
44
-
45
-
46
-
47
-
48
-
49
-
50
-
51
-
52
-
53
-
54
-
55
-
56
-
57
-
58
-
59
-
60
-
61
-
62
-
63
-
64
-
65
-
66
-
67
-
68
-
69
-
70
-
71
-
72
-
73
-
74
-
75
-
76
-
77
-
78
-
79
-
80
-
81
-
82
-
83
-
84
-
85
-
86
-
87
-
88
-
89
-
90
-
91
-
92
-
93
-
94
-
95
-
96
-
97
-
98
-
99
-
100
-
101
-
102
-
103
-
104
-
105
-
106
-
 107
107 -
 108
108 -
 109
109 -
 110
110 -
 111
111 -
 112
112 -
 113
113 -
 114
114 -
 115
115 -
 116
116 -
 117
117 -
118
-
119
-
120
-
121
-
122
-
123
-
124
-
125
-
126
-
127
-
128
-
129
-
130
-
131
-
132
-
133
-
134
-
135
-
136
-
137
-
138
-
139
-
140
-
141
-
142
-
143
-
144
-
145
-
146
-
147
-
148
-
149
-
150
-
151
-
152
-
153
-
154
-
155
-
156
-
157
-
158
-
159
-
160
-
161
 |
 |
