Canon POWERSHOT A80 PowerShot A80 Camera User Guide - Page 155
Camera Solution Disk. - driver
 |
UPC - 838030324328
View all Canon POWERSHOT A80 manuals
Add to My Manuals
Save this manual to your list of manuals |
Page 155 highlights
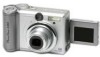
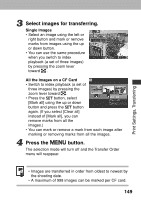
1 Install the driver and the software applications bundled on the Canon Digital Camera Solution Disk. Please see the Software Starter Guide for information on system requirements and installation instructions. 2 Connect the supplied USB interface cable to the computer's USB port and the camera's terminal. • You do not need to turn off the computer or camera when making a USB connection. • Please refer to your computer manual for information regarding the location of the USB port. 3 Slide the mode switch to . Press the ON/OFF button until the power indicator lights. • A image appears on the LCD monitor. • When the connection between the camera and a computer completes, the LCD monitor turns off and the power indicator lights green. USB port terminal 1. Open the terminal cover with your fingernail. 2. Insert the connector until it clicks. Connecting USB cable 1. Terminal cover 2. USB cable 151
-
 1
1 -
2
-
3
-
4
-
5
-
6
-
7
-
8
-
9
-
10
-
11
-
12
-
13
-
14
-
15
-
16
-
17
-
18
-
19
-
20
-
21
-
22
-
23
-
24
-
25
-
26
-
27
-
28
-
29
-
30
-
31
-
32
-
33
-
34
-
35
-
36
-
37
-
38
-
39
-
40
-
41
-
42
-
43
-
44
-
45
-
46
-
47
-
48
-
49
-
50
-
51
-
52
-
53
-
54
-
55
-
56
-
57
-
58
-
59
-
60
-
61
-
62
-
63
-
64
-
65
-
66
-
67
-
68
-
69
-
70
-
71
-
72
-
73
-
74
-
75
-
76
-
77
-
78
-
79
-
80
-
81
-
82
-
83
-
84
-
85
-
86
-
87
-
88
-
89
-
90
-
91
-
92
-
93
-
94
-
95
-
96
-
97
-
98
-
99
-
100
-
101
-
102
-
103
-
104
-
105
-
106
-
107
-
108
-
109
-
110
-
111
-
112
-
113
-
114
-
115
-
116
-
117
-
118
-
119
-
120
-
121
-
122
-
123
-
124
-
125
-
126
-
127
-
128
-
129
-
130
-
131
-
132
-
133
-
134
-
135
-
136
-
137
-
138
-
139
-
140
-
141
-
142
-
143
-
144
-
145
-
146
-
147
-
148
-
149
-
 150
150 -
 151
151 -
 152
152 -
 153
153 -
 154
154 -
 155
155 -
 156
156 -
 157
157 -
 158
158 -
 159
159 -
 160
160 -
161
-
162
-
163
-
164
-
165
-
166
-
167
-
168
-
169
-
170
-
171
-
172
-
173
-
174
-
175
-
176
-
177
-
178
-
179
-
180
-
181
-
182
-
183
-
184
-
185
-
186
-
187
-
188
-
189
-
190
-
191
-
192
-
193
-
194
-
195
-
196
-
197
-
198
-
199
-
200
-
201
-
202
-
203
-
204
-
205
-
206
-
207
-
208
-
209
-
210
-
211
-
212
-
213
-
214
-
215
-
216
-
217
-
218
 |
 |
