Canon PowerShot A75 Software starter Guide Ver.16/17 - Page 44
Merging Panoramic Images - PhotoStitch
 |
View all Canon PowerShot A75 manuals
Add to My Manuals
Save this manual to your list of manuals |
Page 44 highlights
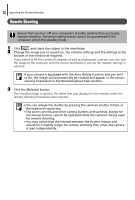
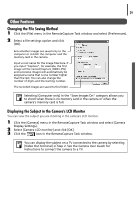
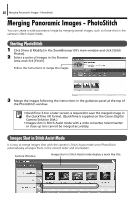
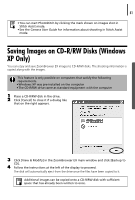
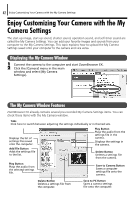
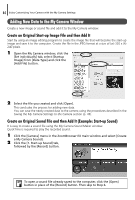
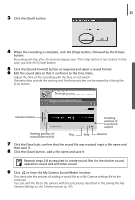
40 Merging Panoramic Images - PhotoStitch Merging Panoramic Images - PhotoStitch You can create a wide panoramic image by merging several images, such as those shot in the camera's Stitch Assist mode. Starting PhotoStitch 1 Click [View & Modify] in the ZoomBrowser EX's main window and click [Stitch Photos]. 2 Select a series of images in the Browser Area and click [Finish]. Follow the instructions to merge the images. 3 Merge the images following the instructions in the guidance panel at the top of the PhotoStitch window. • QuickTime 3.0 or a later version is required to save the merged image in the QuickTime VR format. (QuickTime is supplied on the Canon Digital Camera Solution Disk.) • Images shot in Stitch Assist mode with a wide converter, teleconverter or close-up lens cannot be merged accurately. Images Shot in Stitch Assist Mode It is easy to merge images shot with the camera's Stitch Assist mode since PhotoStitch automatically arranges them in the correct order and orientation. Camera Window Images shot in Stitch Assist mode display a mark like this.
-
 1
1 -
2
-
3
-
4
-
5
-
6
-
7
-
8
-
9
-
10
-
11
-
12
-
13
-
14
-
15
-
16
-
17
-
18
-
19
-
20
-
21
-
22
-
23
-
24
-
25
-
26
-
27
-
28
-
29
-
30
-
31
-
32
-
33
-
34
-
35
-
36
-
37
-
38
-
 39
39 -
 40
40 -
 41
41 -
 42
42 -
 43
43 -
 44
44 -
 45
45 -
 46
46 -
 47
47 -
 48
48 -
 49
49 -
50
-
51
-
52
-
53
-
54
-
55
-
56
-
57
-
58
-
59
-
60
-
61
-
62
-
63
-
64
-
65
-
66
-
67
-
68
-
69
-
70
-
71
-
72
-
73
-
74
-
75
-
76
-
77
-
78
-
79
-
80
-
81
-
82
-
83
-
84
-
85
-
86
-
87
-
88
-
89
-
90
-
91
-
92
-
93
-
94
-
95
-
96
-
97
-
98
-
99
-
100
-
101
-
102
-
103
-
104
-
105
-
106
 |
 |
