Canon PowerShot ELPH 110 HS User Guide - Page 27
Installing the Software and PDF Manuals - digital
 |
View all Canon PowerShot ELPH 110 HS manuals
Add to My Manuals
Save this manual to your list of manuals |
Page 27 highlights
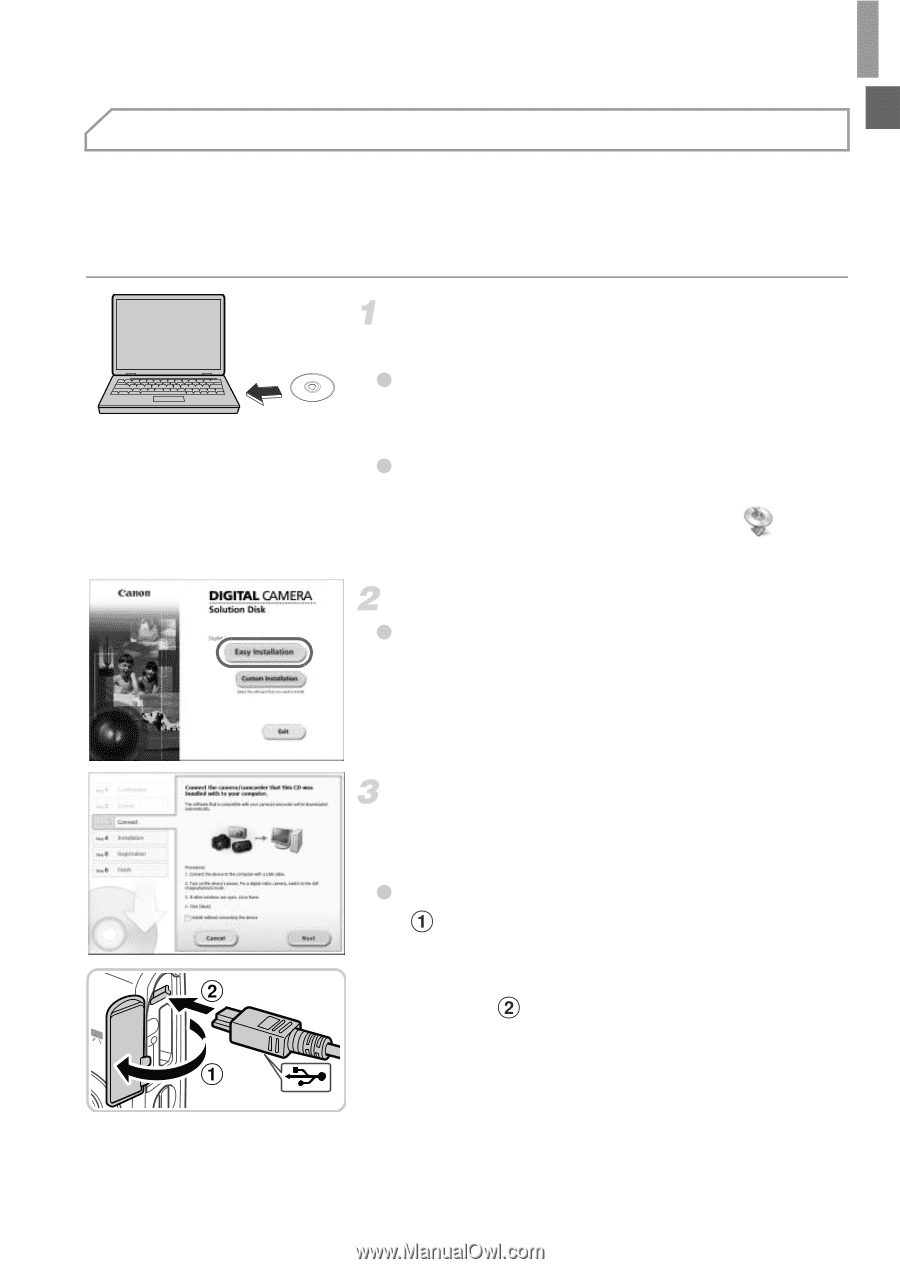
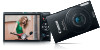
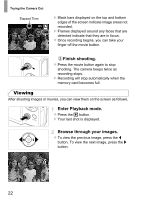
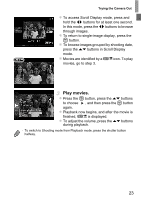
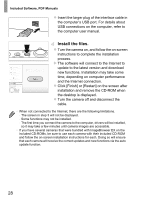
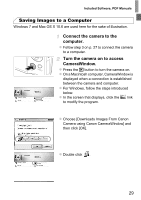
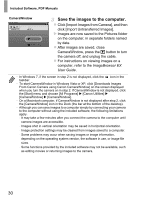
Included Software, PDF Manuals Installing the Software and PDF Manuals Windows 7 and Mac OS X 10.6 are used here for the sake of illustration. Using the software auto update function, you can update to the latest version and download new functions via the Internet (some software excluded), so be sure to install the software on a computer with an Internet connection. Insert the CD-ROM in the computer's CD-ROM drive. z Insert the included CD-ROM (DIGITAL CAMERA Solution Disk) (p. 2) in the computer's CD-ROM drive. z On a Macintosh computer, after inserting the disc, double-click the desktop disc icon to open it, and then double-click the icon displayed. Begin the installation. z Click [Easy Installation] and follow the on- screen instructions to complete the installation process. When a message is displayed prompting you to connect the camera, connect it to a computer. z With the camera turned off, open the cover ( ). With the smaller plug of the included interface cable (p. 2) in the orientation shown, insert the plug fully into the camera terminal ( ). 27
-
 1
1 -
2
-
3
-
4
-
5
-
6
-
7
-
8
-
9
-
10
-
11
-
12
-
13
-
14
-
15
-
16
-
17
-
18
-
19
-
20
-
21
-
 22
22 -
 23
23 -
 24
24 -
 25
25 -
 26
26 -
 27
27 -
 28
28 -
 29
29 -
 30
30 -
 31
31 -
 32
32 -
33
-
34
-
35
-
36
-
37
-
38
-
39
-
40
-
41
-
42
-
43
-
44
-
45
-
46
-
47
-
48
-
49
-
50
-
51
-
52
-
53
-
54
-
55
-
56
-
57
-
58
-
59
-
60
-
61
-
62
-
63
-
64
-
65
-
66
-
67
-
68
-
69
-
70
-
71
-
72
-
73
-
74
-
75
-
76
-
77
-
78
-
79
-
80
-
81
-
82
-
83
-
84
-
85
-
86
-
87
-
88
-
89
-
90
-
91
-
92
-
93
-
94
-
95
-
96
-
97
-
98
-
99
-
100
-
101
-
102
-
103
-
104
-
105
-
106
-
107
-
108
-
109
-
110
-
111
-
112
-
113
-
114
-
115
-
116
-
117
-
118
-
119
-
120
-
121
-
122
-
123
-
124
-
125
-
126
-
127
-
128
-
129
-
130
-
131
-
132
-
133
-
134
-
135
-
136
-
137
-
138
-
139
-
140
-
141
-
142
-
143
-
144
-
145
-
146
-
147
-
148
-
149
-
150
-
151
-
152
-
153
-
154
-
155
-
156
-
157
-
158
-
159
-
160
-
161
-
162
-
163
-
164
-
165
-
166
-
167
-
168
-
169
-
170
-
171
-
172
-
173
-
174
-
175
-
176
-
177
-
178
-
179
-
180
-
181
-
182
-
183
-
184
-
185
-
186
-
187
-
188
-
189
-
190
-
191
-
192
-
193
-
194
-
195
-
196
-
197
-
198
-
199
-
200
-
201
-
202
-
203
-
204
-
205
-
206
-
207
-
208
-
209
-
210
-
211
-
212
-
213
-
214
-
215
-
216
-
217
-
218
 |
 |