Canon PowerShot G5 User Guide - Page 100
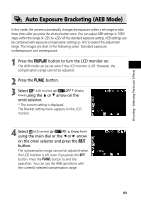
Expand or contract the range using the, main dial or the, arrow on the, omni selector., Press the,
 |
View all Canon PowerShot G5 manuals
Add to My Manuals
Save this manual to your list of manuals |
Page 100 highlights
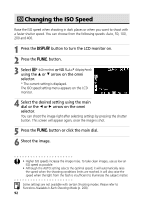
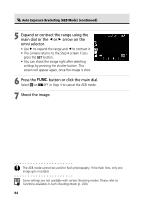
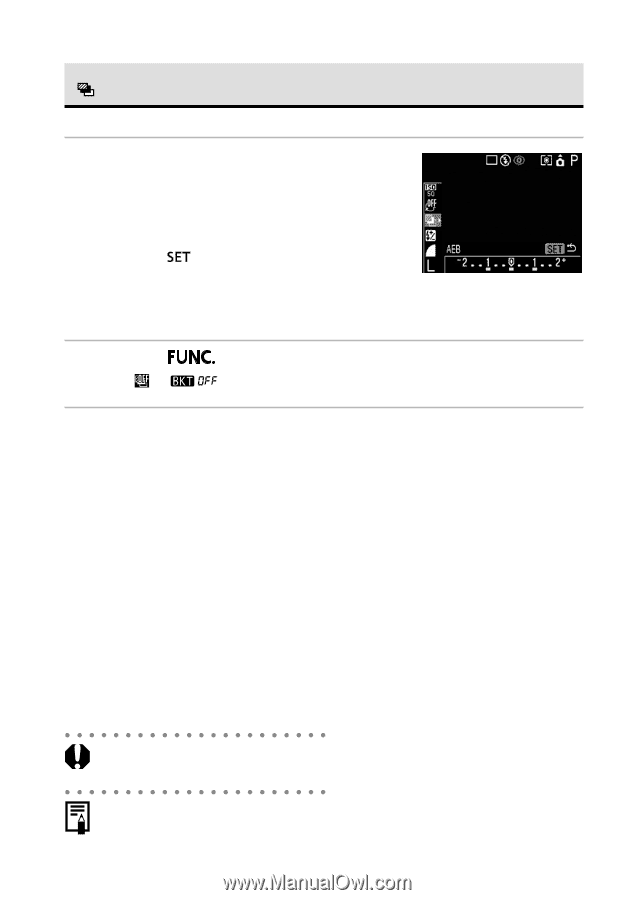
Auto Exposure Bracketing (AEB Mode) (continued) 5 Expand or contract the range using the main dial or the B or A arrow on the omni selector. • Use A to expand the range and B to contract it. • The camera returns to the Step 4 screen if you press the button. • You can shoot the image right after selecting settings by pressing the shutter button. This screen will appear again, once the image is shot. 6 Press the Select or button or click the main dial. in Step 4 to cancel the AEB mode. 7 Shoot the image. The AEB mode cannot be used for flash photography. If the flash fires, only one image gets recorded. Some settings are not available with certain Shooting modes. Please refer to Functions Available in Each Shooting Mode (p. 208). 94
-
 1
1 -
2
-
3
-
4
-
5
-
6
-
7
-
8
-
9
-
10
-
11
-
12
-
13
-
14
-
15
-
16
-
17
-
18
-
19
-
20
-
21
-
22
-
23
-
24
-
25
-
26
-
27
-
28
-
29
-
30
-
31
-
32
-
33
-
34
-
35
-
36
-
37
-
38
-
39
-
40
-
41
-
42
-
43
-
44
-
45
-
46
-
47
-
48
-
49
-
50
-
51
-
52
-
53
-
54
-
55
-
56
-
57
-
58
-
59
-
60
-
61
-
62
-
63
-
64
-
65
-
66
-
67
-
68
-
69
-
70
-
71
-
72
-
73
-
74
-
75
-
76
-
77
-
78
-
79
-
80
-
81
-
82
-
83
-
84
-
85
-
86
-
87
-
88
-
89
-
90
-
91
-
92
-
93
-
94
-
 95
95 -
 96
96 -
 97
97 -
 98
98 -
 99
99 -
 100
100 -
 101
101 -
 102
102 -
 103
103 -
 104
104 -
 105
105 -
106
-
107
-
108
-
109
-
110
-
111
-
112
-
113
-
114
-
115
-
116
-
117
-
118
-
119
-
120
-
121
-
122
-
123
-
124
-
125
-
126
-
127
-
128
-
129
-
130
-
131
-
132
-
133
-
134
-
135
-
136
-
137
-
138
-
139
-
140
-
141
-
142
-
143
-
144
-
145
-
146
-
147
-
148
-
149
-
150
-
151
-
152
-
153
-
154
-
155
-
156
-
157
-
158
-
159
-
160
-
161
-
162
-
163
-
164
-
165
-
166
-
167
-
168
-
169
-
170
-
171
-
172
-
173
-
174
-
175
-
176
-
177
-
178
-
179
-
180
-
181
-
182
-
183
-
184
-
185
-
186
-
187
-
188
-
189
-
190
-
191
-
192
-
193
-
194
-
195
-
196
-
197
-
198
-
199
-
200
-
201
-
202
-
203
-
204
-
205
-
206
-
207
-
208
-
209
-
210
-
211
-
212
-
213
-
214
 |
 |
94
The AEB mode cannot be used for flash photography. If the flash fires, only one
image gets recorded.
Some settings are not available with certain Shooting modes. Please refer to
Functions Available in Each Shooting Mode
(p. 208).
5
Expand or contract the range using the
main dial or the
B
or
A
arrow on the
omni selector.
• Use
A
to expand the range and
B
to contract it.
• The camera returns to the Step 4 screen if you
press the
button.
• You can shoot the image right after selecting
settings by pressing the shutter button. This
screen will appear again, once the image is shot.
6
Press the
button or click the main dial.
Select
or
in Step 4 to cancel the AEB mode.
7
Shoot the image.
Auto Exposure Bracketing (AEB Mode)
(continued)