Canon PowerShot SD450 ImageBrowser 5.5 Software User Guide - Page 9
Downloading Images to Your Computer 2/5
 |
View all Canon PowerShot SD450 manuals
Add to My Manuals
Save this manual to your list of manuals |
Page 9 highlights
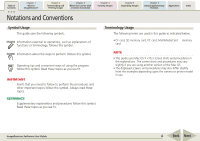
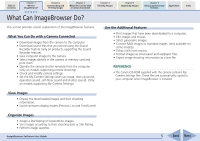
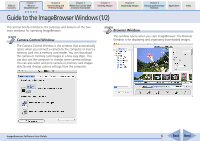
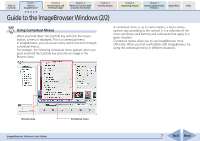
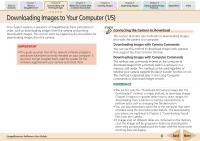
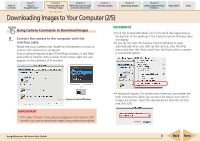
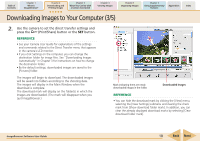
Table of Contents Chapter 1 What is ImageBrowser? Chapter 2 Downloading and Printing Images Chapter 3 What You Can Do with a Camera Connected Chapter 4 Viewing Images Chapter 5 Organizing Images Chapter 6 Using Supplementary Features Appendices Index Downloading Images to Your Computer (2/5) Using Camera Commands to Download Images 1. Connect the camera to the computer with the interface cable. Please see your Camera User Guide for information on how to connect the camera to a computer. If your camera features a (Print/Share) button, it will flash and a Direct Transfer menu similar to the lower right one will appear on the camera's LCD monitor. REFERENCE • Click the [CameraWindow] icon in the Dock (bar appearing at the bottom of the desktop) if the Camera Control Window does not display. • If you do not wish the Camera Control Window to open automatically when you start up the camera, click the [File] menu and clear the check mark from the [Start when a camera is connected] option. Camera Control Window IMPORTANT * If the Direct Transfer menu does not appear in the camera's LCD monitor, you cannot download images using camera procedures. ImageBrowser Software User Guide • A dialog will appear if a camera and a memory card reader are both connected to allow you to select the device from which images are shown. Select the desired device from the list box and click [OK]. 9 Back Next
-
 1
1 -
2
-
3
-
 4
4 -
 5
5 -
 6
6 -
 7
7 -
 8
8 -
 9
9 -
 10
10 -
 11
11 -
 12
12 -
 13
13 -
 14
14 -
15
-
16
-
17
-
18
-
19
-
20
-
21
-
22
-
23
-
24
-
25
-
26
-
27
-
28
-
29
-
30
-
31
-
32
-
33
-
34
-
35
-
36
-
37
-
38
-
39
-
40
-
41
-
42
-
43
-
44
-
45
-
46
-
47
-
48
-
49
-
50
-
51
-
52
-
53
-
54
-
55
-
56
-
57
-
58
-
59
-
60
-
61
-
62
-
63
-
64
-
65
-
66
-
67
-
68
-
69
-
70
-
71
-
72
-
73
-
74
-
75
-
76
-
77
-
78
-
79
-
80
-
81
-
82
-
83
-
84
-
85
-
86
-
87
-
88
-
89
-
90
-
91
-
92
-
93
-
94
-
95
-
96
-
97
-
98
-
99
-
100
-
101
-
102
-
103
-
104
-
105
-
106
-
107
-
108
-
109
-
110
-
111
-
112
-
113
-
114
-
115
-
116
-
117
-
118
-
119
-
120
-
121
-
122
-
123
-
124
-
125
-
126
-
127
-
128
-
129
-
130
-
131
-
132
 |
 |