Canon PowerShot SD750 ZoomBrowser EX 5.8 Software User Guide - Page 40
Setting the My Camera Settings 1/8
 |
View all Canon PowerShot SD750 manuals
Add to My Manuals
Save this manual to your list of manuals |
Page 40 highlights
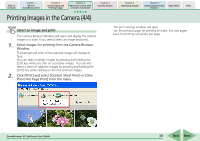
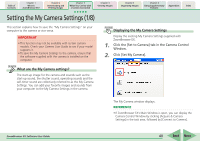
Table of Contents Chapter 1 What is ZoomBrowser EX? Chapter 2 Downloading and Printing Images Chapter 3 What You Can Do with a Camera Connected Chapter 4 Viewing Images Chapter 5 Organizing Images Chapter 6 Using Supplementary Features Appendices Index Setting the My Camera Settings (1/8) This section explains how to save the "My Camera Settings" on your computer to the camera or vice versa. IMPORTANT • This function may not be available with certain camera models. Check your Camera User Guide to see if your model supports it. • To save the My Camera Settings to the camera, ensure that the software supplied with the camera is installed on the computer. Displaying the My Camera Settings Display the existing My Camera Settings supplied with ZoomBrowser EX. 1. Click the [Set to Camera] tab in the Camera Control Window. 2. Click [Set My Camera]. What are the My Camera settings? The start-up image for the camera and sounds such as the start-up sound, the shutter sound, operating sounds and the self-timer sound are collectively referred to as the My Camera Settings. You can add your favorite images and sounds from your computer to the My Camera Settings in the camera. The My Camera window displays. REFERENCE • If ZoomBrowser EX's Main Window is open, you can display the Camera Control Window by clicking [Acquire & Camera Settings] in the task area, followed by [Connect to Camera]. ZoomBrowser EX Software User Guide 40 Back Next
-
 1
1 -
2
-
3
-
4
-
5
-
6
-
7
-
8
-
9
-
10
-
11
-
12
-
13
-
14
-
15
-
16
-
17
-
18
-
19
-
20
-
21
-
22
-
23
-
24
-
25
-
26
-
27
-
28
-
29
-
30
-
31
-
32
-
33
-
34
-
 35
35 -
 36
36 -
 37
37 -
 38
38 -
 39
39 -
 40
40 -
 41
41 -
 42
42 -
 43
43 -
 44
44 -
 45
45 -
46
-
47
-
48
-
49
-
50
-
51
-
52
-
53
-
54
-
55
-
56
-
57
-
58
-
59
-
60
-
61
-
62
-
63
-
64
-
65
-
66
-
67
-
68
-
69
-
70
-
71
-
72
-
73
-
74
-
75
-
76
-
77
-
78
-
79
-
80
-
81
-
82
-
83
-
84
-
85
-
86
-
87
-
88
-
89
-
90
-
91
-
92
-
93
-
94
-
95
-
96
-
97
-
98
-
99
-
100
-
101
-
102
-
103
-
104
-
105
-
106
-
107
-
108
-
109
-
110
-
111
-
112
-
113
-
114
-
115
-
116
-
117
-
118
-
119
-
120
-
121
-
122
-
123
-
124
-
125
-
126
-
127
-
128
-
129
-
130
-
131
-
132
-
133
-
134
-
135
-
136
-
137
-
138
-
139
-
140
-
141
-
142
-
143
-
144
-
145
-
146
-
147
-
148
-
149
-
150
-
151
-
152
-
153
-
154
-
155
 |
 |
