Canon REALiS LCOS WUX6010 MULTIMEDIA PROJECTOR WUX6010 Users Manual - Page 3

Table of Contents, Basic Guide, Advanced Guide, Other Information

Page 3 highlights

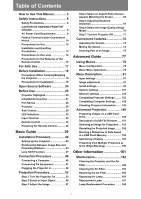
Table of Contents How to Use This Manual 2 Safety Instructions 5 Safety Precautions 6 CAUTION ON HANGING FROM THE CEILING 6 AC Power Cord Requirement 9 Federal Communication Commission Notice 10 Precautions for Use 12 Installation and Handling Precautions 13 Precautions on the Lamp 14 Precautions for the Batteries of the Remote Control 15 For Safe Use 17 Before Installation 19 Precautions When Carrying/Shipping the Projector 19 Precautions for Installation 19 Open Source Software 24 Before Use 25 Projector Highlights 25 Included Accessories 27 Part Names 28 Projector 28 Side Control 29 LED Indicators 30 Input Terminal 32 Remote Control 34 Preparing the Remote Control 36 Basic Guide 39 Installation Procedure 40 Setting Up the Projector 40 Relationship Between Image Size and Projecting Distance 43 Lens Shift Function 47 Connection Procedure 49 Connecting a Computer 49 Connecting AV Equipment 51 Plugging the Projector In 52 Projection Procedure 53 Step 1 Turn the Projector On 53 Step 2 Select an Input Signal 56 Step 3 Adjust the Image 57 Step 4 Select an Aspect Ratio (Screen Aspect) Matching the Screen 63 Step 5 Adjusting Keystone Distortion 67 Step 6 Select the Image Quality (Image Mode 70 Step 7 Turn the Projector Off 71 Convenient Features 72 Adjusting the Volume 74 Muting the Sound 74 Zooming Part of an Image 75 Advanced Guide 77 Using Menus 78 Menu Configuration 78 Basic Menu Operations 79 Menu Description 81 Input settings 81 Image adjustment 87 Install settings 95 System settings 107 Network settings 120 Completing Projector Settings ......... 122 Completing Computer Settings ........ 129 Checking Projector Information ....... 148 Advanced Projection 149 Projecting Images on a USB Flash Drive 149 Description of USB File Browser...... 151 Selecting an Image for Projection .... 152 Operating the Projected Image ......... 152 Running a Slideshow of Data Saved in a USB Flash Memory 153 Split-Screen Display 153 Projecting from Multiple Projectors at Once (Edge Blending 154 Other Information 161 Maintenance 162 Cleaning the Projector and the Air Filter 162 Cleaning the Air Filter 163 Replacing the Air Filter 164 Replacing the Lamp 165 Replacement Lamp 167 Lamp Replacement Procedure ......... 168 3

  • 1
  • 2
  • 3
  • 4
  • 5
  • 6
  • 7
  • 8
  • 9
  • 10
  • 11
  • 12
  • 13
  • 14
  • 15
  • 16
  • 17
  • 18
  • 19
  • 20
  • 21
  • 22
  • 23
  • 24
  • 25
  • 26
  • 27
  • 28
  • 29
  • 30
  • 31
  • 32
  • 33
  • 34
  • 35
  • 36
  • 37
  • 38
  • 39
  • 40
  • 41
  • 42
  • 43
  • 44
  • 45
  • 46
  • 47
  • 48
  • 49
  • 50
  • 51
  • 52
  • 53
  • 54
  • 55
  • 56
  • 57
  • 58
  • 59
  • 60
  • 61
  • 62
  • 63
  • 64
  • 65
  • 66
  • 67
  • 68
  • 69
  • 70
  • 71
  • 72
  • 73
  • 74
  • 75
  • 76
  • 77
  • 78
  • 79
  • 80
  • 81
  • 82
  • 83
  • 84
  • 85
  • 86
  • 87
  • 88
  • 89
  • 90
  • 91
  • 92
  • 93
  • 94
  • 95
  • 96
  • 97
  • 98
  • 99
  • 100
  • 101
  • 102
  • 103
  • 104
  • 105
  • 106
  • 107
  • 108
  • 109
  • 110
  • 111
  • 112
  • 113
  • 114
  • 115
  • 116
  • 117
  • 118
  • 119
  • 120
  • 121
  • 122
  • 123
  • 124
  • 125
  • 126
  • 127
  • 128
  • 129
  • 130
  • 131
  • 132
  • 133
  • 134
  • 135
  • 136
  • 137
  • 138
  • 139
  • 140
  • 141
  • 142
  • 143
  • 144
  • 145
  • 146
  • 147
  • 148
  • 149
  • 150
  • 151
  • 152
  • 153
  • 154
  • 155
  • 156
  • 157
  • 158
  • 159
  • 160
  • 161
  • 162
  • 163
  • 164
  • 165
  • 166
  • 167
  • 168
  • 169
  • 170
  • 171
  • 172
  • 173
  • 174
  • 175
  • 176
  • 177
  • 178
  • 179
  • 180
  • 181
  • 182
  • 183
  • 184
  • 185
  • 186
  • 187
  • 188
  • 189
  • 190
  • 191
  • 192
  • 193
  • 194
  • 195
  • 196
  • 197
  • 198
  • 199
  • 200
  • 201
  • 202

3
Table of Contents
How to Use This Manual
...............
2
Safety Instructions
........................
5
Safety Precautions
.................................
6
CAUTION ON HANGING FROM THE
CEILING
..................................................
6
AC Power Cord Requirement
................
9
Federal Communication Commission
Notice
....................................................
10
Precautions for Use
.............................
12
Installation and Handling
Precautions
..........................................
13
Precautions on the Lamp
....................
14
Precautions for the Batteries of the
Remote Control
....................................
15
For Safe Use
................................
17
Before Installation
.......................
19
Precautions When Carrying/Shipping
the Projector
.........................................
19
Precautions for Installation
.................
19
Open Source Software
...............
24
Before Use
...................................
25
Projector Highlights
.............................
25
Included Accessories
..........................
27
Part Names
...........................................
28
Projector
...............................................
28
Side Control
..........................................
29
LED Indicators
......................................
30
Input Terminal
......................................
32
Remote Control
....................................
34
Preparing the Remote Control
............
36
Basic Guide
............................
39
Installation Procedure
................
40
Setting Up the Projector
......................
40
Relationship Between Image Size and
Projecting Distance
.............................
43
Lens Shift Function
.............................
47
Connection Procedure
...............
49
Connecting a Computer
......................
49
Connecting AV Equipment
..................
51
Plugging the Projector In
....................
52
Projection Procedure
..................
53
Step 1 Turn the Projector On
..............
53
Step 2 Select an Input Signal
..............
56
Step 3 Adjust the Image
......................
57
Step 4 Select an Aspect Ratio (Screen
Aspect) Matching the Screen
..............
63
Step 5 Adjusting Keystone
Distortion
..............................................
67
Step 6 Select the Image Quality (Image
Mode)
....................................................
70
Step 7 Turn the Projector Off
..............
71
Convenient Features
...................
72
Adjusting the Volume
..........................
74
Muting the Sound
.................................
74
Zooming Part of an Image
...................
75
Advanced Guide
....................
77
Using Menus
................................
78
Menu Configuration
.............................
78
Basic Menu Operations
.......................
79
Menu Description
........................
81
Input settings
.......................................
81
Image adjustment
................................
87
Install settings
......................................
95
System settings
.................................
107
Network settings
................................
120
Completing Projector Settings
.........
122
Completing Computer Settings
........
129
Checking Projector Information
.......
148
Advanced Projection
.................
149
Projecting Images on a USB Flash
Drive
....................................................
149
Description of USB File Browser
......
151
Selecting an Image for Projection
....
152
Operating the Projected Image
.........
152
Running a Slideshow of Data Saved
in a USB Flash Memory
.....................
153
Split-Screen Display
..........................
153
Projecting from Multiple Projectors at
Once (Edge Blending)
.......................
154
Other Information
................
161
Maintenance
...............................
162
Cleaning the Projector and the Air
Filter
....................................................
162
Cleaning the Air Filter
........................
163
Replacing the Air Filter
......................
164
Replacing the Lamp
...........................
165
Replacement Lamp
............................
167
Lamp Replacement Procedure
.........
168