Canon SELPHY CP800 SELPHY CP800 Printer User Guide - Page 20
Arranging Images of Different Sizes Shuffle, Printing With or Without a Border Borders - black
 |
View all Canon SELPHY CP800 manuals
Add to My Manuals
Save this manual to your list of manuals |
Page 20 highlights
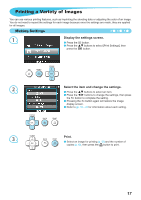
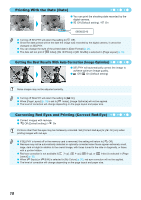
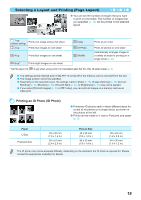
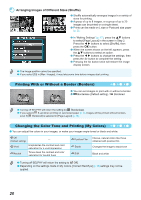
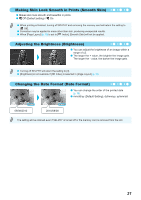
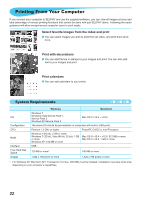
Arranging Images of Different Sizes (Shuffle) Shuffle automatically arranges images in a variety of sizes for printing. A group of up to 8 images, or a group of up to 20 images can be printed on a single sheet. Prints can be made on L size or Postcard size paper (p. 2). In "Making Settings" (p. 17), press the ud buttons to select [Page Layout] in the screen in Step 2. Press the l r buttons to select [Shuffle], then press the o button. When the screen shown on the left appears, press the ud buttons to select an option. Press the l r buttons to change the settings, then press the v button to complete the setting. Pressing the v button twice will restore the image display screen. The image position cannot be specified. If you select [20] in [Max. Images], it may take some time before images start printing. Printing With or Without a Border (Borders) You can set images to print with or without a border. Borderless (Default setting) / Bordered Turning off SELPHY will return the setting to [ Borderless]. If you select [ 8-up] when printing on card sized paper (p. 2), images will be printed without borders, even if [ Bordered] is selected in [Page Layout] (p. 19). Changing the Color Tone and Printing (My Colors) You can adjust the colors in your images, or make your images sepia-toned or black and white. Off - (Default setting) Vivid Emphasizes the contrast and color saturation for a vivid impression Neutral Tones down the contrast and color saturation for neutral hues Positive Film Sepia Intense, natural colors like those obtained with positive film Changes the image to sepia tone B/W Black and white Turning off SELPHY will return the setting to [ Off]. Depending on the settings made in My Colors, [Correct Red-Eye] (p. 18) settings may not be applied. 20
-
 1
1 -
2
-
3
-
4
-
5
-
6
-
7
-
8
-
9
-
10
-
11
-
12
-
13
-
14
-
 15
15 -
 16
16 -
 17
17 -
 18
18 -
 19
19 -
 20
20 -
 21
21 -
 22
22 -
 23
23 -
 24
24 -
 25
25 -
26
-
27
-
28
-
29
-
30
-
31
-
32
-
33
-
34
-
35
-
36
 |
 |
