Canon Ultura Ultura Instruction Manual - Page 72
DV terminal/connections - dv cable
 |
UPC - 013803605884
View all Canon Ultura manuals
Add to My Manuals
Save this manual to your list of manuals |
Page 72 highlights
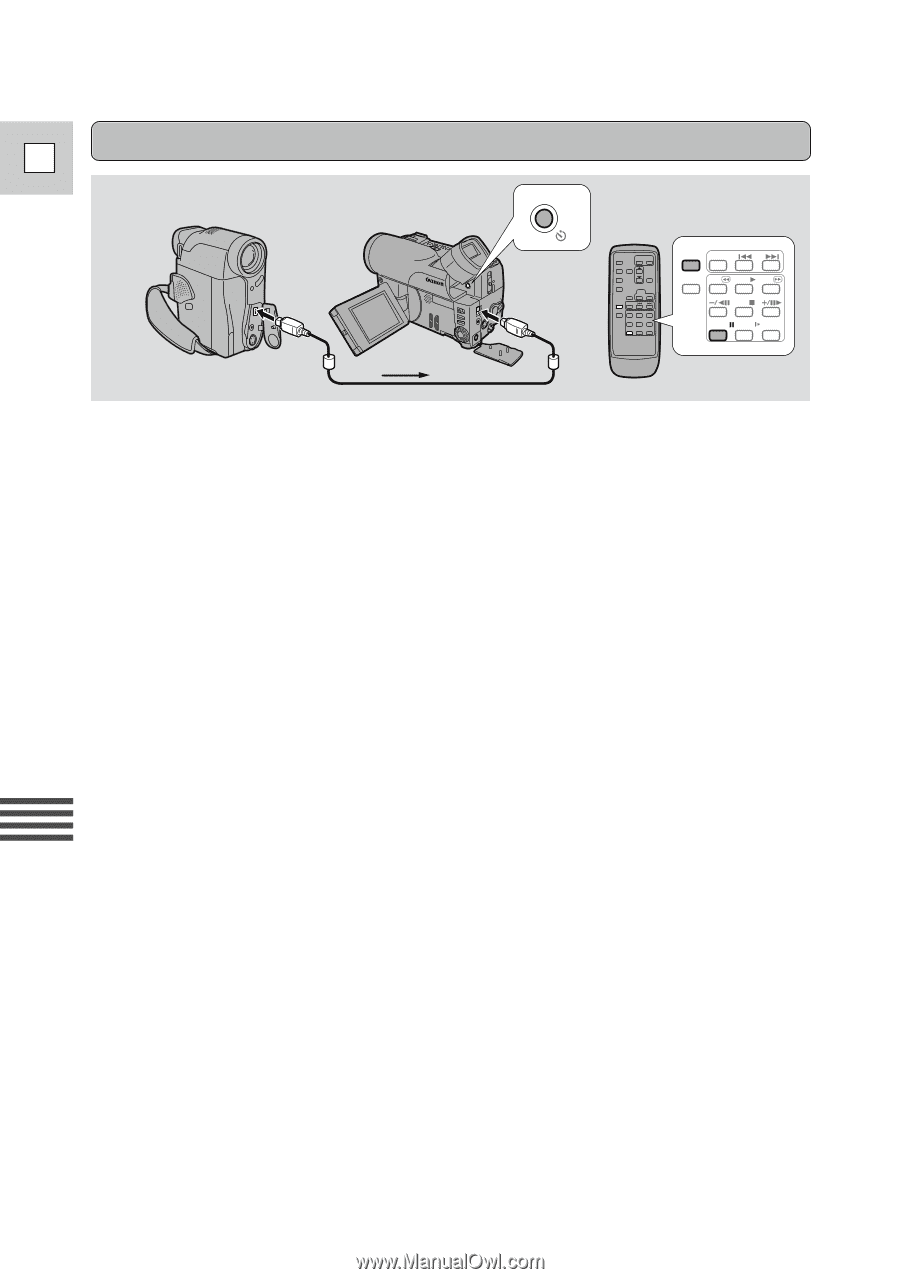
DV terminal/connections E DV REC REC PAUSE SEARCH SELECT ZERO SET MEMORY REW PLAY FF STOP PAUSE SLOW 2 Digital video equipment fitted with this terminal lets you edit, copy and transfer data digitally, with virtually no generation loss in image and sound quality. The DV terminal is for both line-in and line-out, since a single DV cable can handle data in both directions. • If another Canon digital video camcorder is connected, the Auto Editing Function can be used for digital-to-digital editing (i.e. with virtually no generation loss in image quality). Use a Canon CV-150F DV cable (optional) to connect two digital devices together. When you are recording, make sure you connect the cable to the ULTURA before connecting the other end of the cable to the recording device. When you are recording to the ULTURA, slide the POWER switch to VCR and press the DV REC button on the ULTURA or the wireless controller's REC PAUSE button ("DV IN" appears in the display when you press "play" on the playback device). Then press its pause button to start/pause recording. If the cables are not connected properly, the camera displays the caution "CHECK THE DV INPUT". • The image displayed by the camcorder that is being recorded to (for example on its LCD screen, an attached TV, or in its viewfinder) may become distorted during digital dubbing. The actual recording on the tape, however, is not affected. • If you press the DV REC button with the DV cable unconnected, the camera displays the caution "CHECK THE DV INPUT". An anomalous image may also flash onto the screen. • Blanks between recordings on the playback tape are recorded as anomalous images on the tape that is being recorded to. • Do not turn the power off when operating either camcorder with the DV cable connected. Editing 72
-
 1
1 -
2
-
3
-
4
-
5
-
6
-
7
-
8
-
9
-
10
-
11
-
12
-
13
-
14
-
15
-
16
-
17
-
18
-
19
-
20
-
21
-
22
-
23
-
24
-
25
-
26
-
27
-
28
-
29
-
30
-
31
-
32
-
33
-
34
-
35
-
36
-
37
-
38
-
39
-
40
-
41
-
42
-
43
-
44
-
45
-
46
-
47
-
48
-
49
-
50
-
51
-
52
-
53
-
54
-
55
-
56
-
57
-
58
-
59
-
60
-
61
-
62
-
63
-
64
-
65
-
66
-
 67
67 -
 68
68 -
 69
69 -
 70
70 -
 71
71 -
 72
72 -
 73
73 -
 74
74 -
 75
75 -
 76
76 -
 77
77 -
78
-
79
-
80
-
81
-
82
-
83
-
84
-
85
-
86
-
87
-
88
-
89
-
90
-
91
-
92
-
93
-
94
-
95
-
96
-
97
-
98
-
99
-
100
-
101
-
102
-
103
 |
 |