Canon VB-M620VE Network Camera VB-H43/VB-H630VE/VB-H630D/VB-H730F/VB-M42/VB-M6 - Page 166
Troubleshooting, For details on troubleshooting for Camera Management Tool
 |
View all Canon VB-M620VE manuals
Add to My Manuals
Save this manual to your list of manuals |
Page 166 highlights
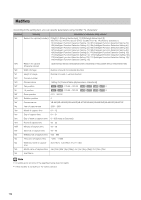
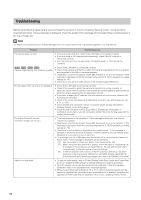
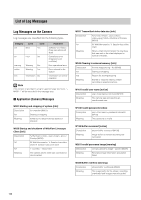
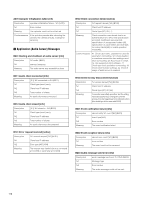
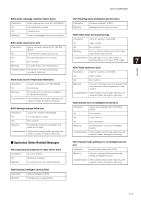
Troubleshooting Before contacting the dealer where you purchased the product or Canon's Customer Service Center, check the items specified as follows. If a log message is displayed, check the details of the message and corresponding countermeasure in the log message list. Note For details on troubleshooting for Camera Management Tool, please refer to the "Camera Management Tool User Manual". Problem Countermeasures The camera does not start. • If you are using a PoE hub, check if the LAN cable is connected correctly. • If you are using an AC adapter (sold separately), check if the AC adapter is connected correctly. • Turn the camera off and on again (see "Installation Guide" > "Connecting the Camera"). Camera Angle Setting Tool does not operate. • Check if the LAN cable is connected correctly. • Check if the camera and the PC in which the Camera Angle Setting Tool is operating are connected to the LAN in the same segment. • "Application could not be started. Install .NET Framework x.x (x is the version)." If this message is displayed, install the corresponding version of .NET Framework or enable settings (p. 18). • Check if you are using an older version of the Camera Angle Setting Tool. The top page of the camera is not displayed. • Check if the LAN cable is connected correctly. • Check if the network to which the camera is connected is set up correctly. In particular, check if the IP address, subnet mask and default gateway address are set within the ranges supported by the applicable network. • If you have changed the IP address, the new address will not become effective until the camera is rebooted. • Check if the correct URI (camera IP address) is entered in your web browser (p. 28, p. 31, p. 138). • Check whether the connection is from a computer whose access is blocked in [Access Control] on the Setting page. • Check the authentication method, [User Name], [Password], combination of certificates, and network rules for connection in [802.1X] on the Setting page with the system administrator. The Admin Tools will not start. The Admin Viewer will not start. • "Your web browser is not supported." If this message is displayed, use Internet Explorer 8 or greater. • "Application could not be started. Install .NET Framework x.x (x is the version)." If this message is displayed, install the corresponding version of .NET Framework or enable settings (p. 18). • "JavaScript is not available or disabled on your web browser." If this message is displayed, set [Active Script] to [Enable] in Internet Explorer's security settings. (See (3) below for instructions on how to set this.) • "The settings from (1) to (3) below must be carried out to use the Admin Viewer and Admin Tools." If this message is displayed, set the following. (1) Use the installer to install your Admin Tools Certificate (p. 26). (2) When using Internet Explorer 9 or greater, follow the steps in "Registering the IP address of the Camera as a Trusted Site" (p. 19) and add this web site to [Trusted sites] in Internet Explorer's security settings. (3) In Internet Explorer click [Tools] > [Internet Options] > [Security] > [Custom level] and under the Security Settings list, set [XAML browser applications], [File download] and [Launching programs and files in an IFRAME] to [Enable]. Video is not displayed. • To improve video quality, refer to "[Video] Setting Video Size, Quality and Frame Rate" (p. 61) in "Chapter 4 Setting Page" to change settings and make adjustments. • Up to 30 viewers can access the camera at the same time. If this limit has been exceeded, video is not displayed and a message appears. • When you are using Internet Explorer 10 or 11 in a 64-bit operating system and the camera is registered as a trusted site and protected mode is enabled, reception and playback of H.264 video may be disabled. If this occurs, disable protected mode. 166
-
 1
1 -
2
-
3
-
4
-
5
-
6
-
7
-
8
-
9
-
10
-
11
-
12
-
13
-
14
-
15
-
16
-
17
-
18
-
19
-
20
-
21
-
22
-
23
-
24
-
25
-
26
-
27
-
28
-
29
-
30
-
31
-
32
-
33
-
34
-
35
-
36
-
37
-
38
-
39
-
40
-
41
-
42
-
43
-
44
-
45
-
46
-
47
-
48
-
49
-
50
-
51
-
52
-
53
-
54
-
55
-
56
-
57
-
58
-
59
-
60
-
61
-
62
-
63
-
64
-
65
-
66
-
67
-
68
-
69
-
70
-
71
-
72
-
73
-
74
-
75
-
76
-
77
-
78
-
79
-
80
-
81
-
82
-
83
-
84
-
85
-
86
-
87
-
88
-
89
-
90
-
91
-
92
-
93
-
94
-
95
-
96
-
97
-
98
-
99
-
100
-
101
-
102
-
103
-
104
-
105
-
106
-
107
-
108
-
109
-
110
-
111
-
112
-
113
-
114
-
115
-
116
-
117
-
118
-
119
-
120
-
121
-
122
-
123
-
124
-
125
-
126
-
127
-
128
-
129
-
130
-
131
-
132
-
133
-
134
-
135
-
136
-
137
-
138
-
139
-
140
-
141
-
142
-
143
-
144
-
145
-
146
-
147
-
148
-
149
-
150
-
151
-
152
-
153
-
154
-
155
-
156
-
157
-
158
-
159
-
160
-
 161
161 -
 162
162 -
 163
163 -
 164
164 -
 165
165 -
 166
166 -
 167
167 -
 168
168 -
 169
169 -
 170
170 -
 171
171 -
172
-
173
-
174
-
175
-
176
-
177
-
178
-
179
-
180
-
181
-
182
-
183
-
184
-
185
-
186
-
187
-
188
-
189
-
190
-
191
-
192
-
193
-
194
-
195
 |
 |
