Canon VB-M620VE Network Camera VB-H43/VB-H630VE/VB-H630D/VB-H730F/VB-M42/VB-M6 - Page 36
Setting the Camera Angle, Launching the Camera Angle Setting Tool, Connecting to the Camera
 |
View all Canon VB-M620VE manuals
Add to My Manuals
Save this manual to your list of manuals |
Page 36 highlights
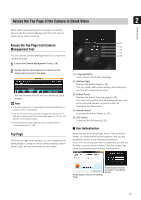
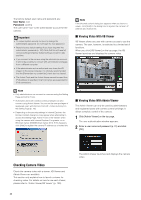
Setting the Camera Angle Use the Camera Angle Setting Tool to adjust the camera angle when installing the camera or to change the capture orientation according to the situation. The following gives an overview of the settings that can be made with the Camera Angle Setting Tool. Pan, Tilt, Rotation, Zoom, Image Flip, Focus Zoom, Image Flip, Focus Important • The Camera Angle Setting Tool is included for angle adjustment during camera installation only and is not intended for daily use. Overuse may cause the camera to malfunction. • After changing settings in the Camera Angle Setting Tool, check the settings in the Setting page and Admin Tools operate as intended. • The Camera Angle Setting Tool cannot be used via a proxy server. • Upload functions cannot be used while the Camera Angle Setting Tool is connected. Launching the Camera Angle Setting Tool 1 Double-click the Camera Angle Setting Tool icon on the desktop to launch the Camera Angle Setting Tool. 2 Enter each item for the camera to connect to and click [OK]. Note You can also launch the Camera Angle Setting Tool from the Camera Management Tool. For details, please refer to the Camera Management Tool user manual. Connecting to the Camera 1 Click [Connect] from the [File] menu. The [Connection settings] dialog box will appear. [Host Name] Enter the host name or IP address of the camera (p. 28). [Administrator User Name] Enter the administrator user name for the camera (p. 28). [Administrator Password] Enter the administrator password for the camera (p. 28). [Enable SSL Communications] checkbox Select this checkbox to connect to the camera using SSL communications. Normally SSL communications are not used (factory default setting) (p. 81). [Port] Set the HTTP port number to 80, 443 or in the range of 1024 to 65535. Normally [80] (factory default setting) is used (p. 70). 36
-
 1
1 -
2
-
3
-
4
-
5
-
6
-
7
-
8
-
9
-
10
-
11
-
12
-
13
-
14
-
15
-
16
-
17
-
18
-
19
-
20
-
21
-
22
-
23
-
24
-
25
-
26
-
27
-
28
-
29
-
30
-
 31
31 -
 32
32 -
 33
33 -
 34
34 -
 35
35 -
 36
36 -
 37
37 -
 38
38 -
 39
39 -
 40
40 -
 41
41 -
42
-
43
-
44
-
45
-
46
-
47
-
48
-
49
-
50
-
51
-
52
-
53
-
54
-
55
-
56
-
57
-
58
-
59
-
60
-
61
-
62
-
63
-
64
-
65
-
66
-
67
-
68
-
69
-
70
-
71
-
72
-
73
-
74
-
75
-
76
-
77
-
78
-
79
-
80
-
81
-
82
-
83
-
84
-
85
-
86
-
87
-
88
-
89
-
90
-
91
-
92
-
93
-
94
-
95
-
96
-
97
-
98
-
99
-
100
-
101
-
102
-
103
-
104
-
105
-
106
-
107
-
108
-
109
-
110
-
111
-
112
-
113
-
114
-
115
-
116
-
117
-
118
-
119
-
120
-
121
-
122
-
123
-
124
-
125
-
126
-
127
-
128
-
129
-
130
-
131
-
132
-
133
-
134
-
135
-
136
-
137
-
138
-
139
-
140
-
141
-
142
-
143
-
144
-
145
-
146
-
147
-
148
-
149
-
150
-
151
-
152
-
153
-
154
-
155
-
156
-
157
-
158
-
159
-
160
-
161
-
162
-
163
-
164
-
165
-
166
-
167
-
168
-
169
-
170
-
171
-
172
-
173
-
174
-
175
-
176
-
177
-
178
-
179
-
180
-
181
-
182
-
183
-
184
-
185
-
186
-
187
-
188
-
189
-
190
-
191
-
192
-
193
-
194
-
195
 |
 |
