Canon VIXIA HG21 Digital Video Software (Windows) Ver.31 Instruction Manual - Page 20
Installing the Digital Video Software - cables
 |
View all Canon VIXIA HG21 manuals
Add to My Manuals
Save this manual to your list of manuals |
Page 20 highlights
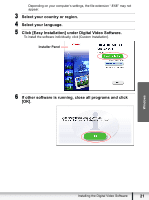
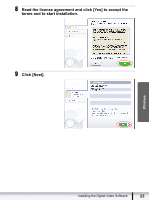
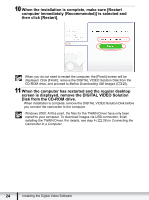
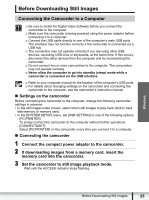
Installing the Digital Video Software Be sure to install the Digital Video Software before connecting the camcorder to the computer. You must have authorization as a Computer System Administrator to install programs. Windows Vista/Windows XP Users: Your digital video camcorder is equipped with the standard Picture Transfer Protocol (PTP). This protocol enables you to download still images by simply connecting the camcorder to a computer with the USB cable (applications such as the [Scanner and Camera Wizard] start automatically). However, note that there are several limitations to downloading still images with this method. To avoid these, install ZoomBrowser EX to download still images. It may take a few minutes, after connecting the camcorder, until you can download still images. Still images protected on the camcorder may lose this setting once they are downloaded to the computer. 1 Check that the camcorder is not connected to the computer. While a camcorder is connected to the computer, the software cannot be installed normally. If a camcorder is connected, detach the USB cable from the computer. 2 Set the DIGITAL VIDEO Solution Disk in the computer's CDROM drive. • Windows Vista: When the [AutoPlay] window appears, click [Run SETUP.EXE]. Follow the instructions in the [User Account Control] window that appears after a brief period. • Windows XP/Windows 2000: The installer panel appears automatically. • If the installer panel does not open automatically, use the following procedures to display it. - Windows Vista: 1) Select [Computer] from the Start menu. 2) Right-click the CD-ROM icon and select [Open] from the displayed menu. 3) Double-click the [setup.exe] icon. 4) Follow the instructions in the [User Account Control] window that appears. - Windows XP: 1) Select [My Computer] from the [start] menu. 2) Right-click the CD-ROM icon and select [Open] from the displayed menu. 3) Double-click the [SETUP.EXE] icon. - Windows 2000: 1) Double-click the [My Computer] icon. 2) Right-click the CD-ROM icon and select [Open] from the displayed menu. 3) Double-click the [SETUP.EXE] icon. 20 Installing the Digital Video Software
-
 1
1 -
2
-
3
-
4
-
5
-
6
-
7
-
8
-
9
-
10
-
11
-
12
-
13
-
14
-
 15
15 -
 16
16 -
 17
17 -
 18
18 -
 19
19 -
 20
20 -
 21
21 -
 22
22 -
 23
23 -
 24
24 -
 25
25 -
26
-
27
-
28
-
29
-
30
-
31
-
32
-
33
-
34
-
35
-
36
-
37
-
38
-
39
-
40
-
41
-
42
-
43
-
44
-
45
-
46
-
47
-
48
-
49
-
50
-
51
-
52
-
53
-
54
-
55
-
56
-
57
-
58
-
59
-
60
-
61
-
62
-
63
-
64
-
65
-
66
-
67
-
68
-
69
-
70
-
71
-
72
-
73
-
74
-
75
-
76
-
77
-
78
-
79
 |
 |