Canon ZR60 ZR70 ZR65 Instruction Manual - Page 90
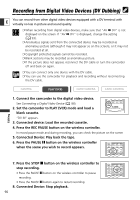
Recording from Digital Video Devices DV Dubbing
 |
UPC - 490561400607
View all Canon ZR60 manuals
Add to My Manuals
Save this manual to your list of manuals |
Page 90 highlights
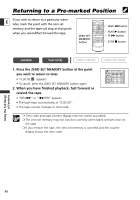
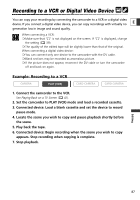
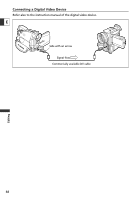
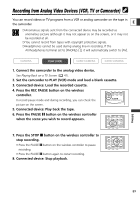
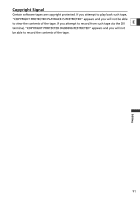
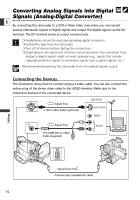
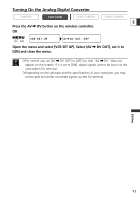
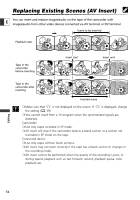
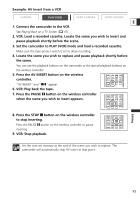
Recording from Digital Video Devices (DV Dubbing) You can record from other digital video devices equipped with a DV terminal with E virtually no loss in picture and sound quality. ❍ When recording from digital video devices, make sure that "AV \ DV" is not displayed on the screen. If "AV \ DV" is displayed, change the setting ( 93). ❍ Anomalous signals sent from the connected device may be recorded as anomalous picture (although it may not appear so on the screen), or it may not be recorded at all. ❍ Copyright protected signals cannot be recorded. ❍ Blank sections may be recorded as anomalous picture. ❍ If the picture does not appear, reconnect the DV cable or turn the camcorder off and back on again. ❍ You can connect only one device with the DV cable. ❍ You can use the camcorder for playback and recording without reconnecting the DV cable. CAMERA PLAY (VCR) CARD CAMERA CARD CAMERA Editing 1. Connect the camcorder to the digital video device. See Connecting a Digital Video Device ( 88). 2. Set the camcorder to PLAY (VCR) mode and load a blank cassette. AV INSERT AV DV REMOTESET REC PAUSE WIRELESS CONTROLLER WL-D79 "DV IN" appears. 3. Connected device: Load the recorded cassette. 4. Press the REC PAUSE button on the wireless controller. In record pause mode and during recording, you can check the picture on the screen 5. Connected Device: Play back the tape. 6. Press the PAUSE a button on the wireless controller when the scene you wish to record appears. ZERO SET MEMORY REW PLAY FF 12bit AUDIO OUT STOP AUDIO DUB. PAUSE SLOW 2 AV INSERT AV DV REMOTESET 7. Press the STOP 3 button on the wireless controller to stop recording. • Press the PAUSE a button on the wireless controller to pause recording. • Press the PAUSE a button again to restart recording. 8. Connected Device: Stop playback. 90 ZERO SET MEMORY REW PLAY FF 12bit AUDIO OUT STOP AUDIO DUB. PAUSE SLOW 2 AV INSERT AV DV REMOTESET
-
 1
1 -
2
-
3
-
4
-
5
-
6
-
7
-
8
-
9
-
10
-
11
-
12
-
13
-
14
-
15
-
16
-
17
-
18
-
19
-
20
-
21
-
22
-
23
-
24
-
25
-
26
-
27
-
28
-
29
-
30
-
31
-
32
-
33
-
34
-
35
-
36
-
37
-
38
-
39
-
40
-
41
-
42
-
43
-
44
-
45
-
46
-
47
-
48
-
49
-
50
-
51
-
52
-
53
-
54
-
55
-
56
-
57
-
58
-
59
-
60
-
61
-
62
-
63
-
64
-
65
-
66
-
67
-
68
-
69
-
70
-
71
-
72
-
73
-
74
-
75
-
76
-
77
-
78
-
79
-
80
-
81
-
82
-
83
-
84
-
 85
85 -
 86
86 -
 87
87 -
 88
88 -
 89
89 -
 90
90 -
 91
91 -
 92
92 -
 93
93 -
 94
94 -
 95
95 -
96
-
97
-
98
-
99
-
100
-
101
-
102
-
103
-
104
-
105
-
106
-
107
-
108
-
109
-
110
-
111
-
112
-
113
-
114
-
115
-
116
-
117
-
118
-
119
-
120
-
121
-
122
-
123
-
124
-
125
-
126
-
127
-
128
-
129
-
130
-
131
-
132
-
133
-
134
-
135
-
136
-
137
-
138
-
139
-
140
-
141
-
142
-
143
-
144
-
145
-
146
-
147
-
148
-
149
-
150
-
151
-
152
-
153
-
154
-
155
-
156
-
157
-
158
 |
 |